Blueprints for campaign prioritization
Overview
Blueprints are a method of creating dynamic Audiences. A collection of records are sent through a series of conditions and decisions to identify more specific segments of records. Campaigns are able to target the segments identified within the Blueprint.
This article describes the process of using Blueprints for Campaign Prioritization and defines the process of Campaign Prioritization.
The example built in this article describes the process of creating a Blueprint to separate records for multiple Campaign contacts. Records will be processed through the Blueprint conditions and contacted through the appropriate Campaign.
Audiences and Blueprints must be activated in order to use Blueprints for Campaign Prioritization.
Campaign Prioritization and Campaign Segmentation
There are two similar concepts that combine Campaigns and Blueprints for more advanced functionality.
Campaign Prioritization uses Blueprints to divide an Audience into specific segments. Different Campaigns are used to target individual segments.
Campaign Segmentation uses Blueprints to divide Audiences into specific segments. The Blueprint is used to identify Personalization content within the same Campaign. Each Segment enabled the appropriate content to render in the Campaign contact.
For more information on Campaign Segmentation, read this article.
Building a Blueprint
Creating a New Blueprint
To create a new Blueprint, navigate to People > Blueprints. Select Create Blueprint in the top right.
Three options are available:
- Choose an Audience: Select from a list of pre-configured audiences.
- Continue with a Blueprint: Select from a list of pre-configured blueprints to chain from, creating a linked parent-child relationship. Your new blueprint is the child.
- Query your data warehouse: Use the SQL editor create a new query against your customer warehouse, or copy a query from an existing audience.
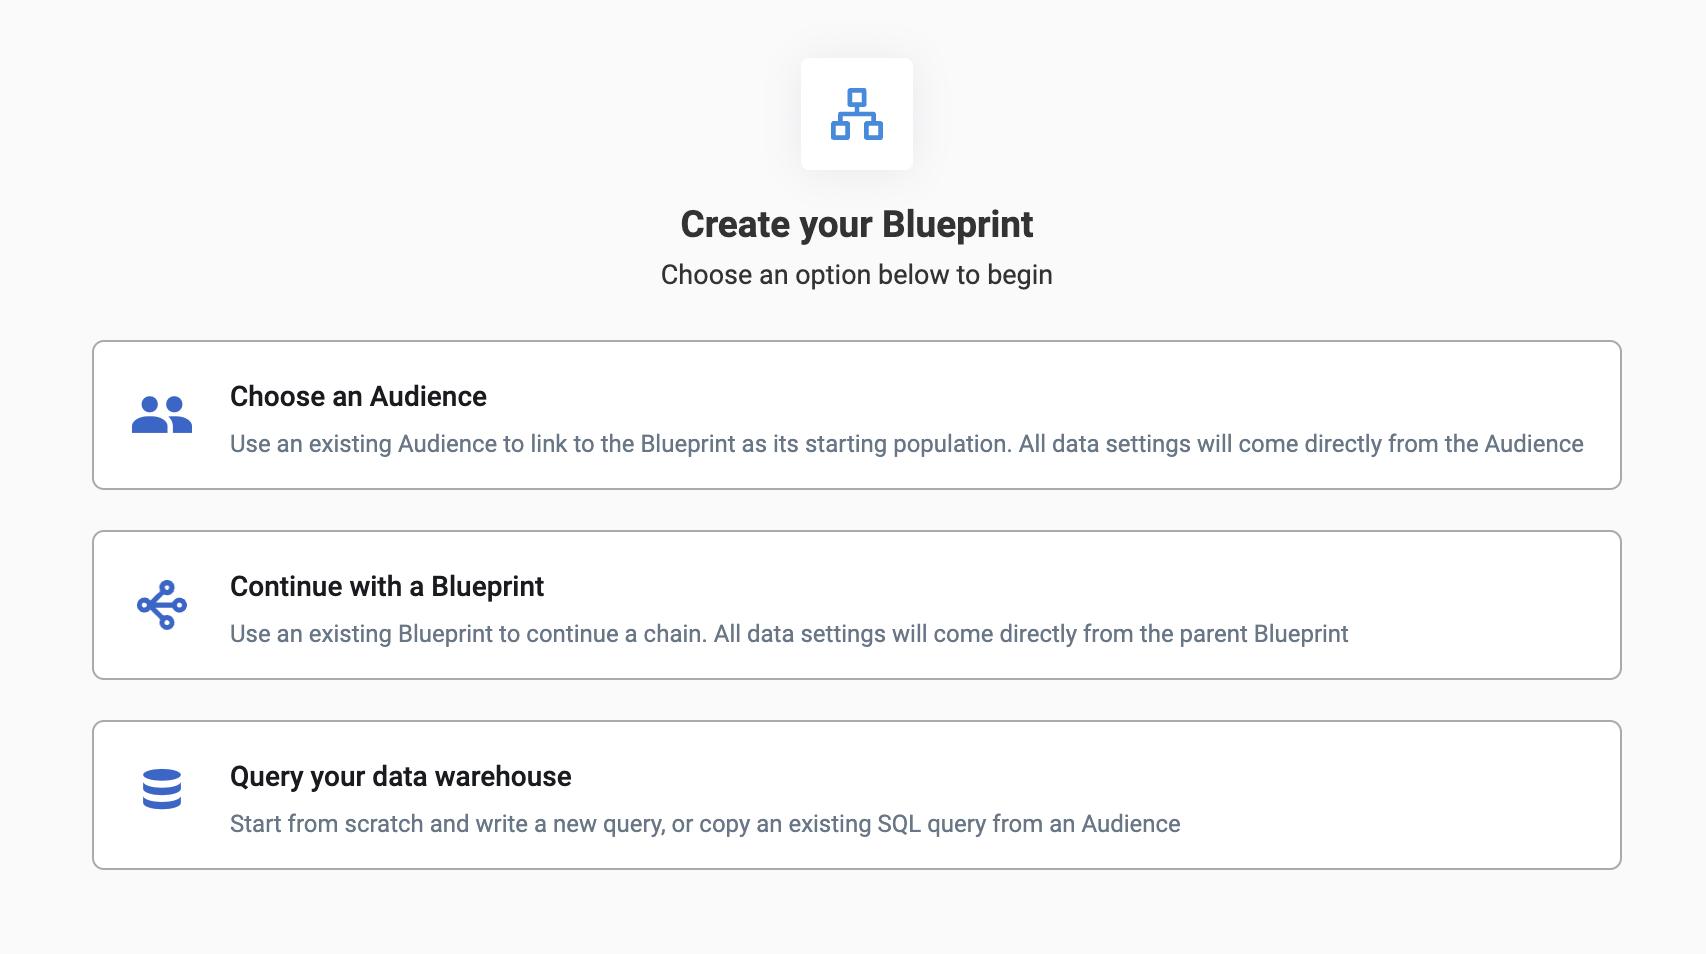
If a new audience source is needed and may be reused for multiple blueprints, it's best practice to create a new audience in People > Audiences, then use Choose an Audience instead when creating your blueprint to select the audience source.
For more information on creating Audiences with the Drag-and-Drop Builder, follow the first section of the End-to-End Newsletter Creation article.
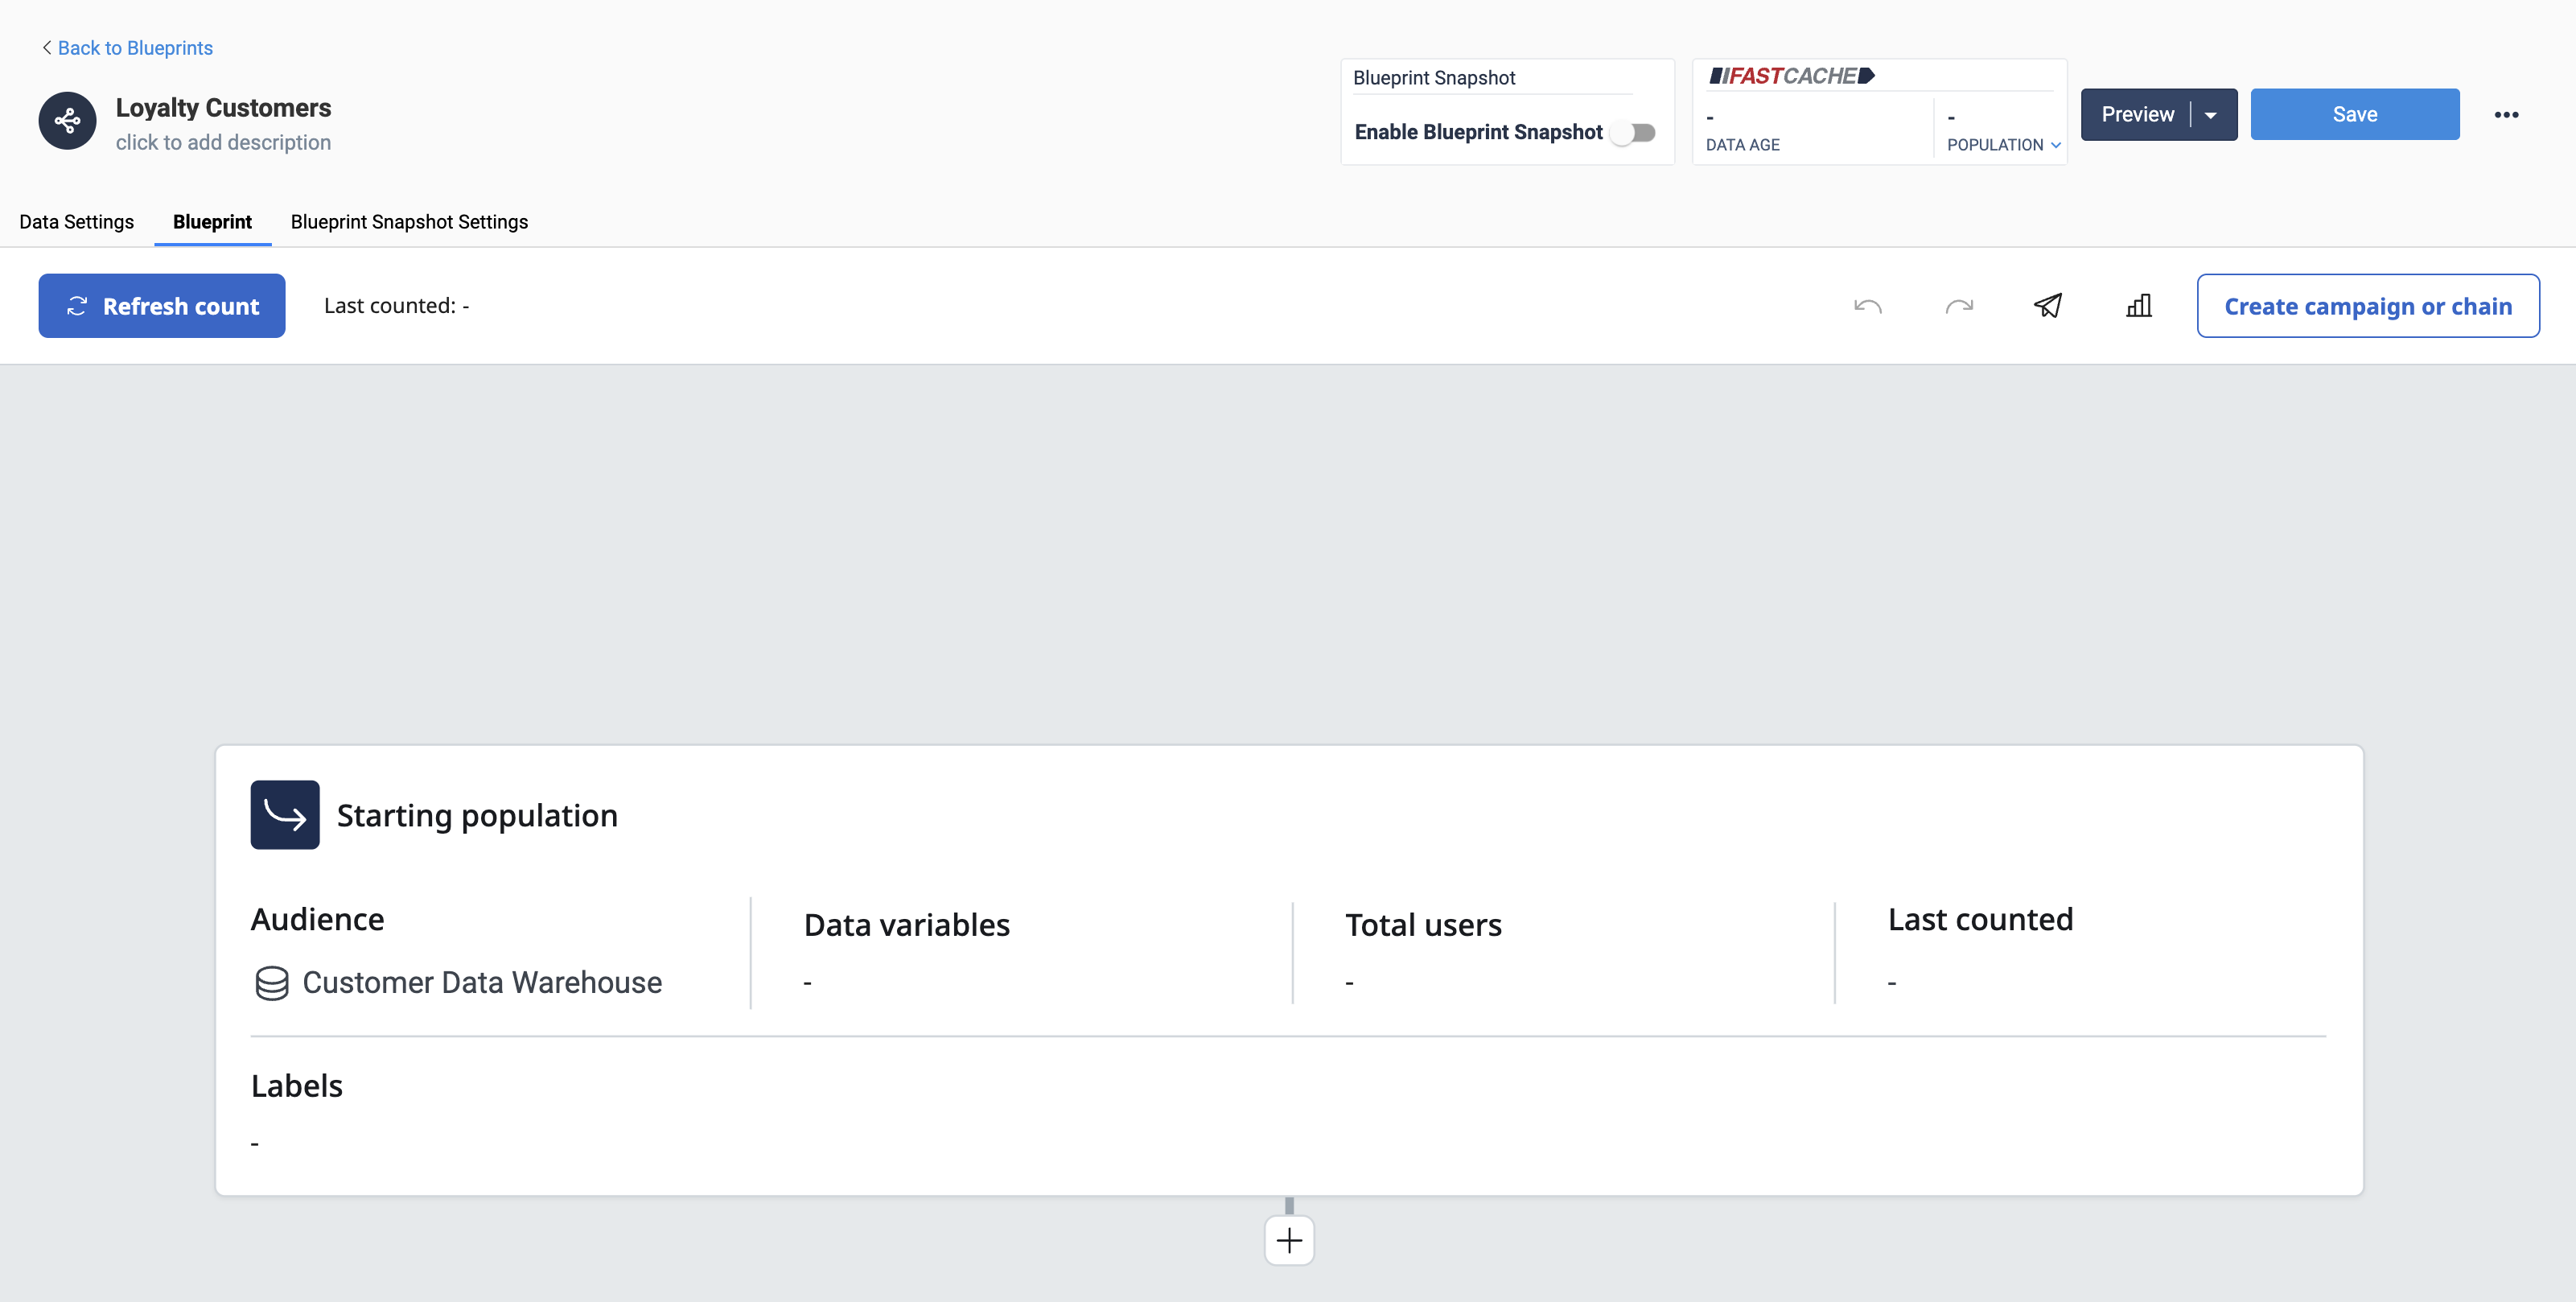
After audience source selection, the Blueprint flowchart interface opens. This interface is used to create decisions on how data is targeted. The interface works as a flowchart.
Starting population
The starting population shows details of the population of customers for the Blueprint, whether that be an andience or chained parent blueprint. This includes information about:
- Audience of Blueprint source name
- available Data Variables from the source
- total user count of the population
- available Labels created for the Blueprint
- available mapped Predictive Model columns
If the Starting Population does not show the number of total users, the Refresh count button must be clicked. This returns a count of records accessible by the source audience or blueprint.
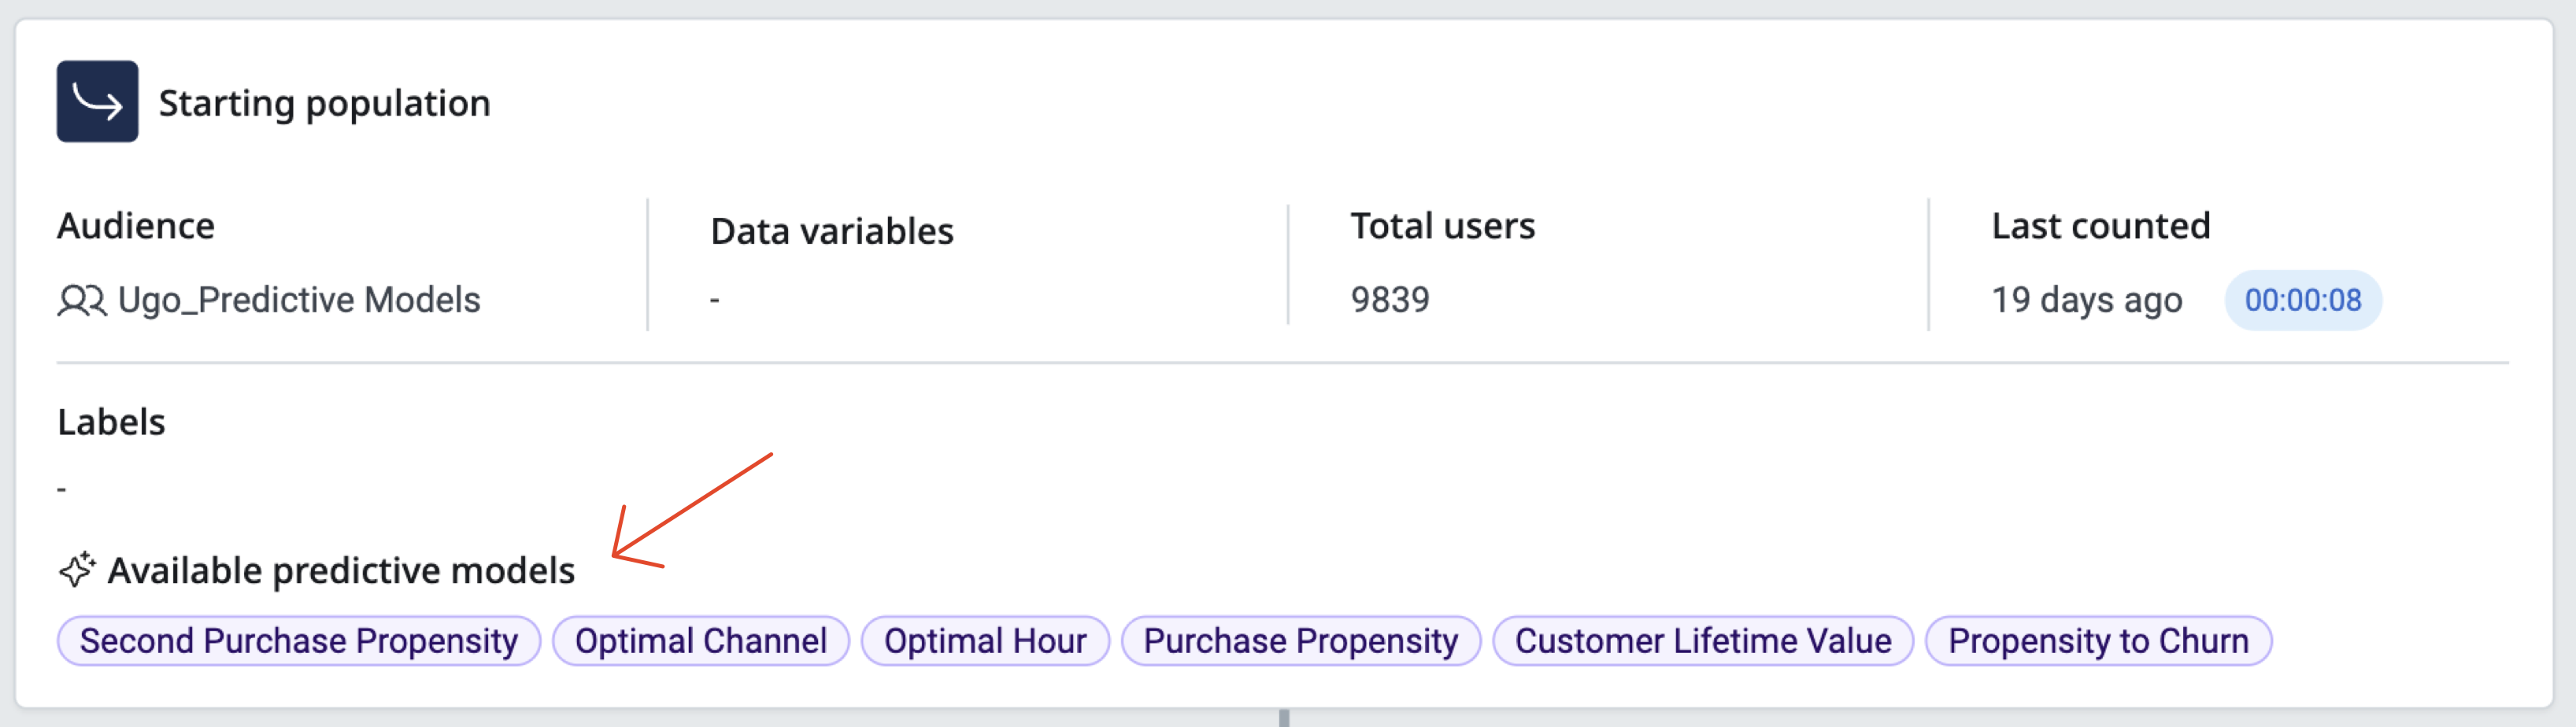
Available Predictive Models
If the audience query references any predictive model columns, an Available Predictive Models callout on the Starting Population lists every model referenced in the query, so you can see at a glance which models are already wired up for this Blueprint.
Adding a Node
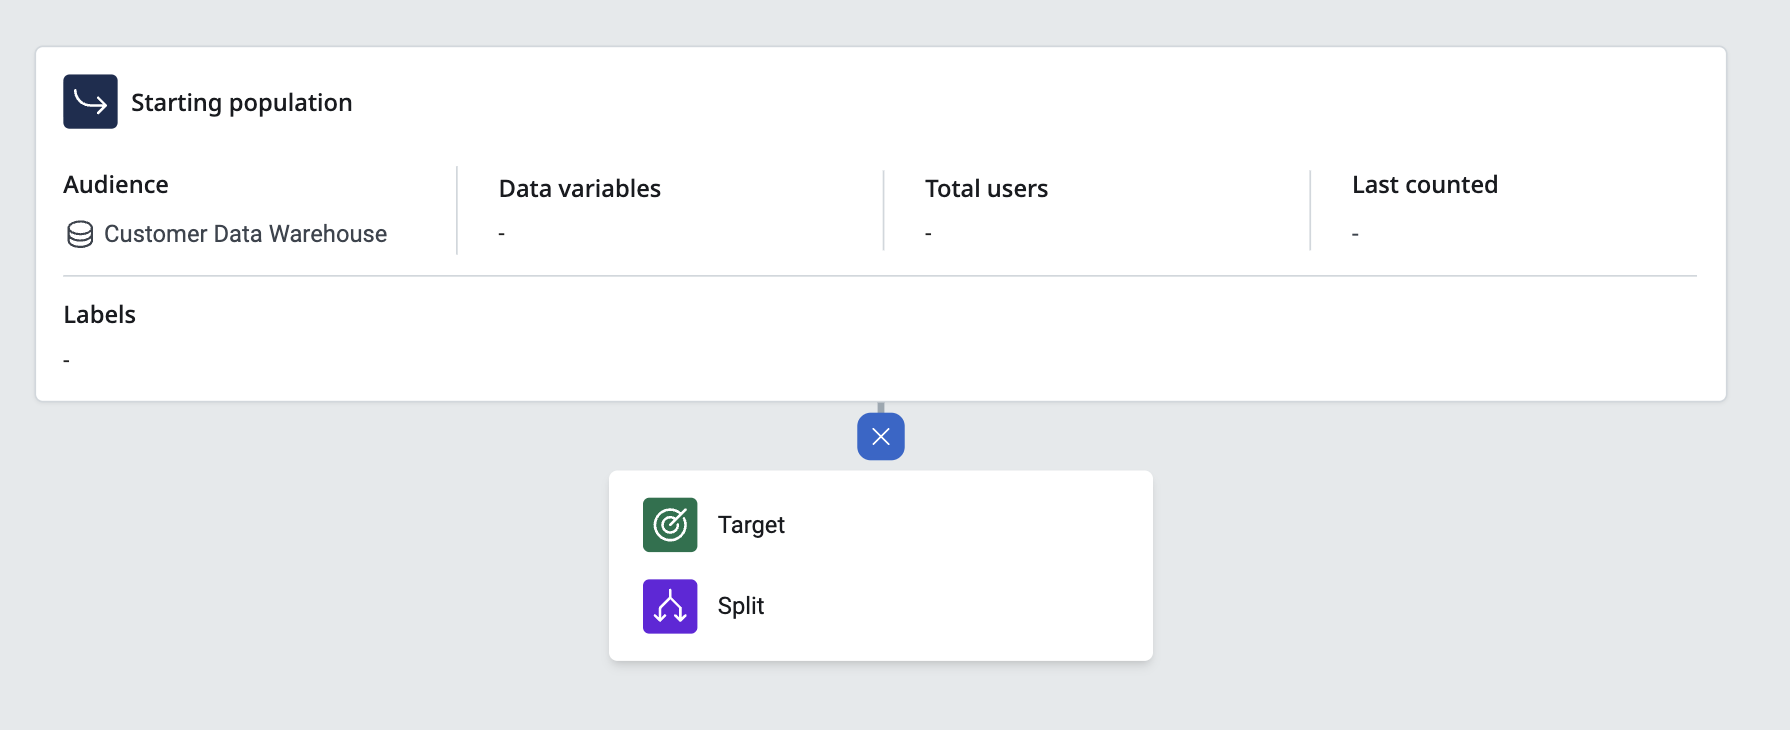
To add a new Node in the Blueprint, click the + sign beneath the Starting Population. Nodes are each item added to a Blueprint flowchart. There are two kinds of starting Nodes: Target and Split.
Target
The circular logo is a Target Node. A Target Node is a method of creating an IF/ELSE statement. A Target Node creates one conditioned Node and one non-conditioned Node.
Clicking the Target Node button creates two more items on the screen. Configure the options for the Target Node.
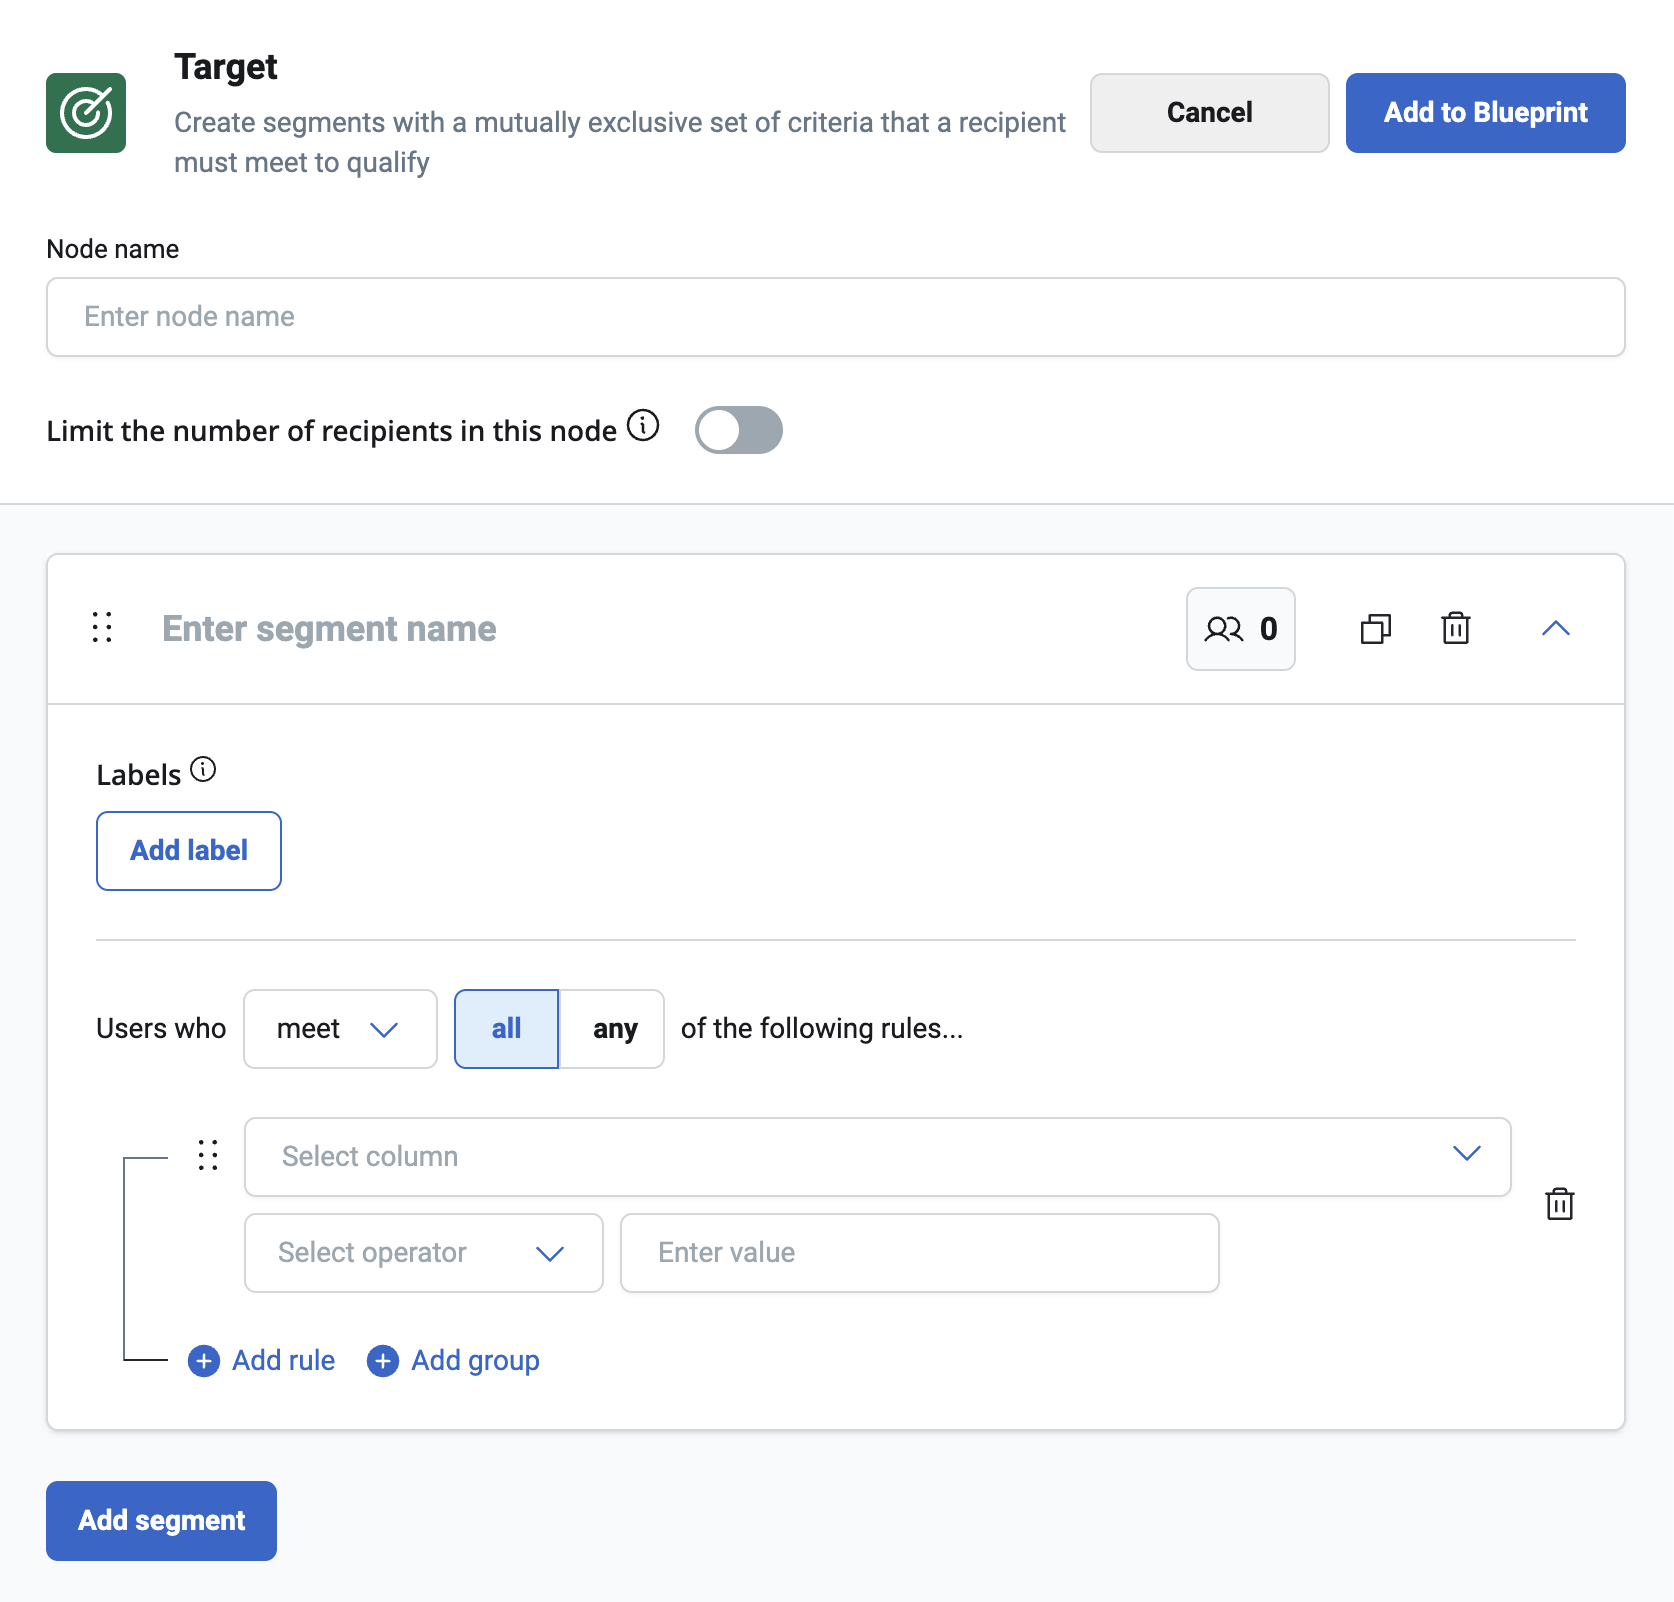
The Target Name is a descriptive name of the Node. It is a best practice to name the Node with a title that describes all the conditions within the Node. This way, when all Nodes are built, a user does not have to open each individual Node to understand the functionality.
Under the Segments section, configure the conditions to select customers. The dropdown selector is populated with customer attributes from the source audience or blueprint. Columns that are mapped to Data Variables will also have selectable dropdown of pre-configured (or dynamically populated) values to chose from.
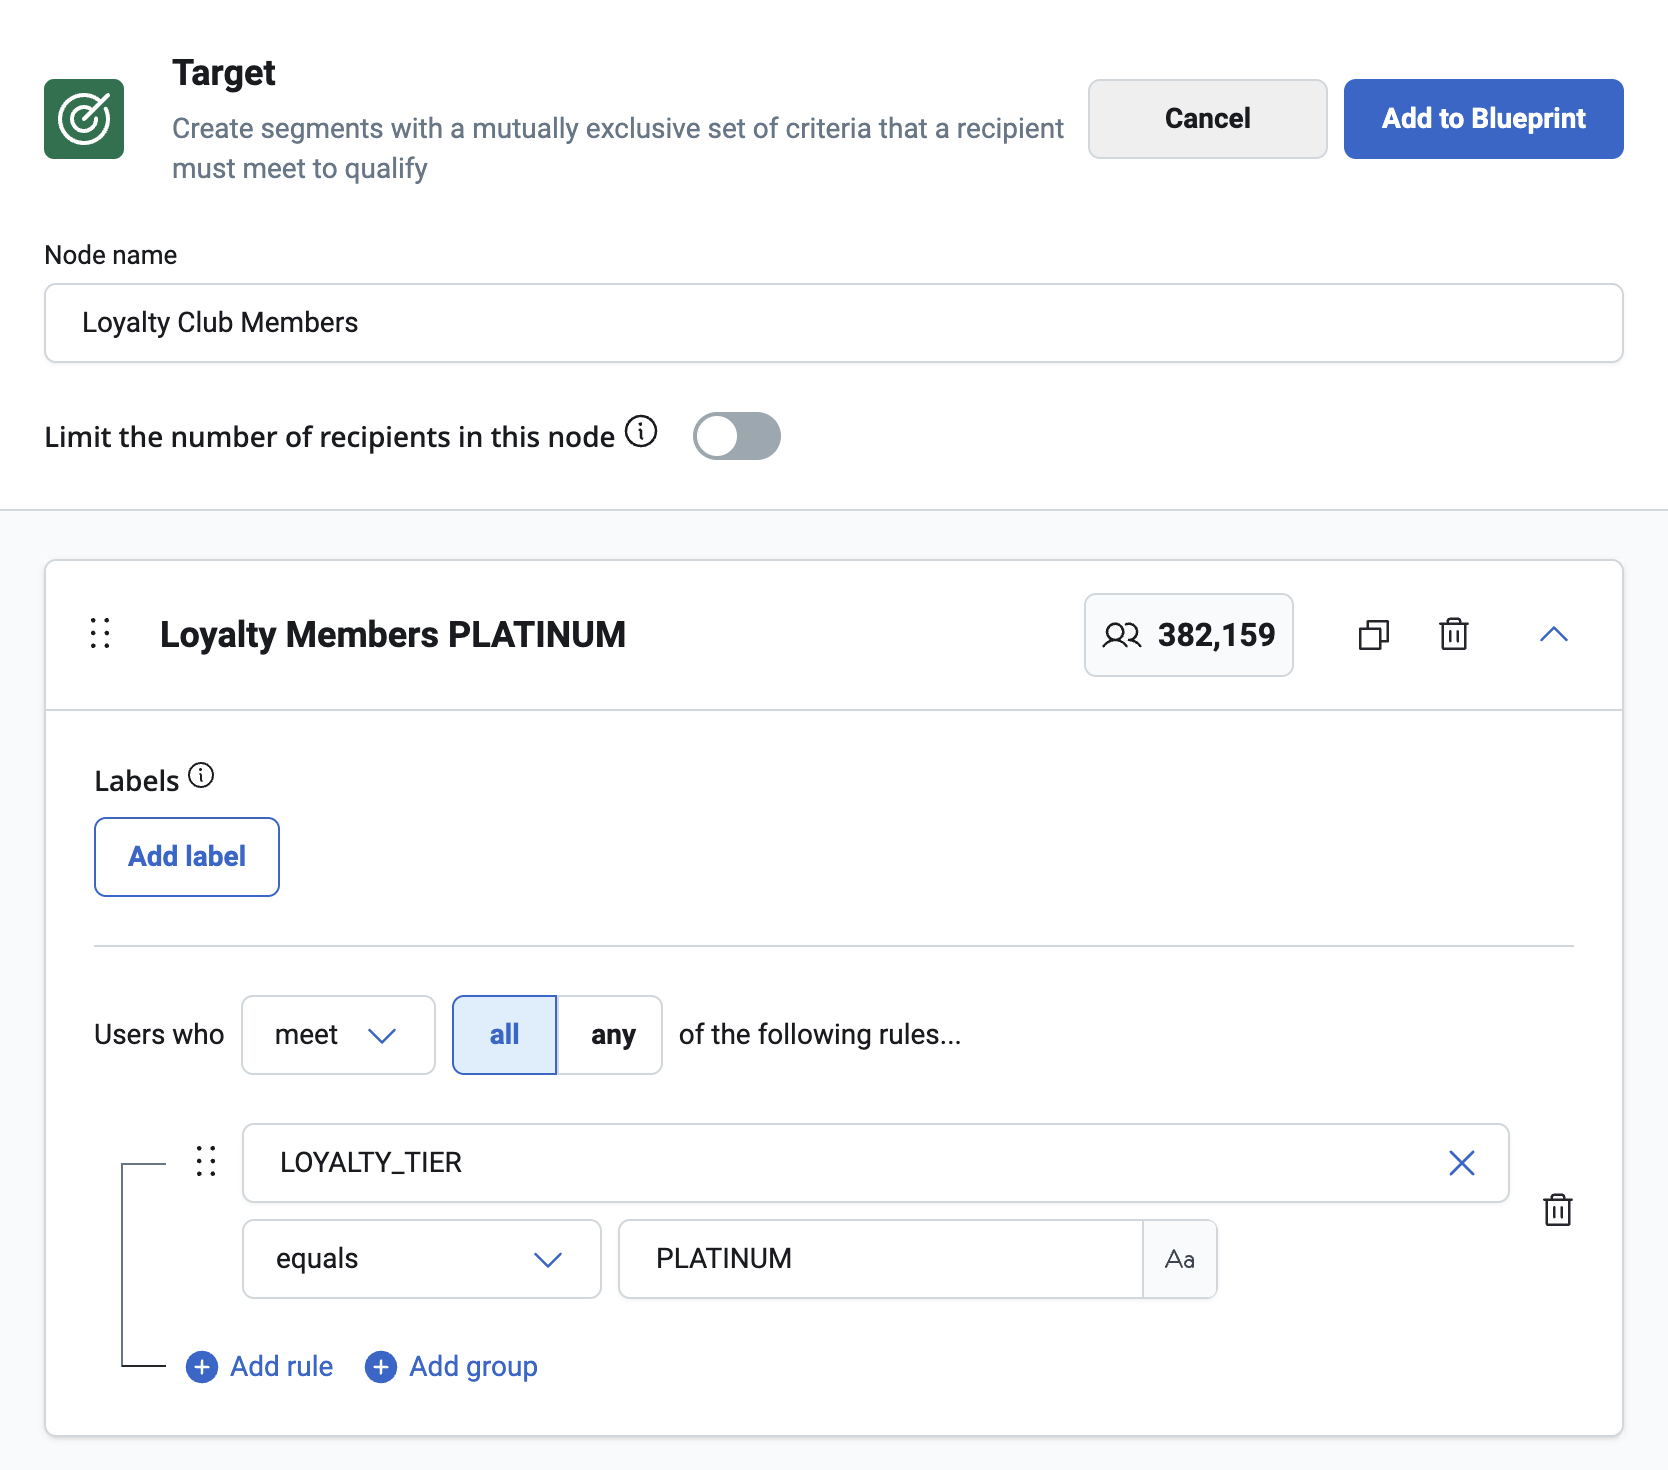
The Target Node can be as simple as one condition or as complex as needed. A set of conditions within a Node is called a Segment. Name the Segment and the Node before saving.
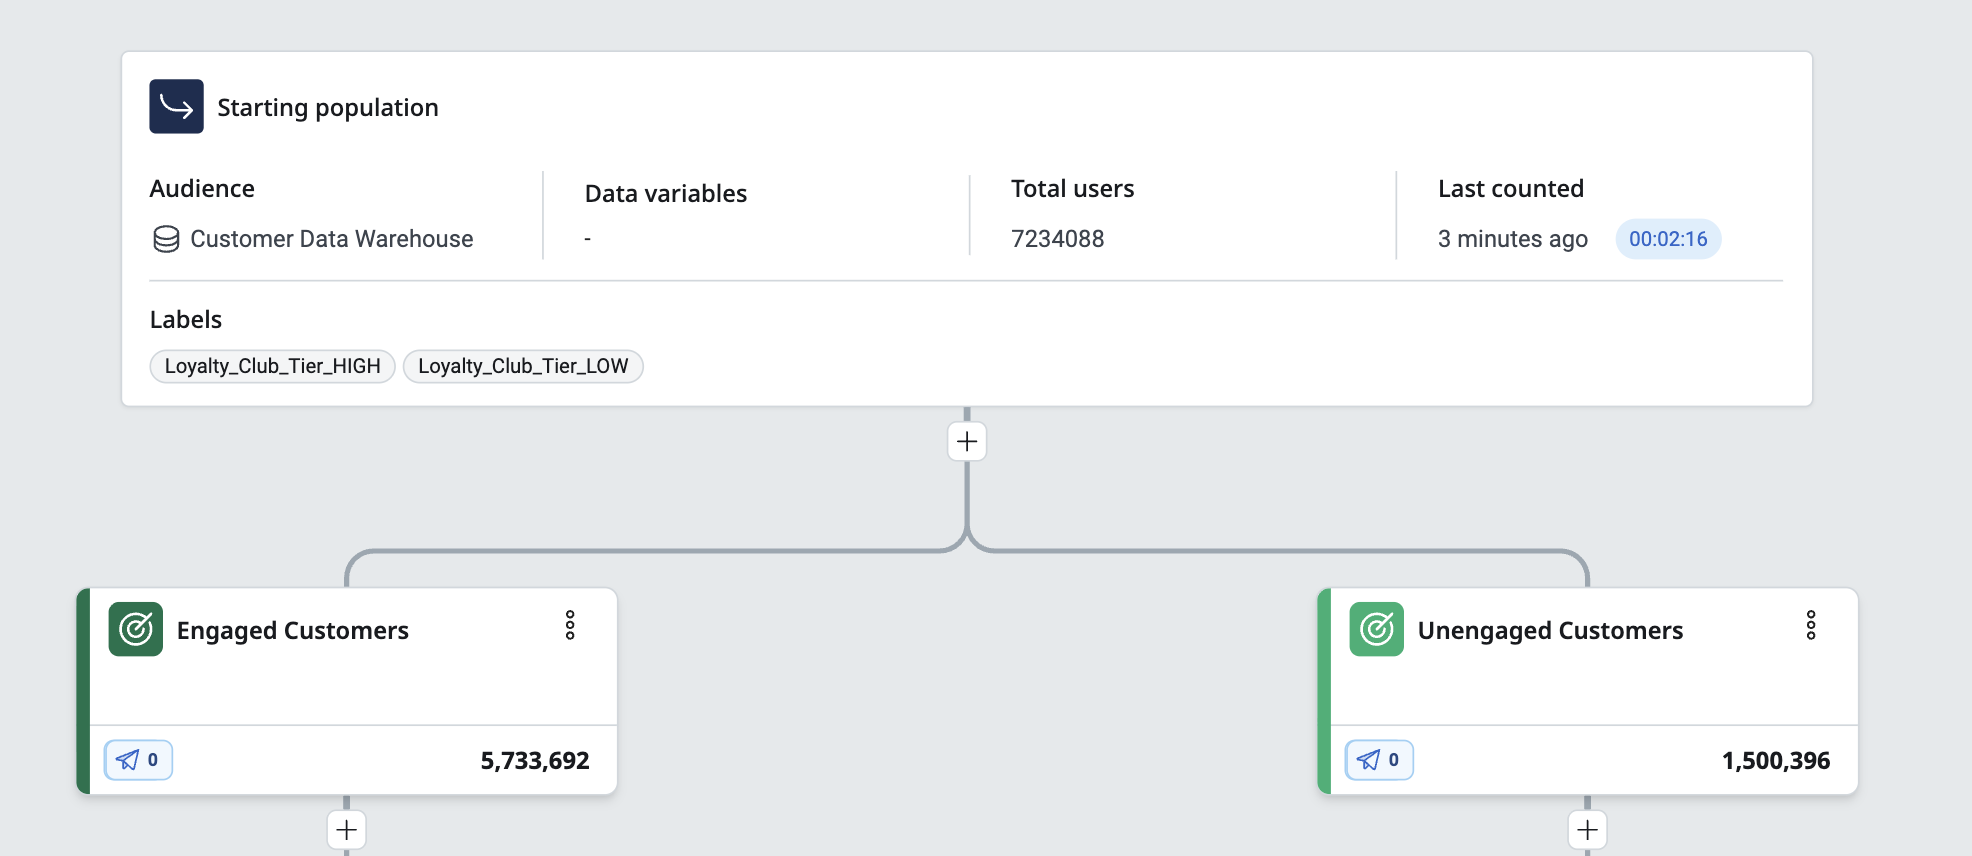
Two Nodes are created when choosing the Targeted Node option. The Node to the left is the conditioned Node. This is the node that applies the logic to target records. The Node furthest right is the ELSE Node. All records that do not meet the condition will progress down this path.
This is the core idea of a Blueprint. A series of Target Steps that filters records down into desired groups.
Click the Refresh button to view the count of records that meet the conditions for each Node.
Nodes must be built in order of priority. The visual order of the Nodes are the order that records evaluation conditions.
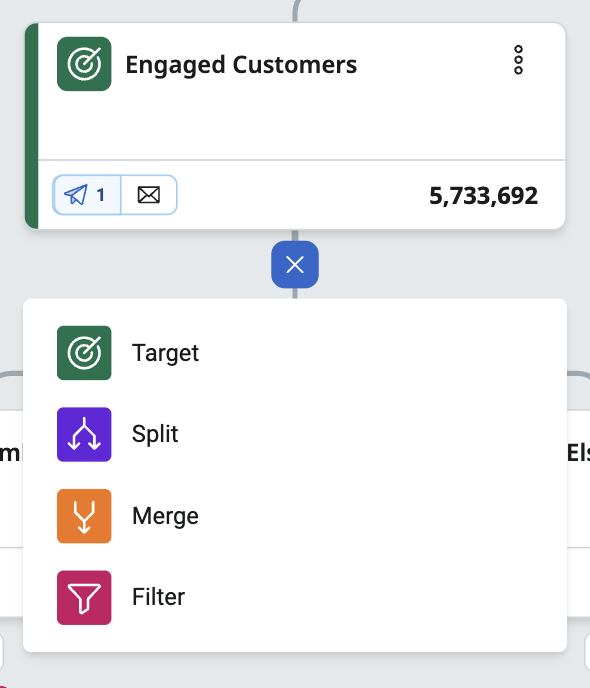
Clicking the + sign beneath the Target Node. More options are available than before.
Segmenting on predictive models
Native predictive model segmentation is available starting in Accelerator version 26.3.1. It requires Predictive Models to be enabled in Admin > System Config > System Defaults, and the relevant reserved score columns to be present in the audience query under their exact reserved names. For the full list of models and their reserved column names, see Reserved predictive model column names. For a walkthrough of configuring model-based segmentation and channel selection, see Using predictive models in campaigns and journeys.
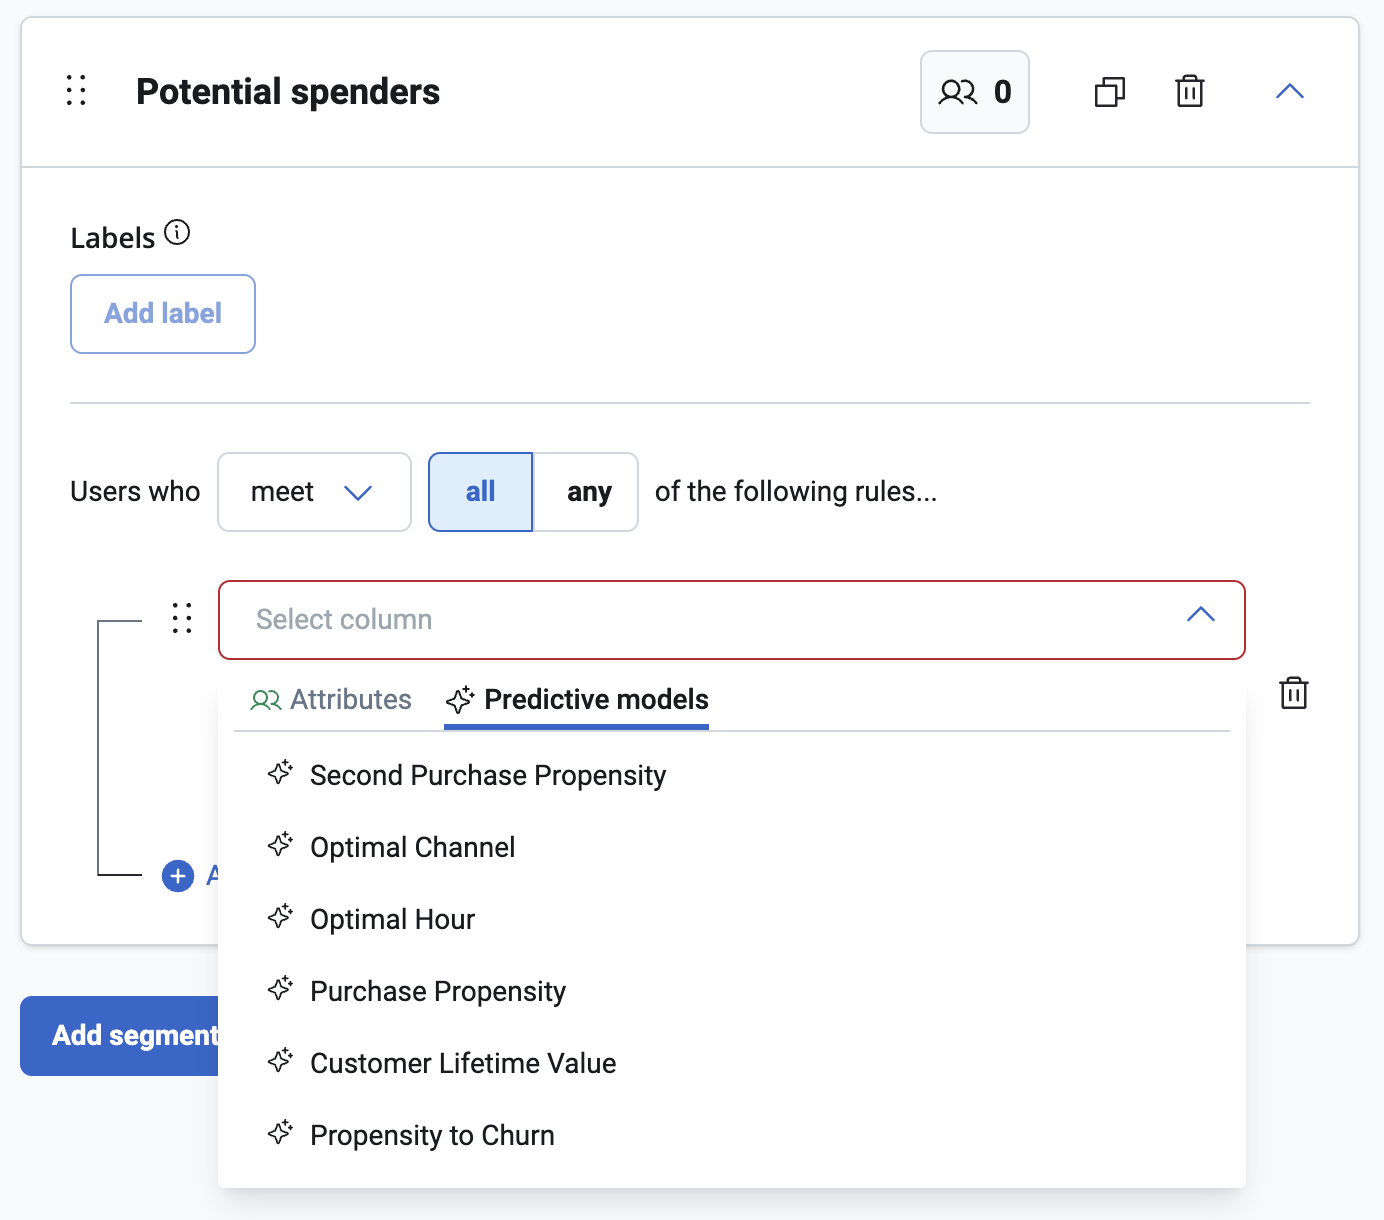
When configuring a segment's conditions, the column picker separates predictive models into their own group, distinct from general audience attributes, and highlights predictive model columns in lilac wherever they appear in audience, Blueprint, and User Profile previews. Apply an operator and threshold to a model score the same way as any other condition.
Merge and Filter
The options beneath the Target node include Merge and Filter options.
The Merge option allows multiple paths to combine into one.
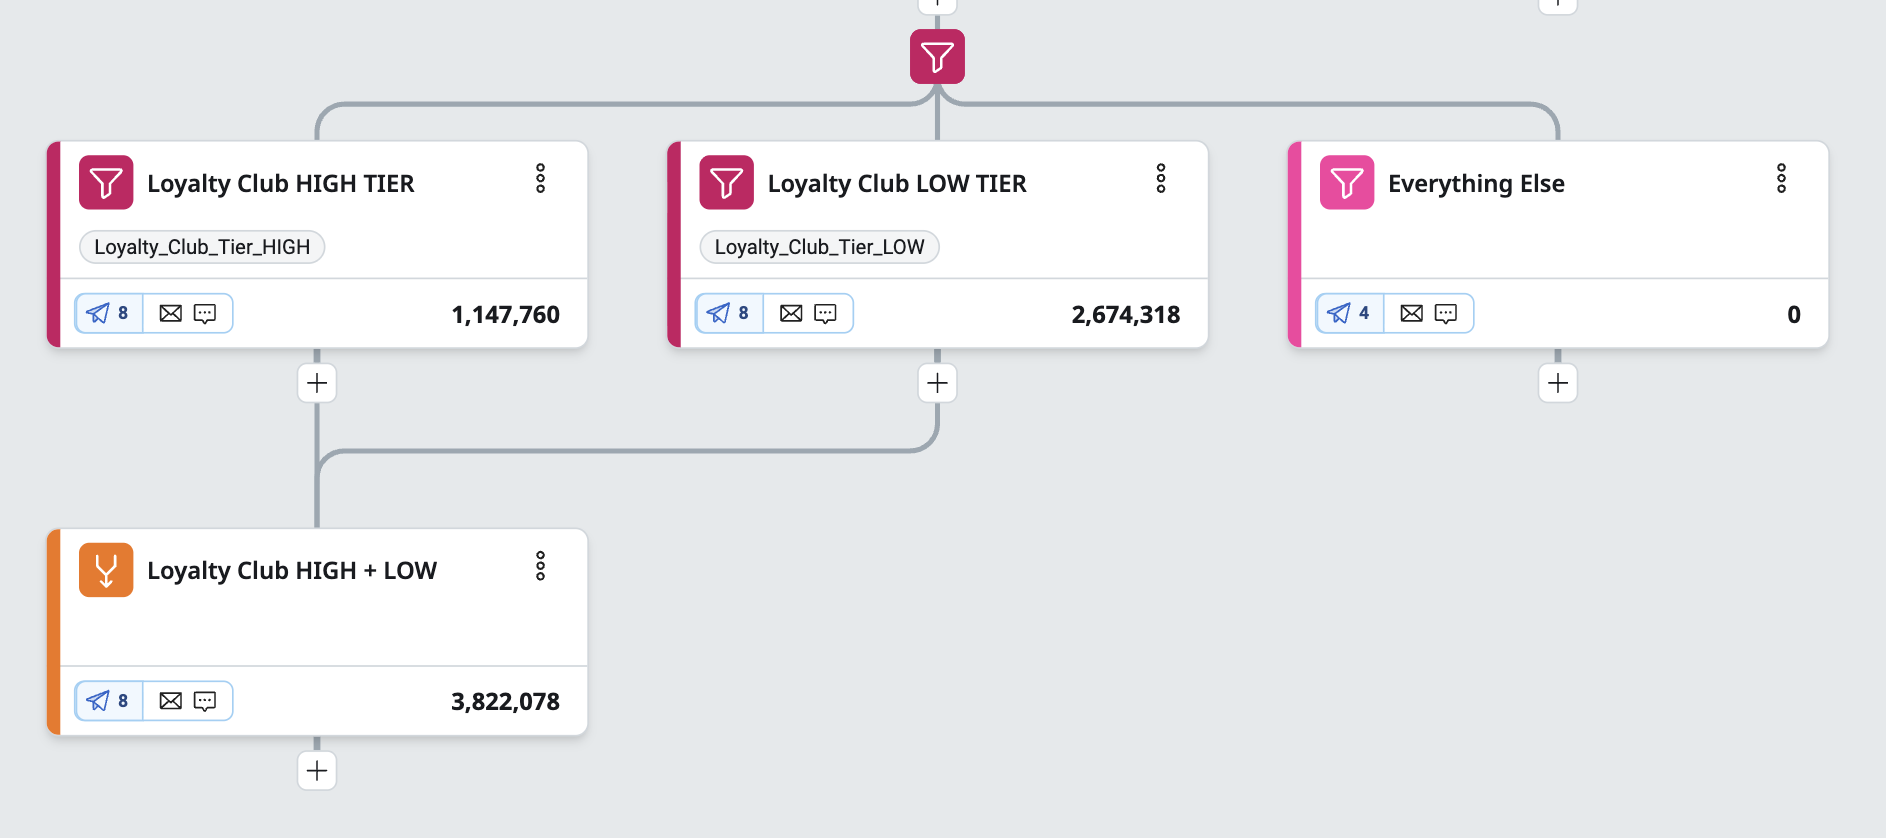
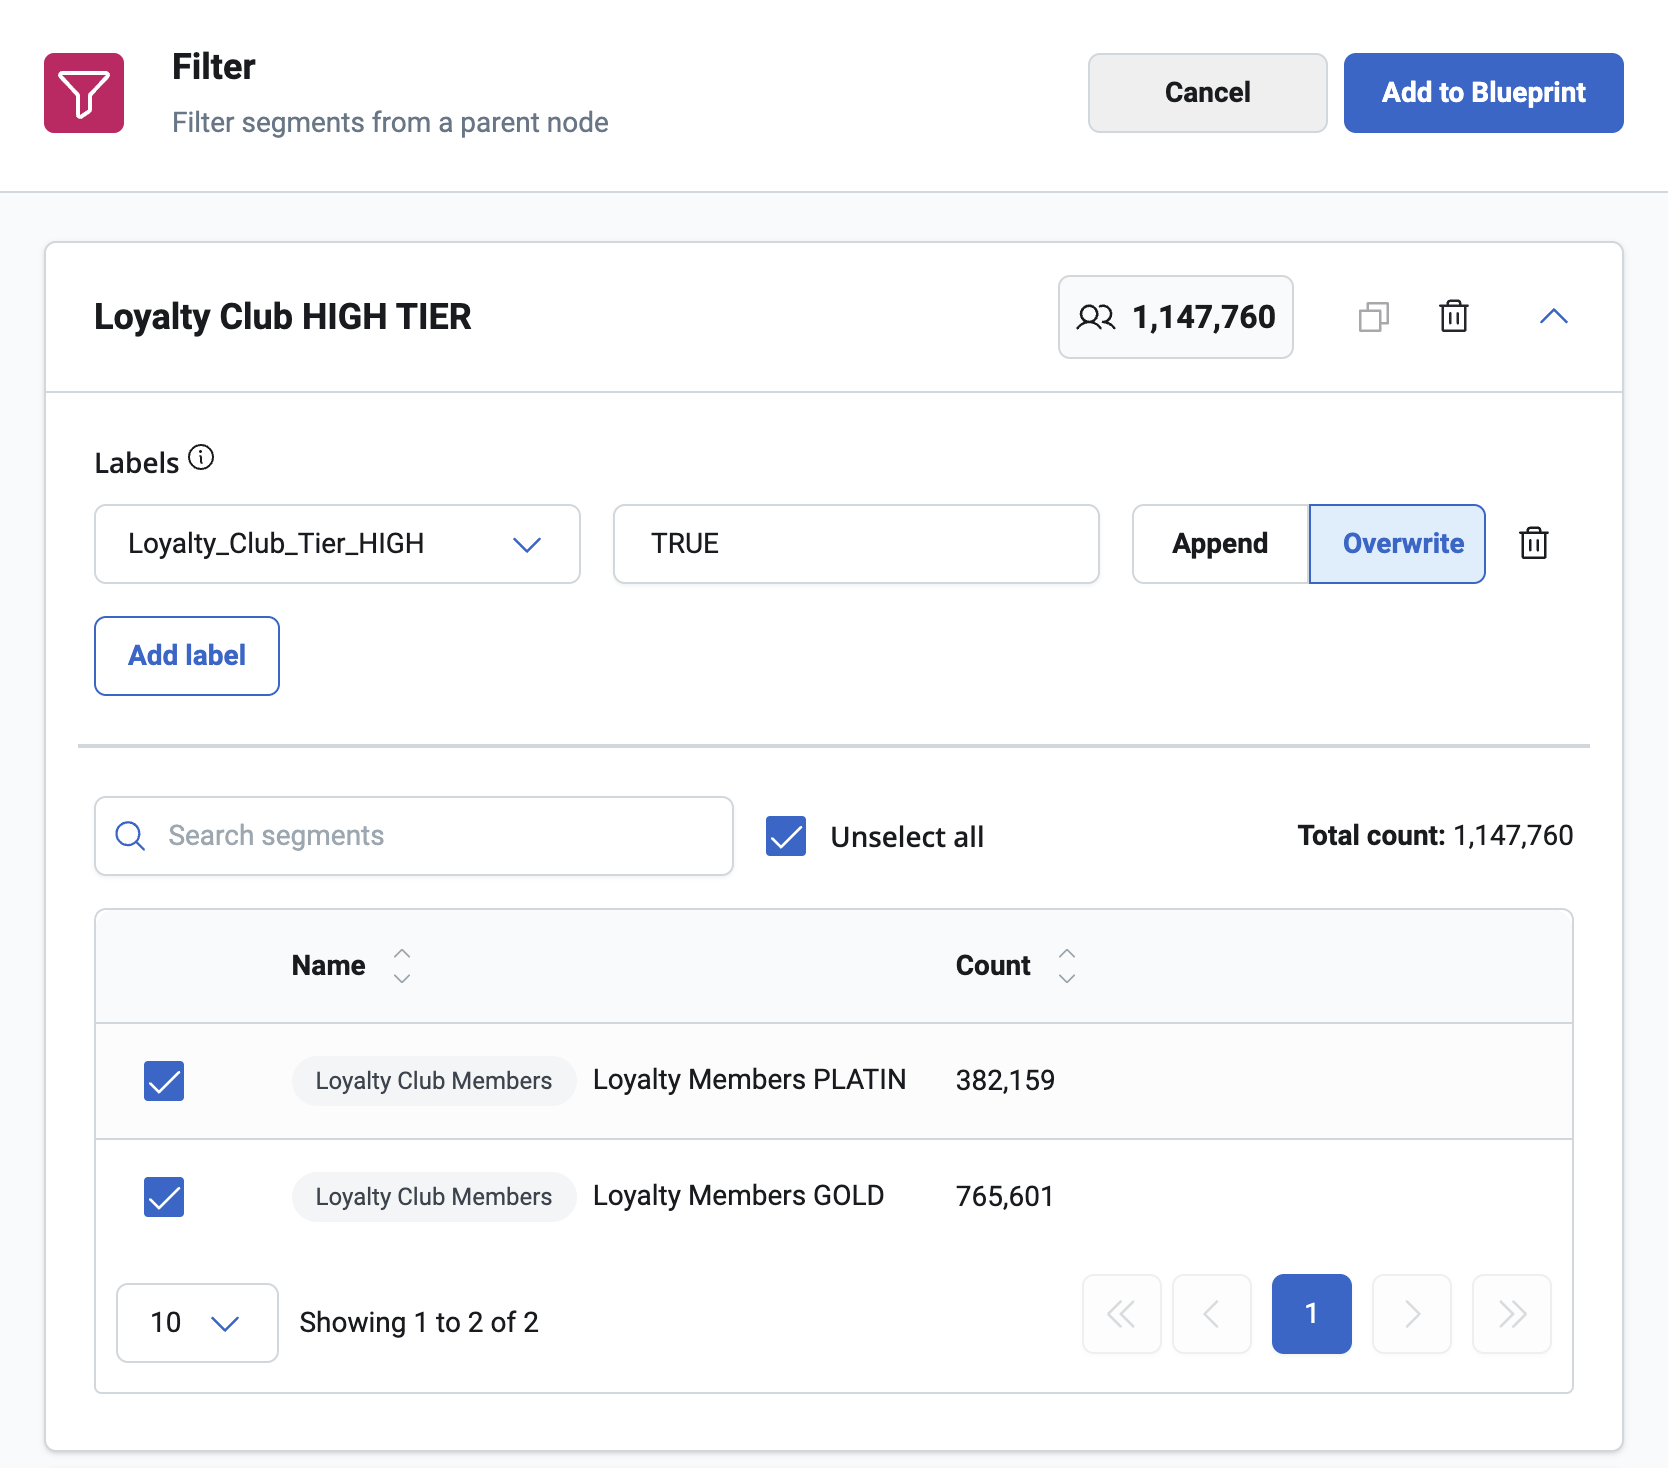
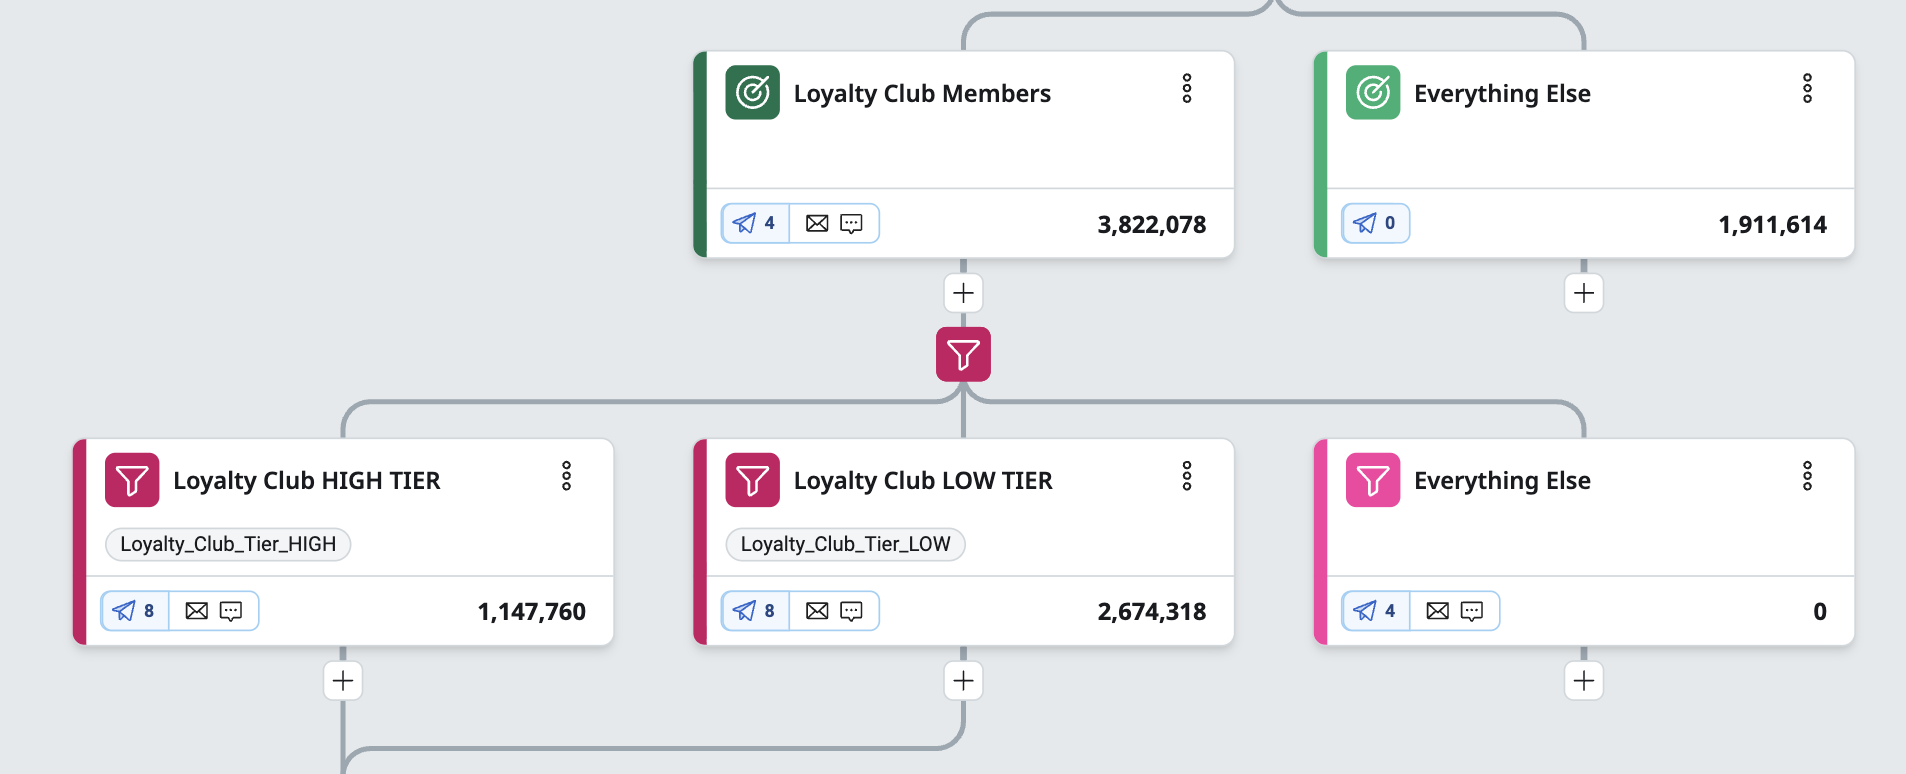
The Filter option has a very specific use. The Filter can group customers based on the Segments of the previous Target Node. For example, if a Target Node creates segments based on loyalty levels, the Filter node can group those resulting records into different tiers. All records where the level is platinum or gold could be grouped as "high" tiers. Using the Filter node, results from a Target Node can be combined into more specific groups.
Split
The Split option is a way to divide records based on a percentage allocation. The Split can divide records among many different nodes. When configuring the Split, the chosen percentages must add up to 100%.
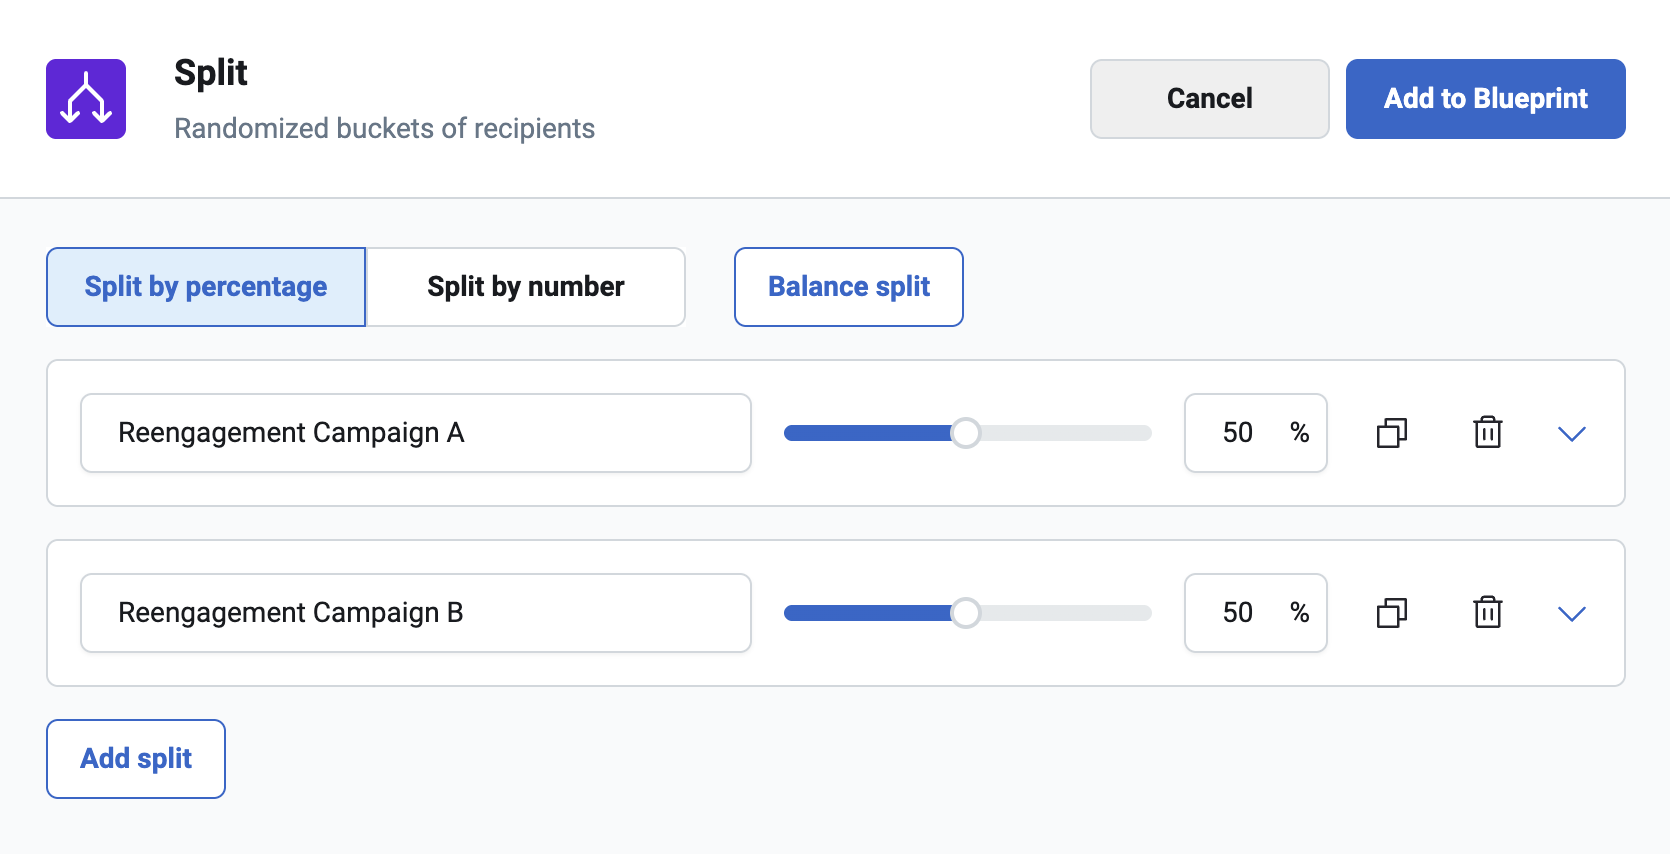
Splits are added to Target Nodes to randomly distribute records through multiple paths. Saving the Split configuration will add Nodes to the Blueprint.
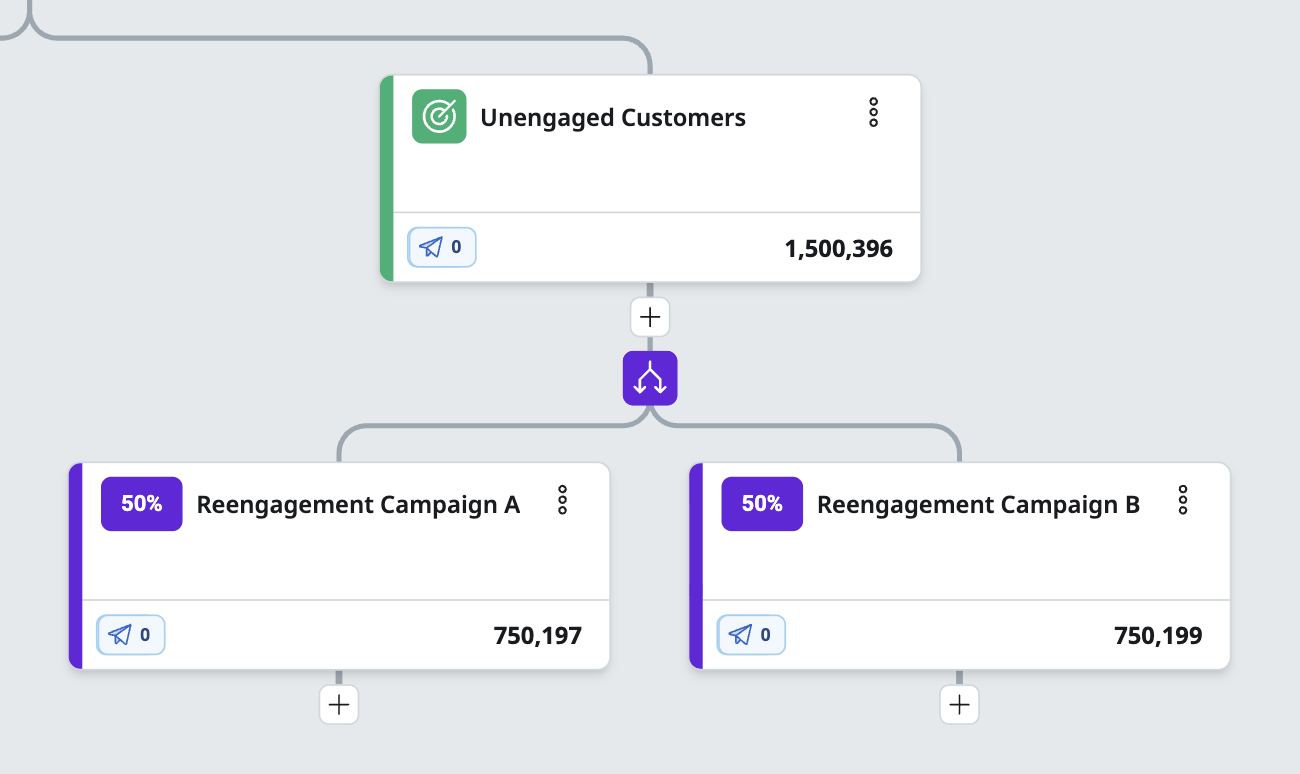
Use Refresh to display the number of records that each Node receives.
Moving and Reordering
Some blueprint nodes can be moved and reordered by clicking and dragging the node into a new position. This is important because the order that the Nodes are arranged in the order that they are executed.
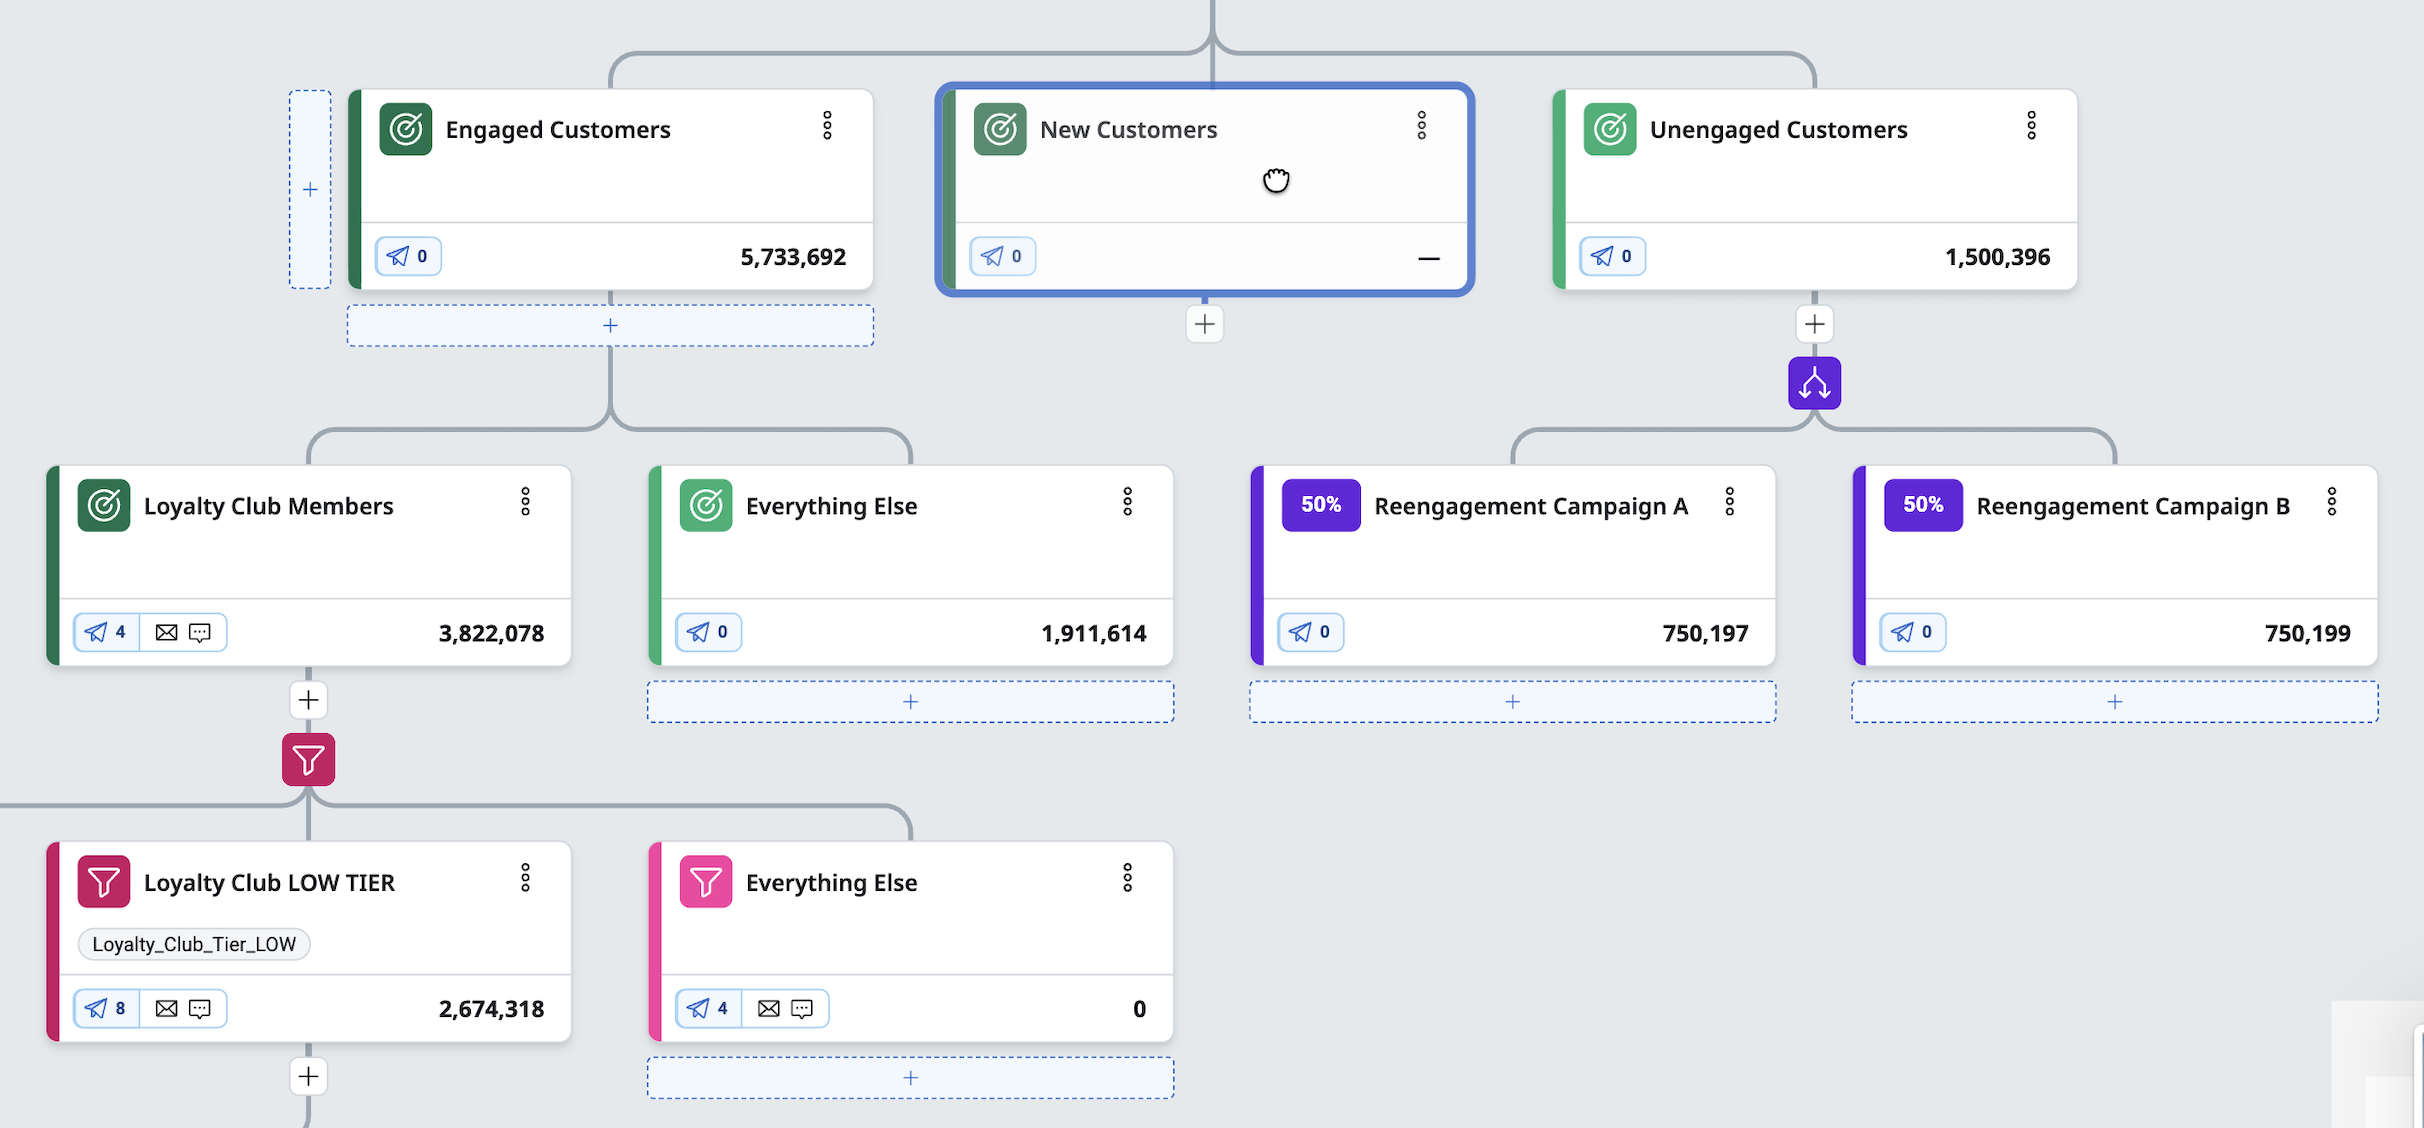
Locations where a node may be moved will appear next to and below the available locations. Simply drag the node into one of these positions until it is highlighted, then release to move the node.
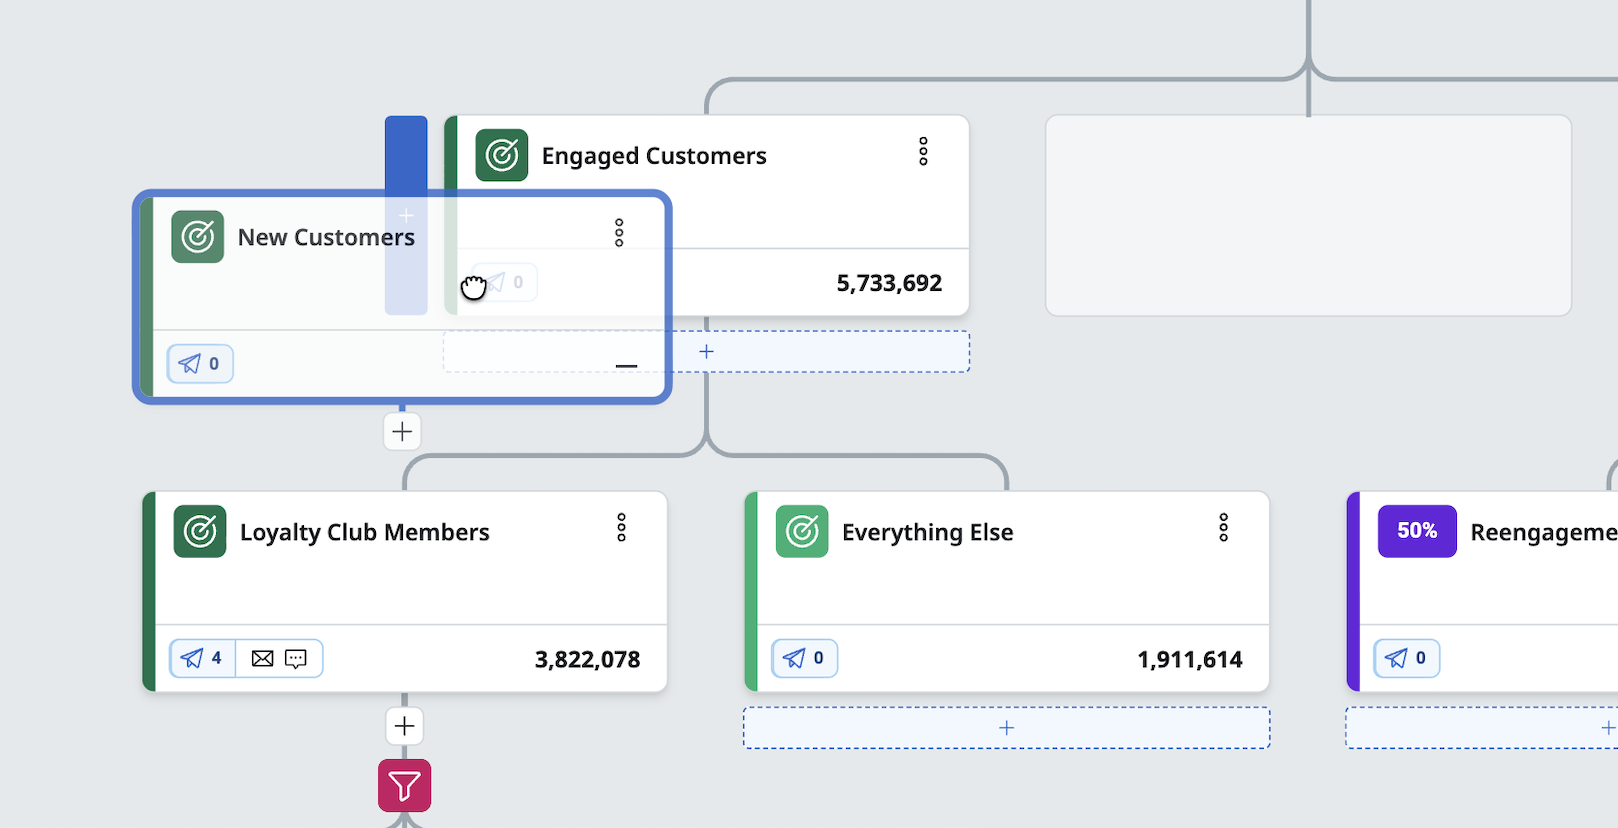
The counts on Nodes affected by the reordering will be cleared. Once all Nodes have been moved into their final positions, recount the Blueprint to refresh counts on the individual Nodes. This recount will reprocess the full live starting population (or FastCache, if configured and active) across all Node rules and labels.
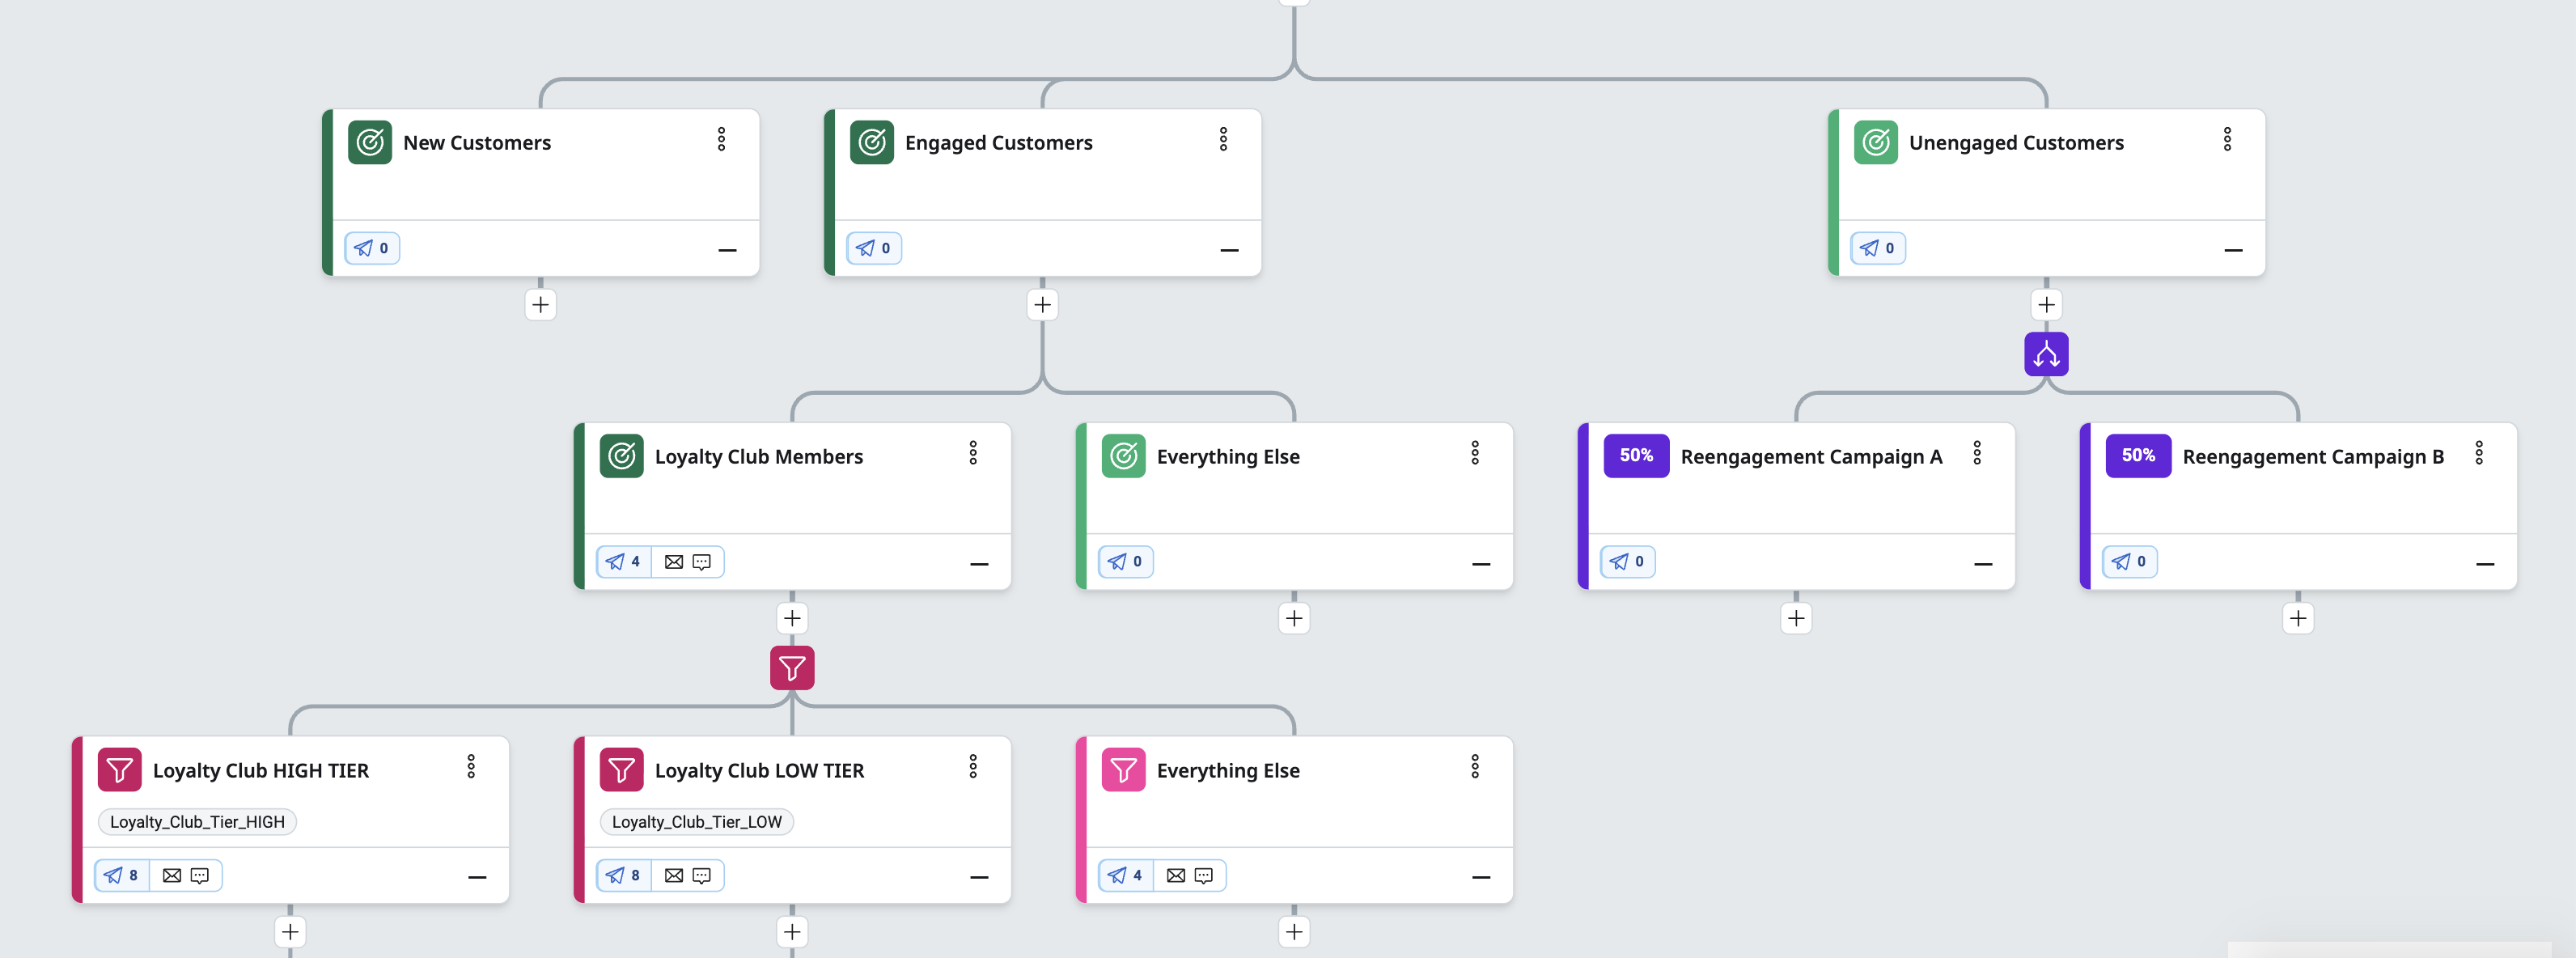
Labels
Labels are a powerful data augmentation tool within Blueprints. Labels are assigned to customer records as they process through the Blueprint. Labels assigned to a customer are available anywhere the Blueprint's data is accessible, such as in a Template, and can be recorded back the the warehouse through Audience Recording.
Create a Label by selecting the Starting Population at the top of the Blueprint.
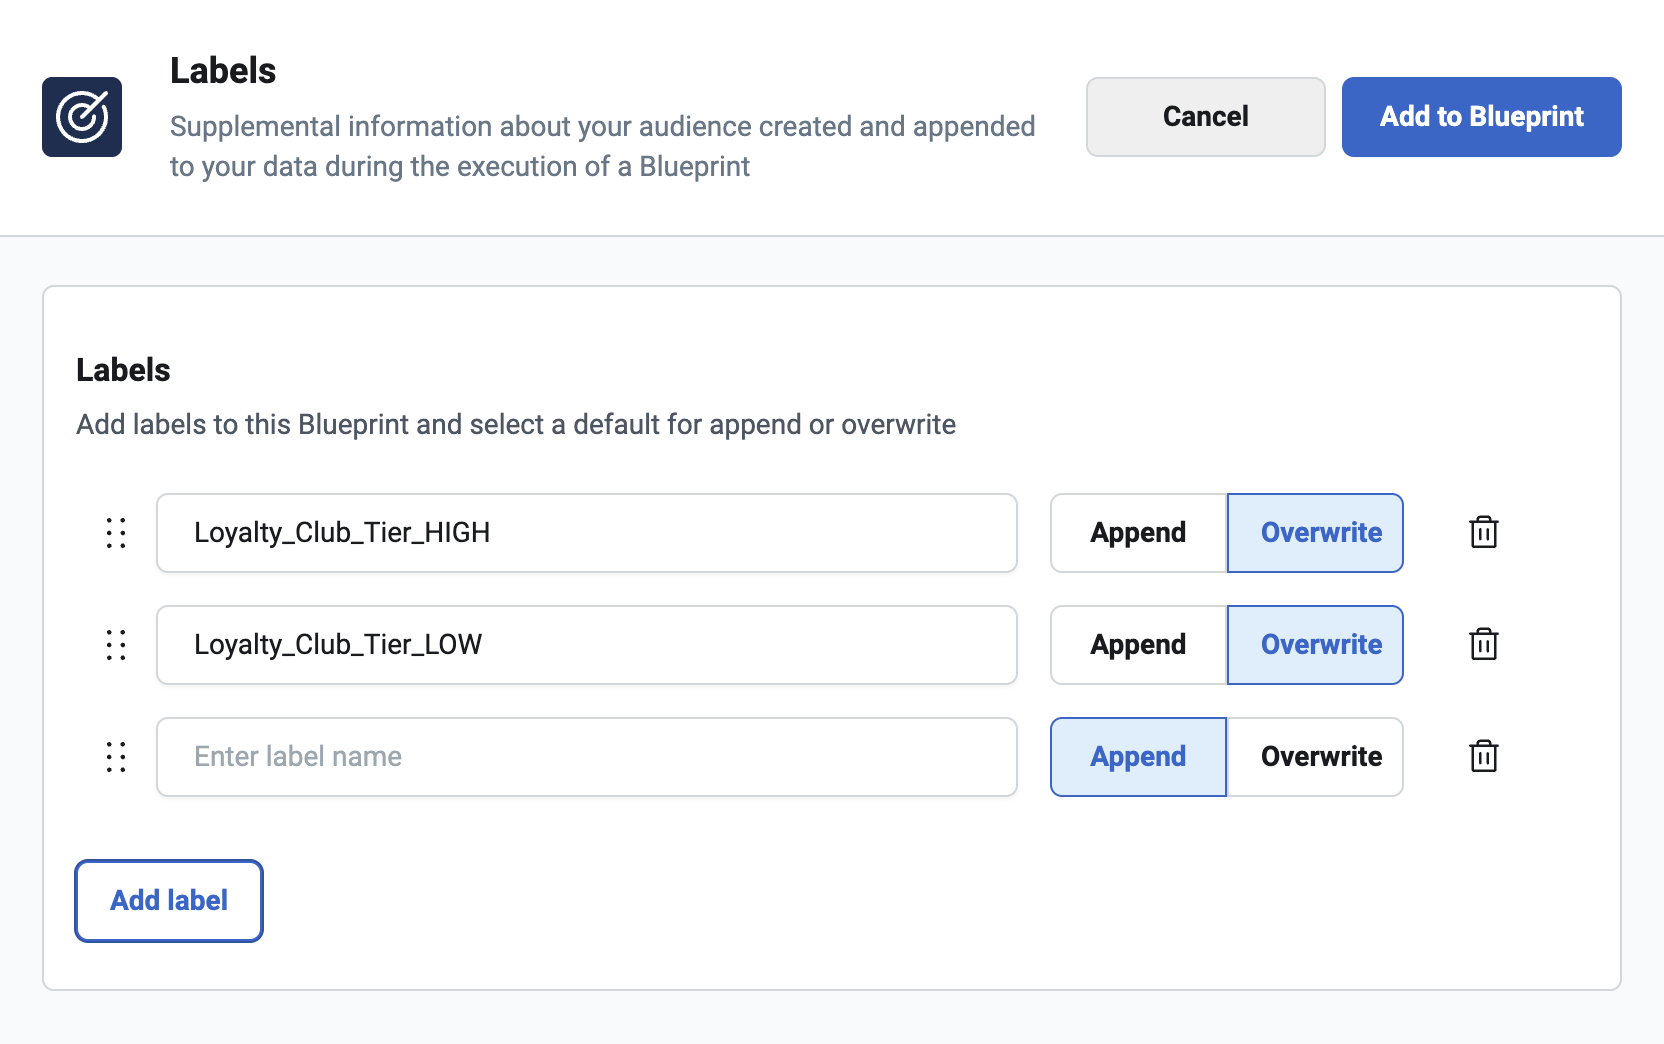
Labels only require a name. All Labels are string data types and default to an empty value. To populate the label, select a Node to open it. Select Add label and choose a label from the dropdown. Use the Value field to assign a value to the Label. Select Add to Blueprint to save.
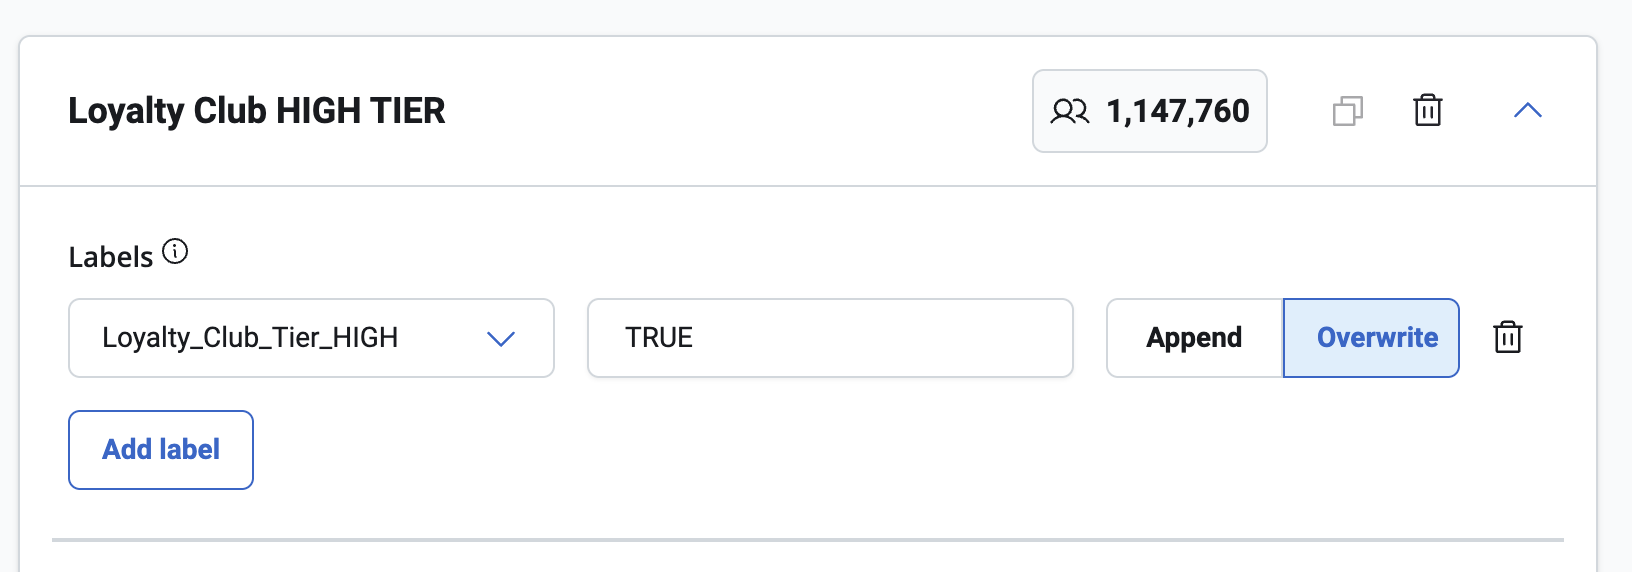
There are two methods of populating a Label:
- Append option will add data to any existing value a record has for this Label
- Overwrite option will delete any value assigned higher in the blueprint out of the Label and assign a new value
All Labels are treated as string values. There is no limit to how many Labels can be used within a Blueprint. Throughout the Blueprint, a record can receive multiple Labels.
Creating a Label with the same name as a column from the Audience data source will append or overwrite the information within that column in the Blueprint results.
How Blueprints Execute
Blueprints follow Waterfall Logic. Nodes are evaluated in the order they appear, from top to bottom and left to right. This means that the organization of Nodes is important. If a record meets the conditions for a Node, it will attempt to continue to any Child Nodes. If a record meets the conditions for a Node and there are no Child Nodes, then the record is done processing. Here is an example:
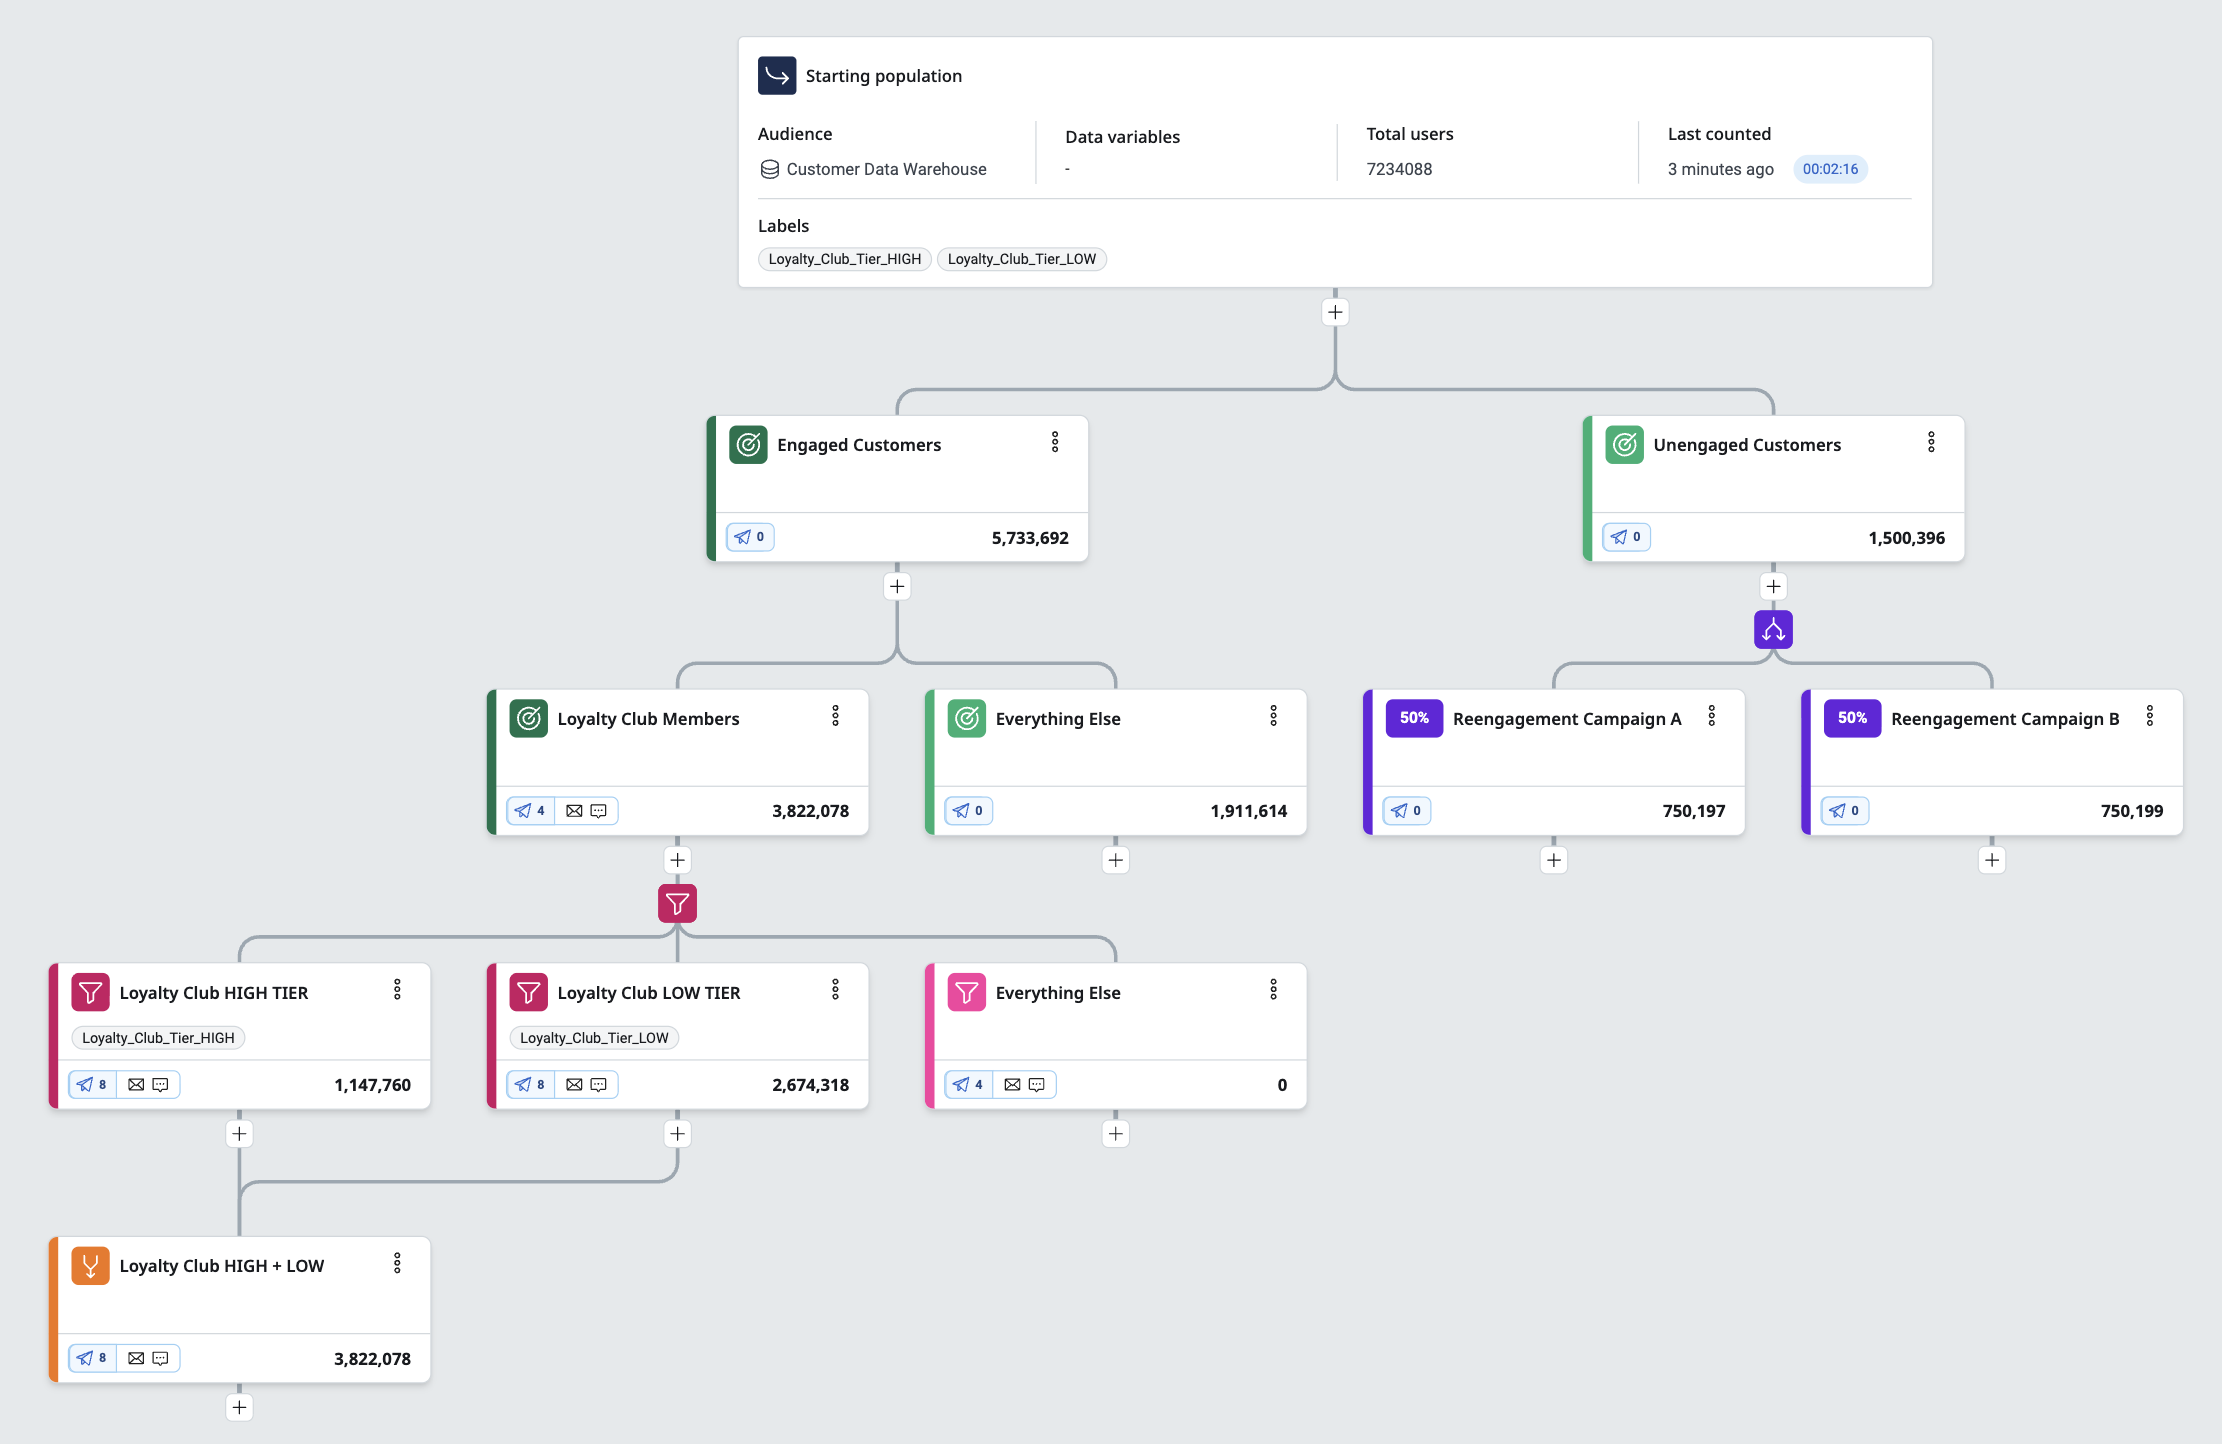
The starting population for this Blueprint is 7.2M records. The first set of Target Nodes identified engaged customers. All customer records that do not meet the "engaged" rules of the target node are filtered to the right node. Those customers will be split into randomized 50% groups for reengagement campaigns.
Engaged customer are filtered to the left node. In the above example, there are 5.7M records that are marked with complete profiles. These customers will continue through the Loyalty Club Members rules, down through the Club Tier filter and merge nodes.
When using a Campaign to contact records from a Blueprint, all Nodes can be targeted.
When selecting an Audience or Blueprint within a Campaign, it can be difficult to tell the two apart. It is recommended that Blueprints contain some identifier in the name. For Example, a Blueprint titled “Weekly Onboarding” would benefit from the following name: “BP Weekly Onboarding”
Using Data Variables and Dynamic Lists
Segment conditions can be driven by Global Data Variables instead of hard-coded values, so the same Blueprint can be reused and adjusted without editing its conditions. A Dynamic List Data Variable goes further: it resolves to a set of values that refreshes automatically against your source of truth, so the Blueprint always evaluates against current data. You can also set a Data Variable's value at any level of a Blueprint chain to override the parent.
For step-by-step instructions on referencing a Dynamic List in a Segment condition and setting per-level overrides, see Using Dynamic Lists in Blueprints.
Using Campaigns
Completed Blueprints can be used for campaign activation or as a source for continued Blueprint chaining. Campaigns are used to target records and contact them, either through marketing campaign messaging channels or to external destinations for paid media campaigns. Campaigns can also be created through the Campaigns left navigation menu. Multiple Campaigns can access the Blueprint. They can target the same Nodes or different Nodes.
To create a campaign or chain through the Blueprint canvas, select the Create campaign or chain button.
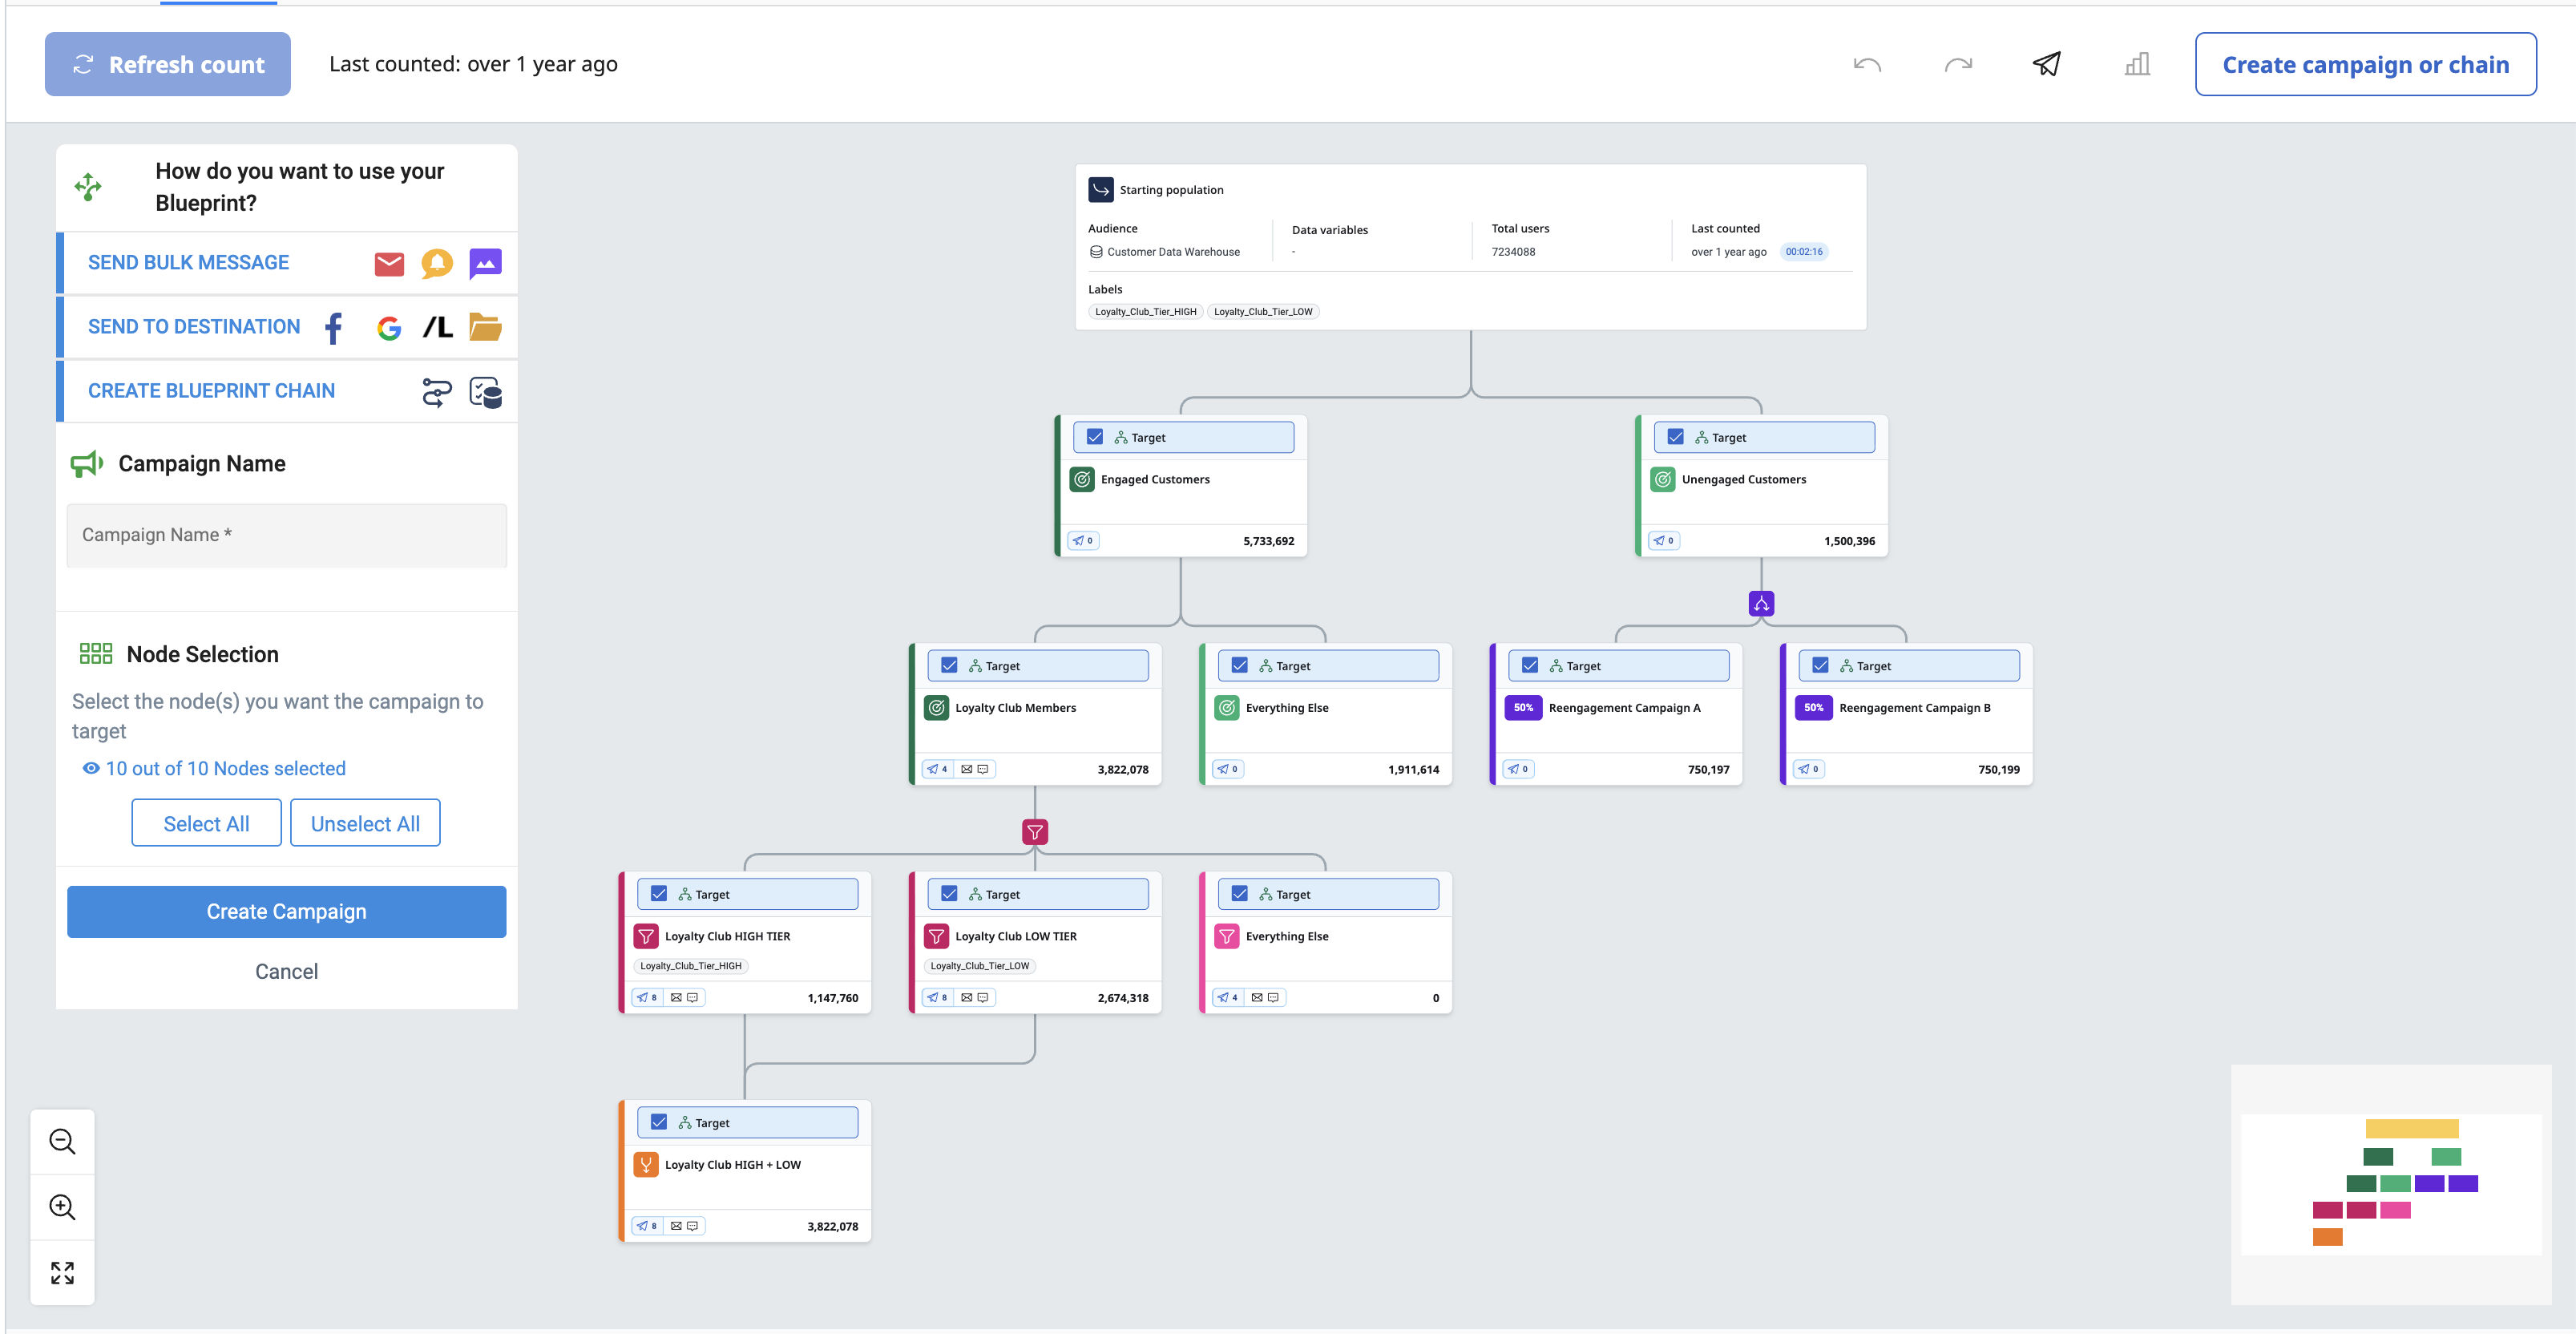
More instructions on creating Campaigns can be found at the article End-to-End Newsletter Creation.
Create a new Campaign. When selecting an Audience, choose the Blueprint.
To select which records to contact from the Blueprint, select Filter Blueprint on the Who card.
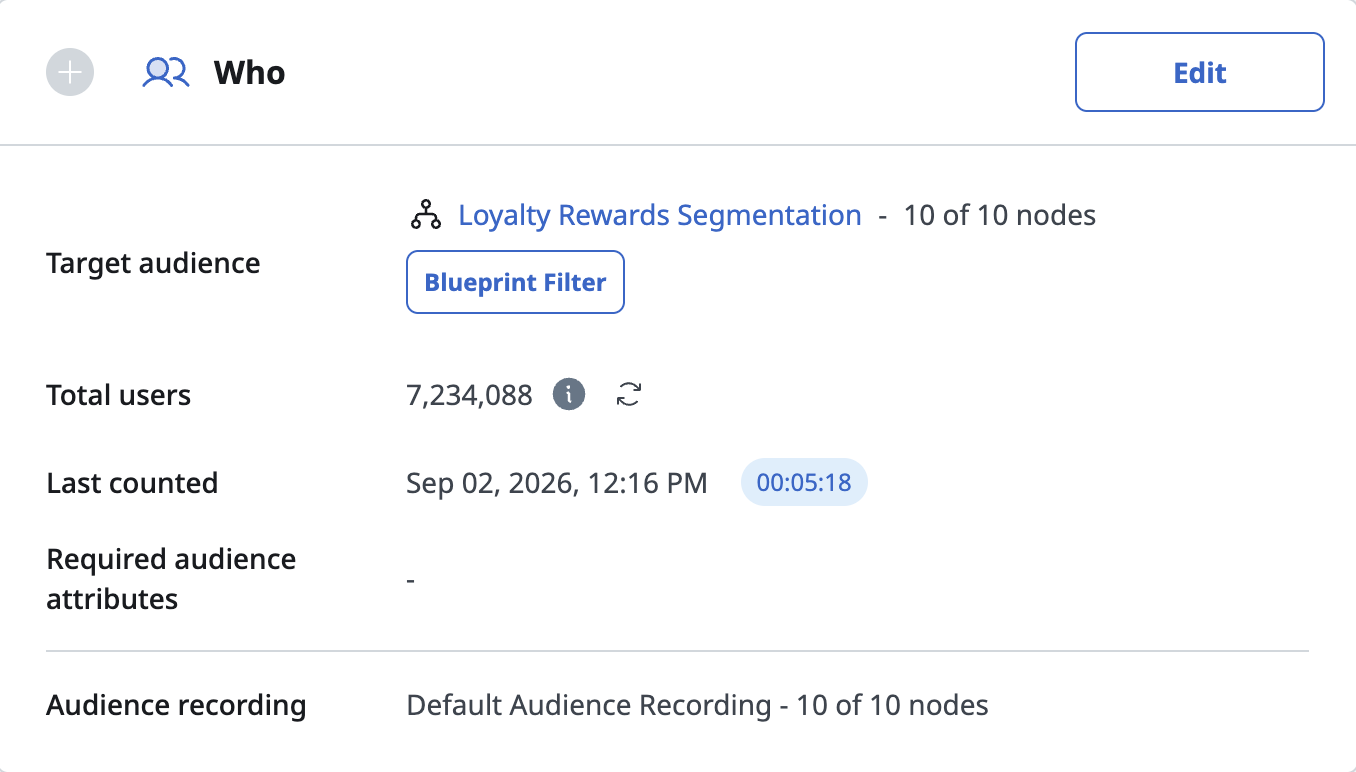
Clicking this button opens the Blueprint.
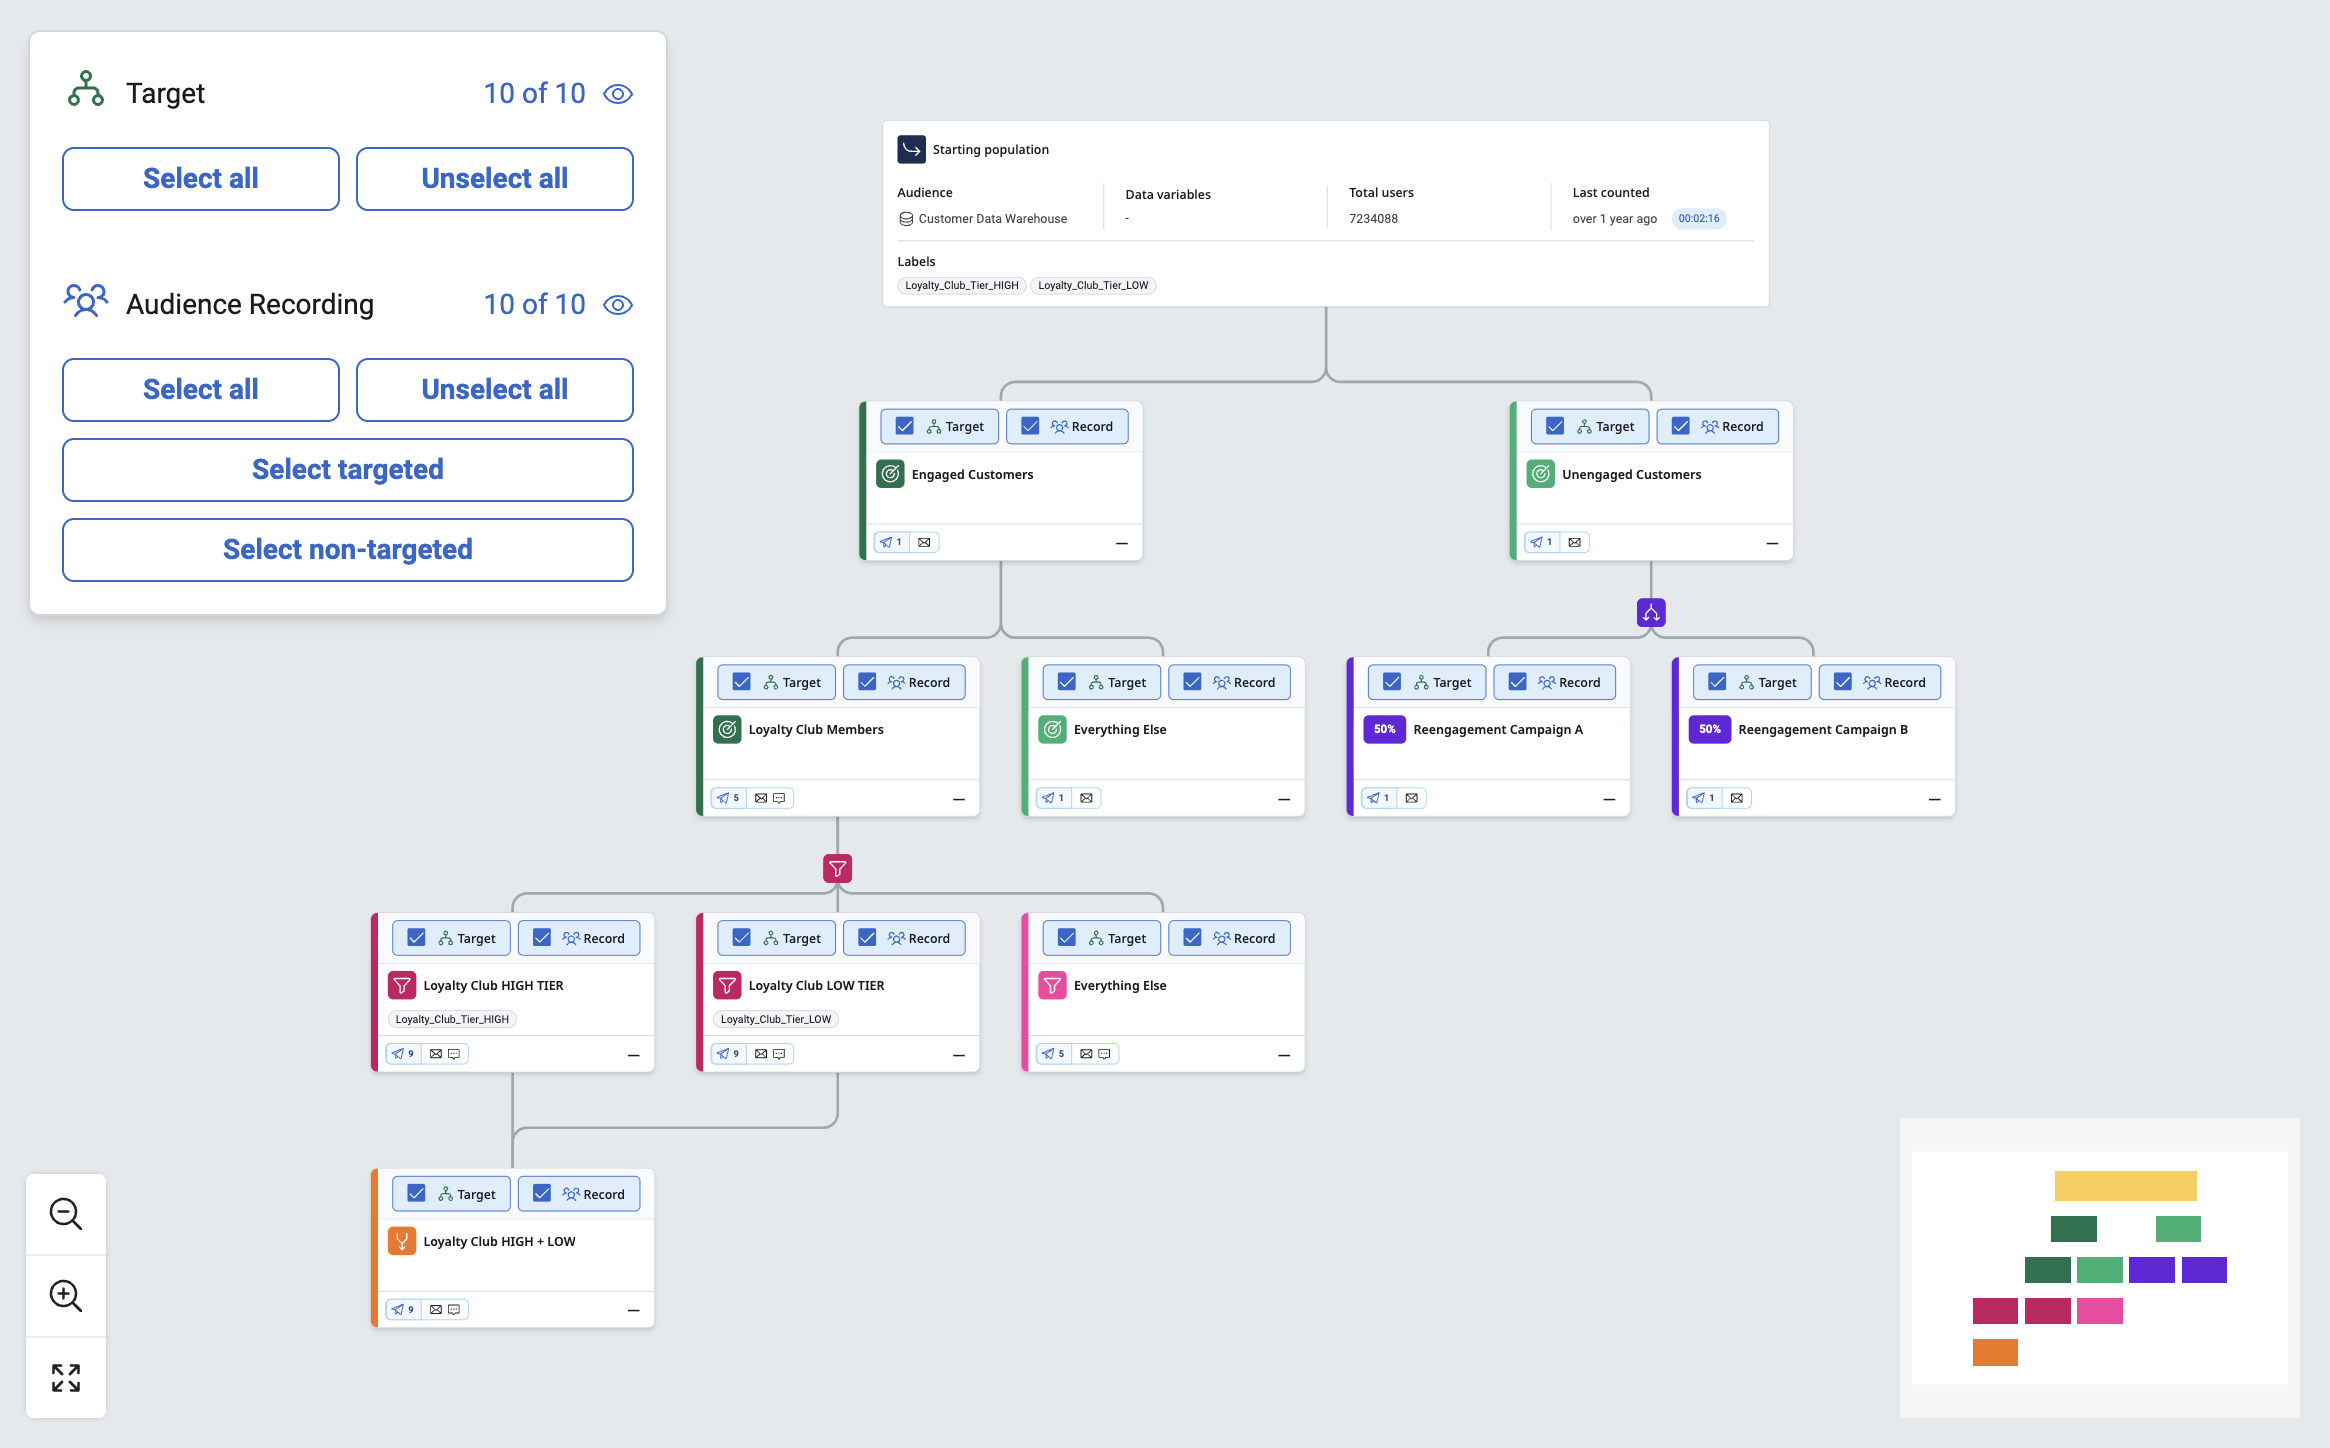
Each Node of the Blueprint has checkboxes for selection. Select the Nodes to target. The customers selected by that Node and all child Nodes will be targeted by the Campaign. The child Nodes themselves do not need to be checked if a parent Node is checked.
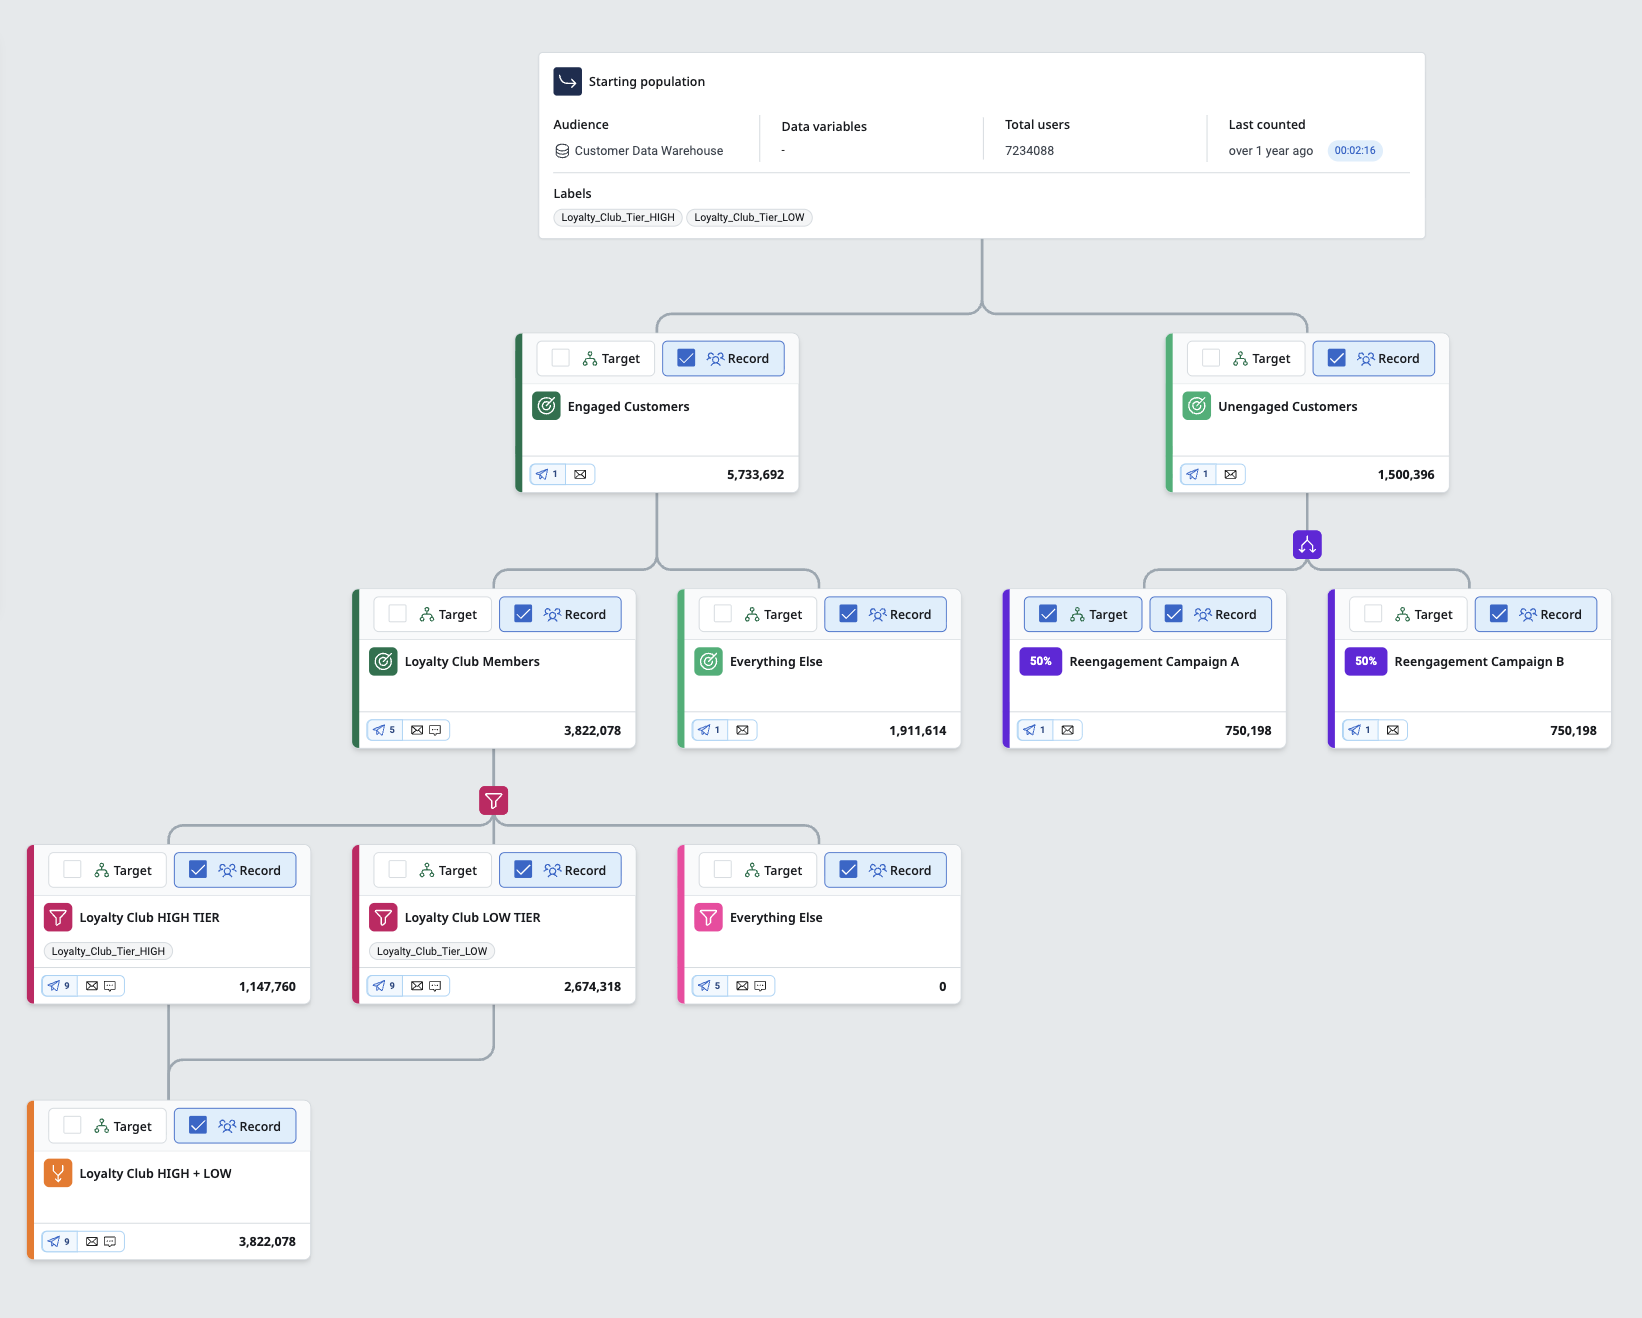
In the above example, the “Reengagement Campaign A” Node is checked as the Target. This will only target records that are sent to this Split Node. These customers will also be recorded, as will all other Nodes selected for Record, which means customers in these non-targeted nodes at the time of campaign send will not be included in the message or destination delivery, but will be recorded back to the customer warehouse for tracking their position (and labels) as a snapshot in time.
Once all the appropriate Nodes are checked, save the selection. When launching the Campaign, only records returned by the checked Nodes are contacted. You can also manually choose which Nodes are processed through Audience Recording (if Audience Recording is configured and active on the campaign).