Using Data Variables
Overview
Data Variables are a feature of Audiences that helps the Audiences become more versatile. Data Variables can be included in the Audience SQL statement as placeholder values. When creating/launching a Campaign, Data Variables can then be populated with values. This article will provide you with the tools to populate Data Variables with values to easily get more value from Audiences.
For more information on creating Audiences, refer to End-To-End Newsletter.
Process
Creating Data Variables
When creating an Audience, whether using the Drag-and-Drop method of the SQL method, Data Variables are available for use. This example will use the SQL method of creating an Audience.
Navigate to People > Audiences and create a new Audience. Give this Audience a name and description.
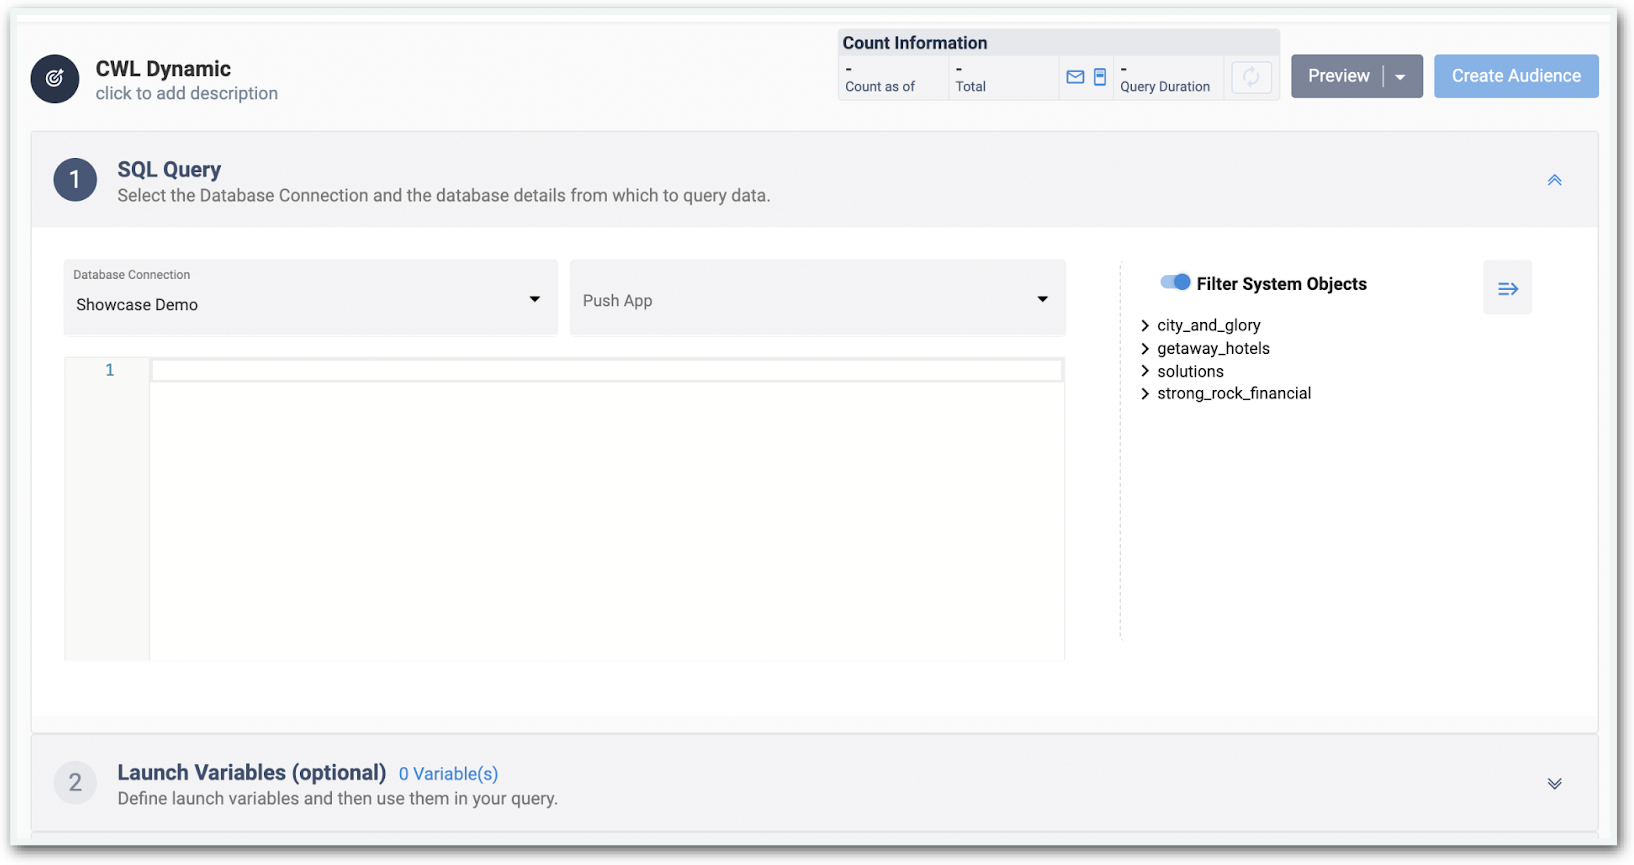
Create the SQL statement for the Audience to select the appropriate columns.
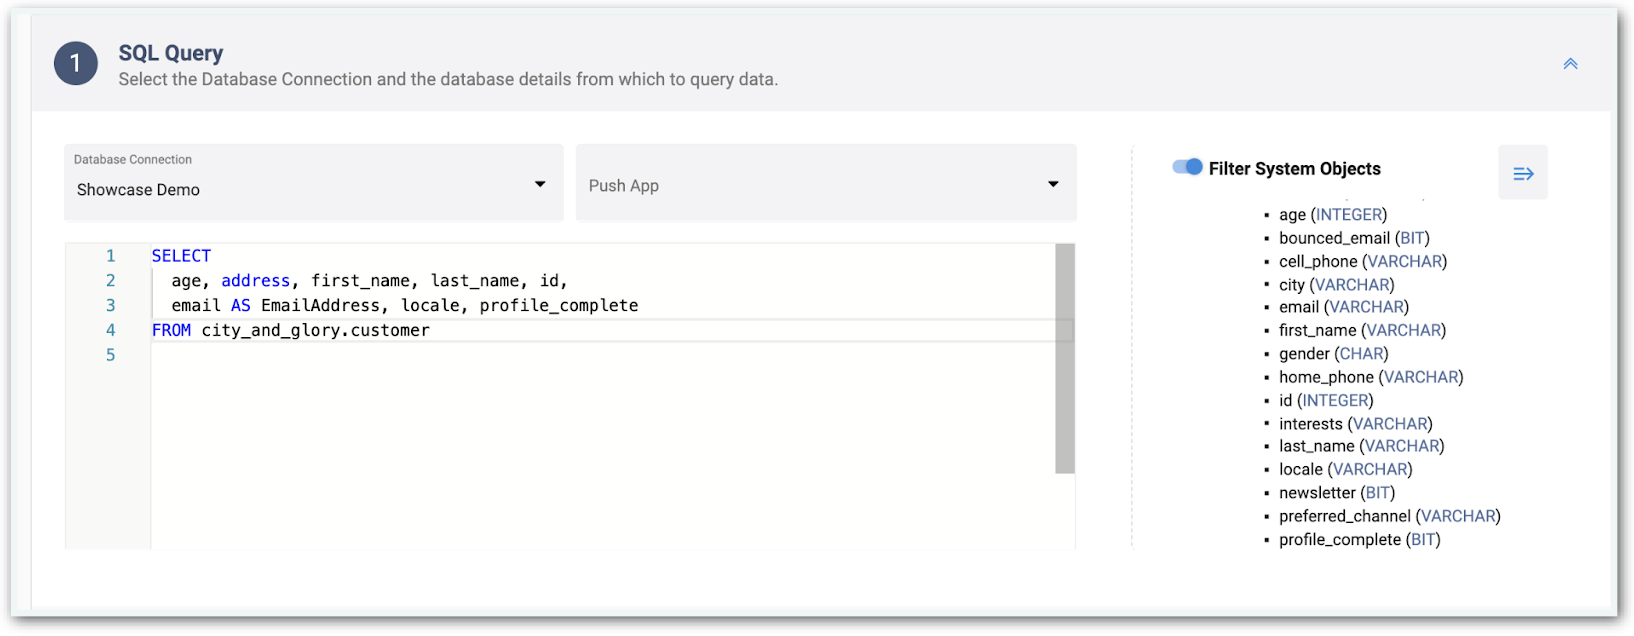
Before creating the WHERE clause of the SQL statement, scroll down and expand the Data Variables option. This is where Data Variables are established.
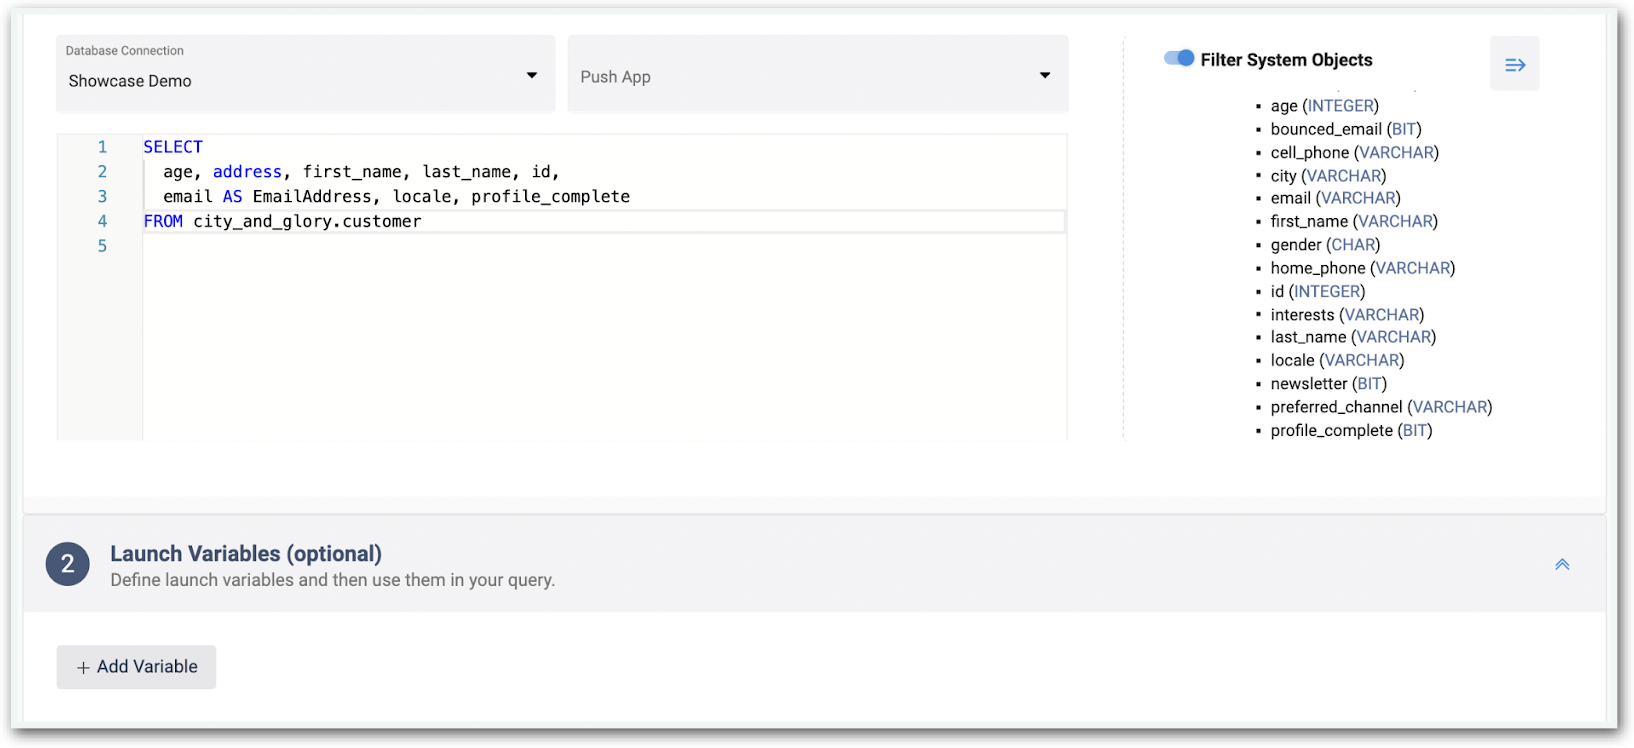
Click the Add Variable button.
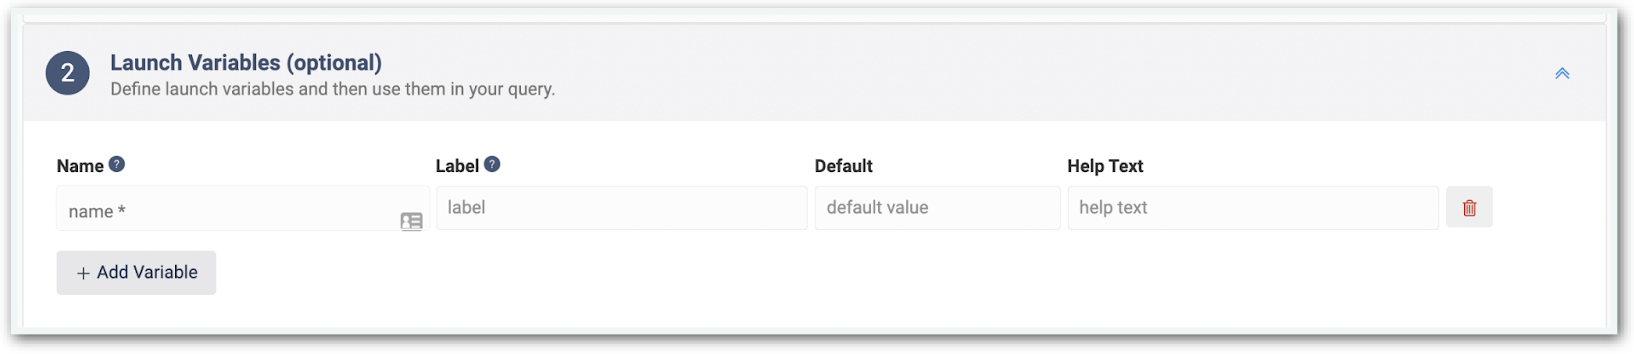
There is no limit to how many Data Variables can be created for an Audience. After creating a new Data Variable, populated the following fields:
- Name - The name of the Data Variable. This name does not support spaces. This is the name of the variable used within the SQL queries that run to the external datasource.
- Label - The front-end display name of the Data Variable. This may differ from the Name of the Data Variable if the Name of the variable is more technical and the Label needs to be more user-friendly.
- Default Value - A starting value for the Data Variable. Can be overwritten by Campaigns for use. If not overwritten, the Data Variable maintains the default value.
- Help Text - A helpful tip that displays with the Data Variable. The Help Text is shown when clicking on a help icon next to the Data Variable.
Create a Data Variable called “stateCode”. This Data Variable will be populated at Campaign Launch to allow a Marketer to dynamically change which records will be targeted.
To include Data Variables in the SQL statement, FreeMarker must be used.
For more information about FreeMarker, start with the Basics of FreeMarker Personalization.
When including the Data Variable in the Audience SQL, use the following format:
${Criteria.variableName}
Complete the Audience SQL statement with a WHERE clause. The full SQL for this example is below:
SELECT
 age, address, first_name, last_name, id,
 email AS EmailAddress, locale, profile_complete, state
FROM
 city_and_glory.customer
WHERE
 state = '${Criteria.stateCode}'
The purpose of this SQL statement is to allow a User to populate the stateCode when launching a Campaign for varying results.
Default Values
When using Data Variables in WHERE statements, considerations must be made about what happens if a User launching a Campaign does not populate the stateCode. One method of addressing this is to populate a default value for the Data Variable.
Without a default value populated, then the SQL statement, when rendered, would look like:
SELECT
 age, address, first_name, last_name, id,
 email AS EmailAddress, locale, profile_complete, state
FROM
 city_and_glory.customer
WHERE
 state = ''
In the case of this SQL statement, this won’t result in a very useful Audience, as it would only return records that do not have a state listed in their record.
FreeMarker IF Statements
Another approach to address Data Variables that are not updated is to surround the WHERE clause with FreeMarker IF statements.
The purpose of the IF statement is to detect whether the Data Variable is populated or if it is empty. If the Data Variable is populated, then the Data Variable is used within the WHERE clause. If the Data Variable is not populated, then it is ignored.
For more information on FreeMarker, start with the Basics of Personalization in MessageGears.
Below is an example of the FreeMarker statement surrounding the Data Variable:
SELECT
 age, address, first_name, last_name, id,
 email AS EmailAddress, locale, profile_complete, state
FROM
 City_and_glory.customer
<#if Criteria.stateCode?trim != ''>
WHERE
state = '${Criteria.stateCode}'
</#if>
The ?trim function is a method of determining if a value is null. Trim removes whitespace.
If the value of the Data Variable after being trimmed is an empty string, then the code within the IF statement will not run. If the value of the Data Variable after being trimmed is not an empty string (it contains a state code), then the code within the IF statement will run.
If the stateCode Data Variable is not populated, then the SQL statement will render as:
SELECT
 age, address, first_name, last_name, id,
 email AS EmailAddress, locale, profile_complete, state
FROM
 city_and_glory.customer
If the stateCode is populated with “GA”, then the SQL statement will render as:
SELECT
 age, address, first_name, last_name, id,
 email AS EmailAddress, locale, profile_complete, state
FROM
 city_and_glory.customer
WHERE
 state = 'GA'
Multiple IF statements can be included in the SQL statement if needed.
Below is an example of a FreeMarker statement surrounding a boolean Data Variable - note that the true or false condition needs to be treated as a string by surrounding it in double quotes:
SELECT
 age, address, first_name, last_name, id,
 email AS EmailAddress, locale, profile_complete, state
FROM
 City_and_glory.customer
<#if Criteria.Georgia == "true">
WHERE
 state = 'GA'
</#if>
Populating Data Variables in Campaigns
In order to take advantage of Data Variables, they must be populated within a Campaign.
Open a new Campaign or edit an existing Campaign. The Who card will display available Data Variables. If any variables have default values, those will auto-populate.
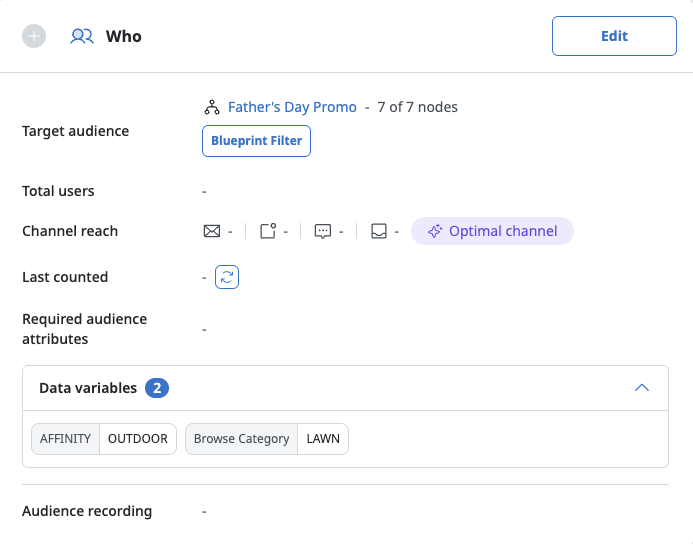
Data Variables can be modified by opening the Who card. Variables with mapped list values, such as dynamic lists, will have dropdowns showing the available values to select.
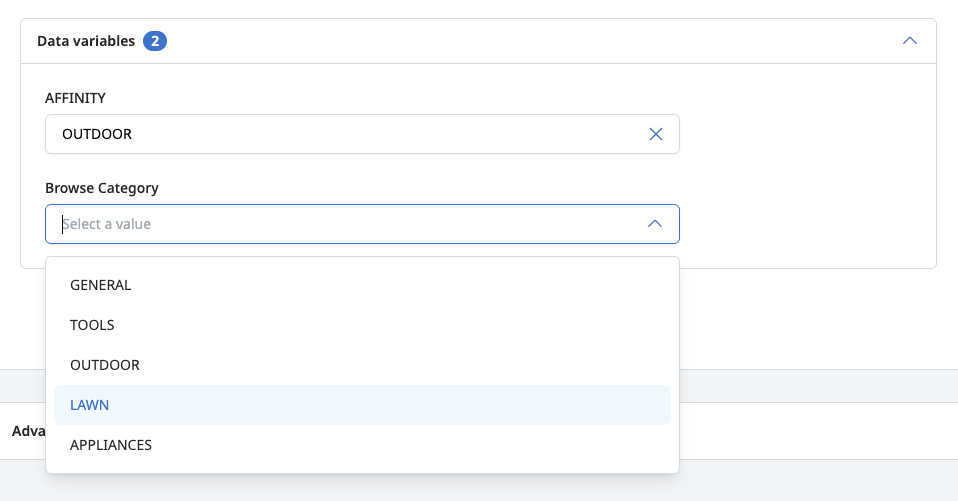
After populating the Data Variables, it is important to review that the Templates are rendering correctly and Recipient Data is returned by the Audience successfully.
It is important that the users Launching Campaigns are aware of the importance of Data Variables.
Dynamic Lists
The Data Variables described above hold a single, manually-entered value. A Dynamic List is a Global Data Variable type that instead holds a set of values produced by a query and refreshed automatically against your source of truth. This removes the need to maintain static, one-off lists that go stale as data changes — for example, the current set of loyalty tiers, the SKUs in a declining-performance segment, or a machine-learning-driven target list.
Because a Dynamic List is a Global Variable, it is defined once in the Admin section and can then be reused across Audiences, Blueprints, and Supplemental Data. Any update to the list is reflected everywhere it is used.
Creating a Dynamic List
Dynamic Lists are created in the Admin section alongside the other Global Variables. For the general steps to reach and add a Global Variable, see Global Variables.
-
In the Admin section, open Global variables and click Add variable.
-
Set Data input to the Dynamic list type.
-
Configure the variable details: Name (how it is referenced in the data definition — alphanumeric and underscores only), Label, optional Help text, and a Default value.
-
Choose the Database connection the list should query. The Database Explorer panel can be used to browse catalogs, schemas, tables, and columns.
-
In the SQL query editor, write the query that returns the list of values. The query must return a single column, and the result set must fall within the configured row limit.
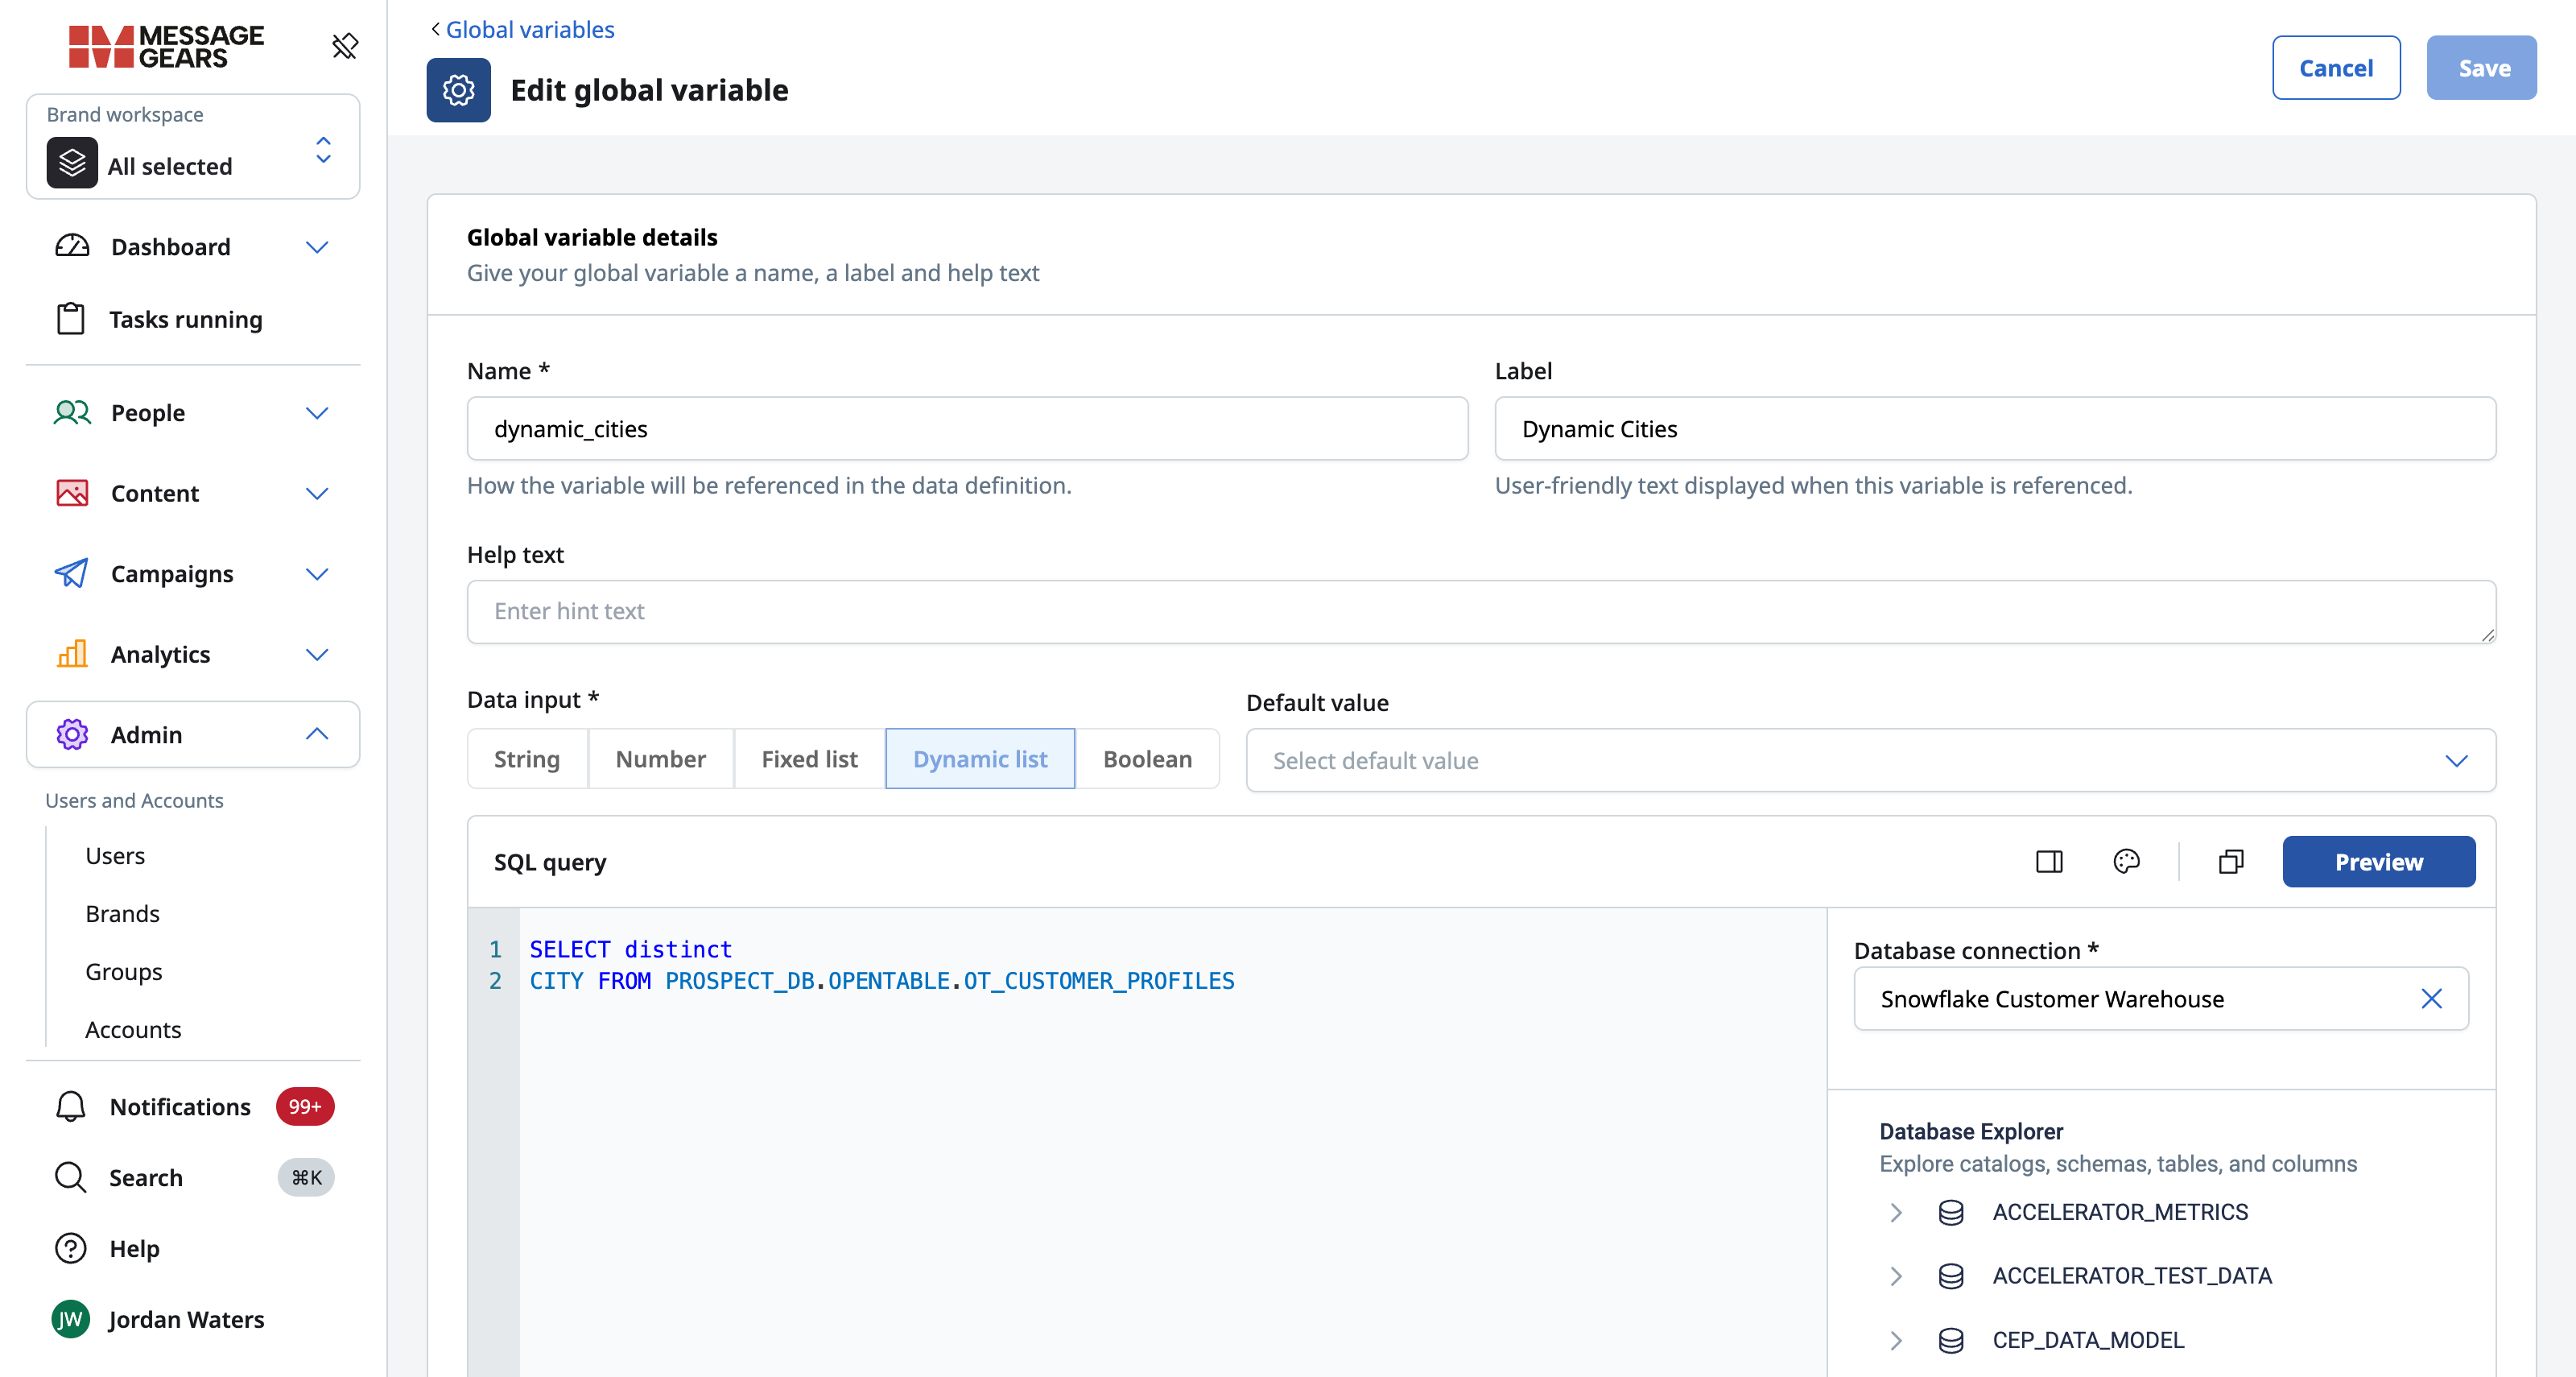
-
Click Preview to run the query and confirm the results before saving. Preview validates the result and surfaces errors such as too many rows, more than one column, or an empty result. The Preview results panel shows the returned column, row count, and query duration.
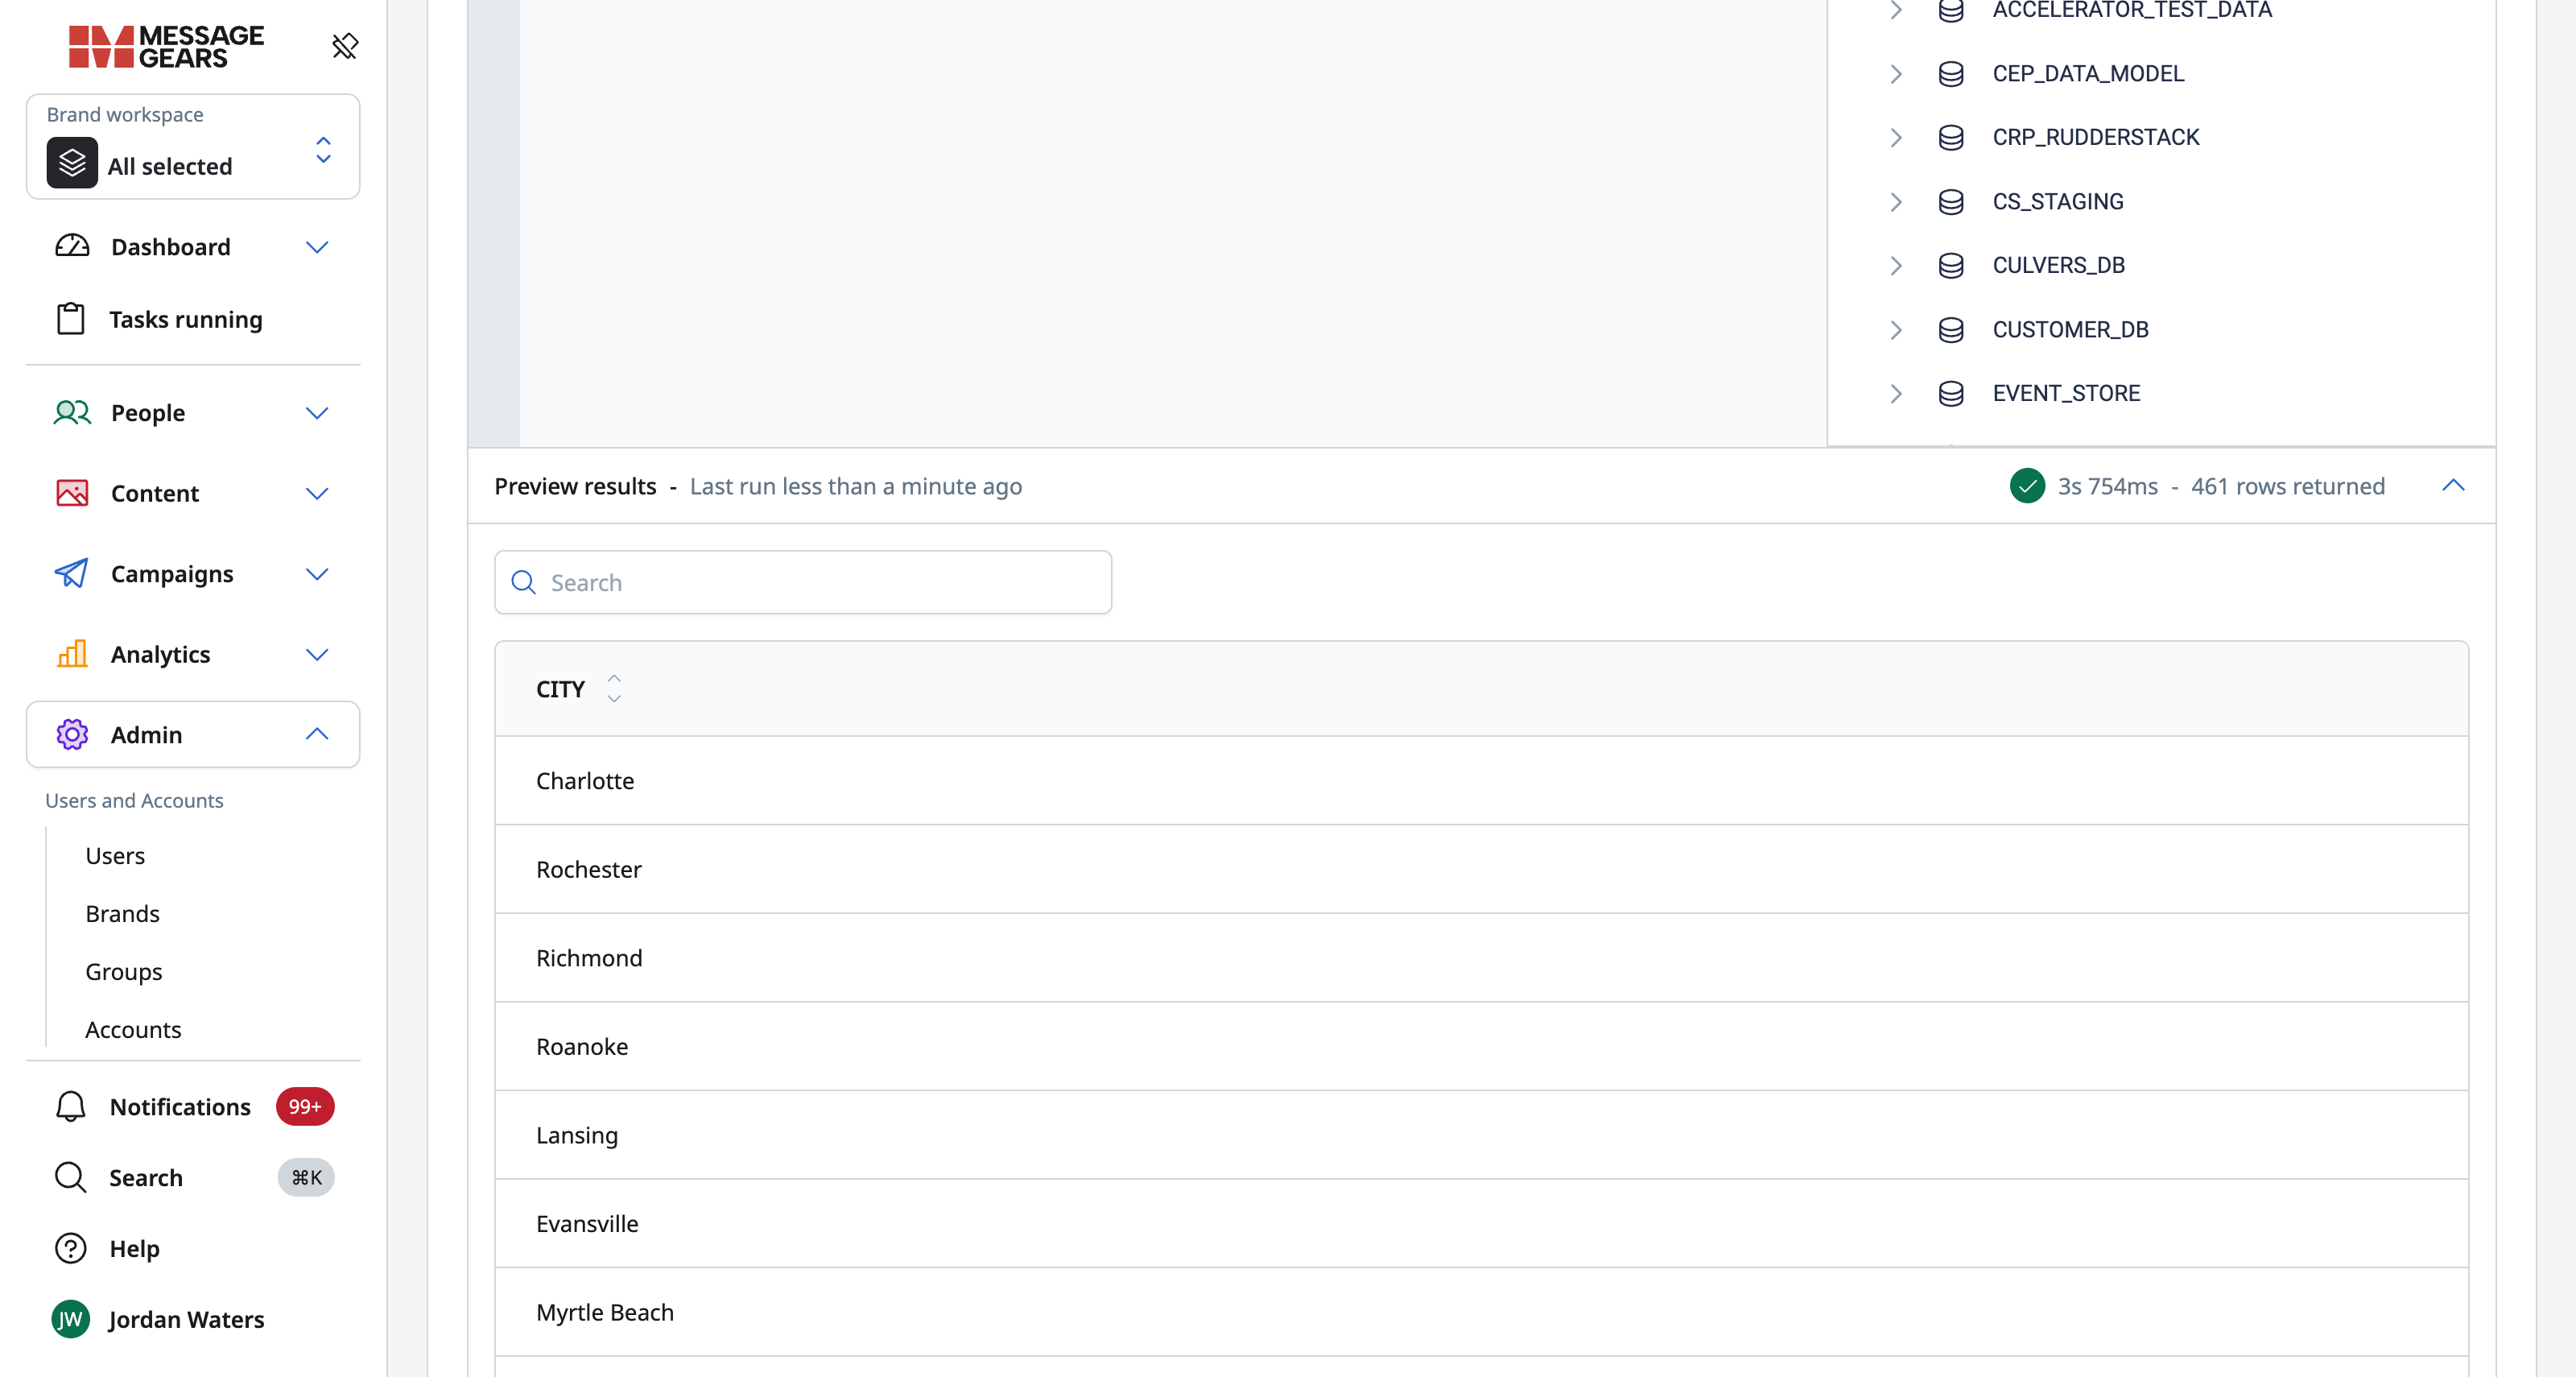
-
Save the variable.
Refreshing and monitoring a Dynamic List
- Refresh schedule — set a cadence so the list refreshes automatically against the latest data.
- Manual refresh — rerun the query and save at any time to update the list on demand.
- Failure handling — if a refresh fails, the last successful list remains in use so campaigns are not left with an empty list. Error notifications are sent to the designated recipients, and success notifications can optionally be enabled.
- Current state — you can view a variable's current state, including the values currently available in the list.
- Audit log — an audit log records the refresh history, each refresh's status, and the reason for any failure.
Using Dynamic Lists in Blueprints
A Dynamic List can be used in a Blueprint the same way any Global Data Variable is used in a Blueprint evaluation: as a placeholder that resolves to its current value(s) when the Blueprint runs. The difference is that the value is the up-to-date list produced by the most recent refresh, so the Blueprint always evaluates against current data without anyone editing the Blueprint.
Associating a Dynamic List with a Blueprint
Using a Dynamic List in a Blueprint is a two-step process: first associate the Global Variable with the Blueprint, then map a column from the SQL query to it.
-
Open or create a Blueprint (People > Blueprints). For how to build Nodes and Segments, see Blueprints for Campaign Segmentation.
-
Open the Data Settings tab, below the SQL input window.
-
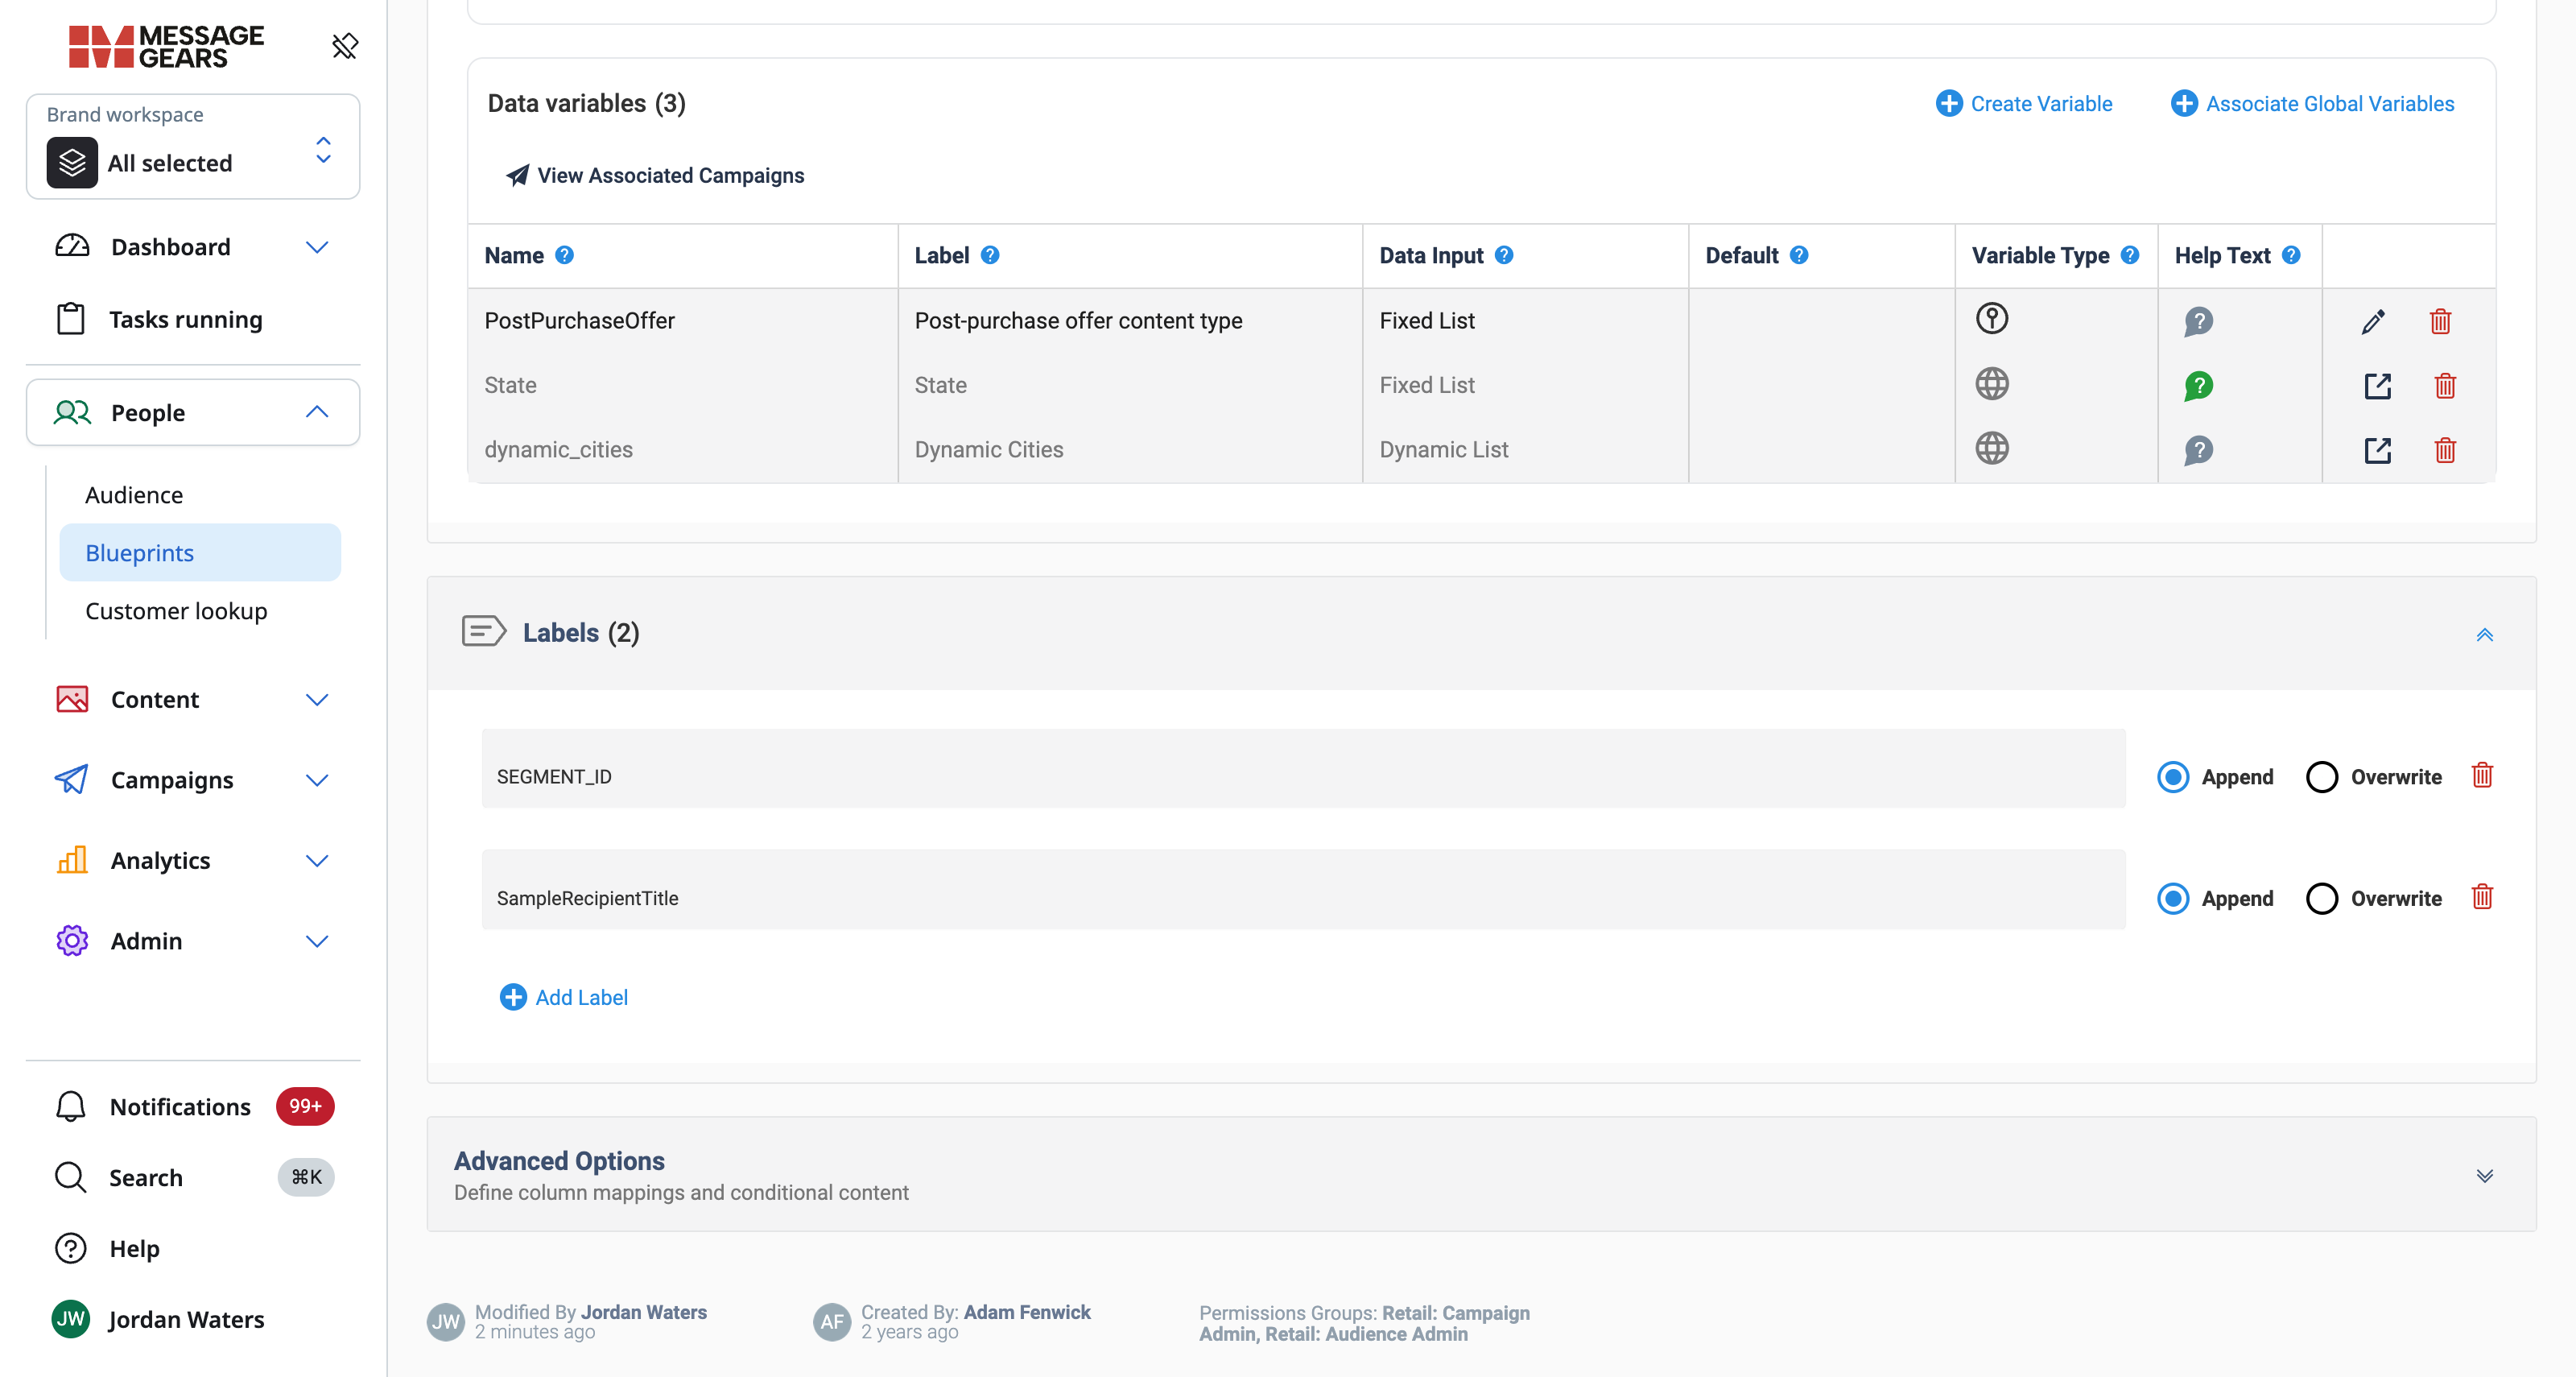
In the Data variables section, click + Associate Global Variables and select the Dynamic List. Once associated, the variable appears in the Data variables table with its Data Input shown as Dynamic List.
If the Blueprint is built on a separate SQL Audience, associate the variable on that Audience instead of on the Blueprint.
-
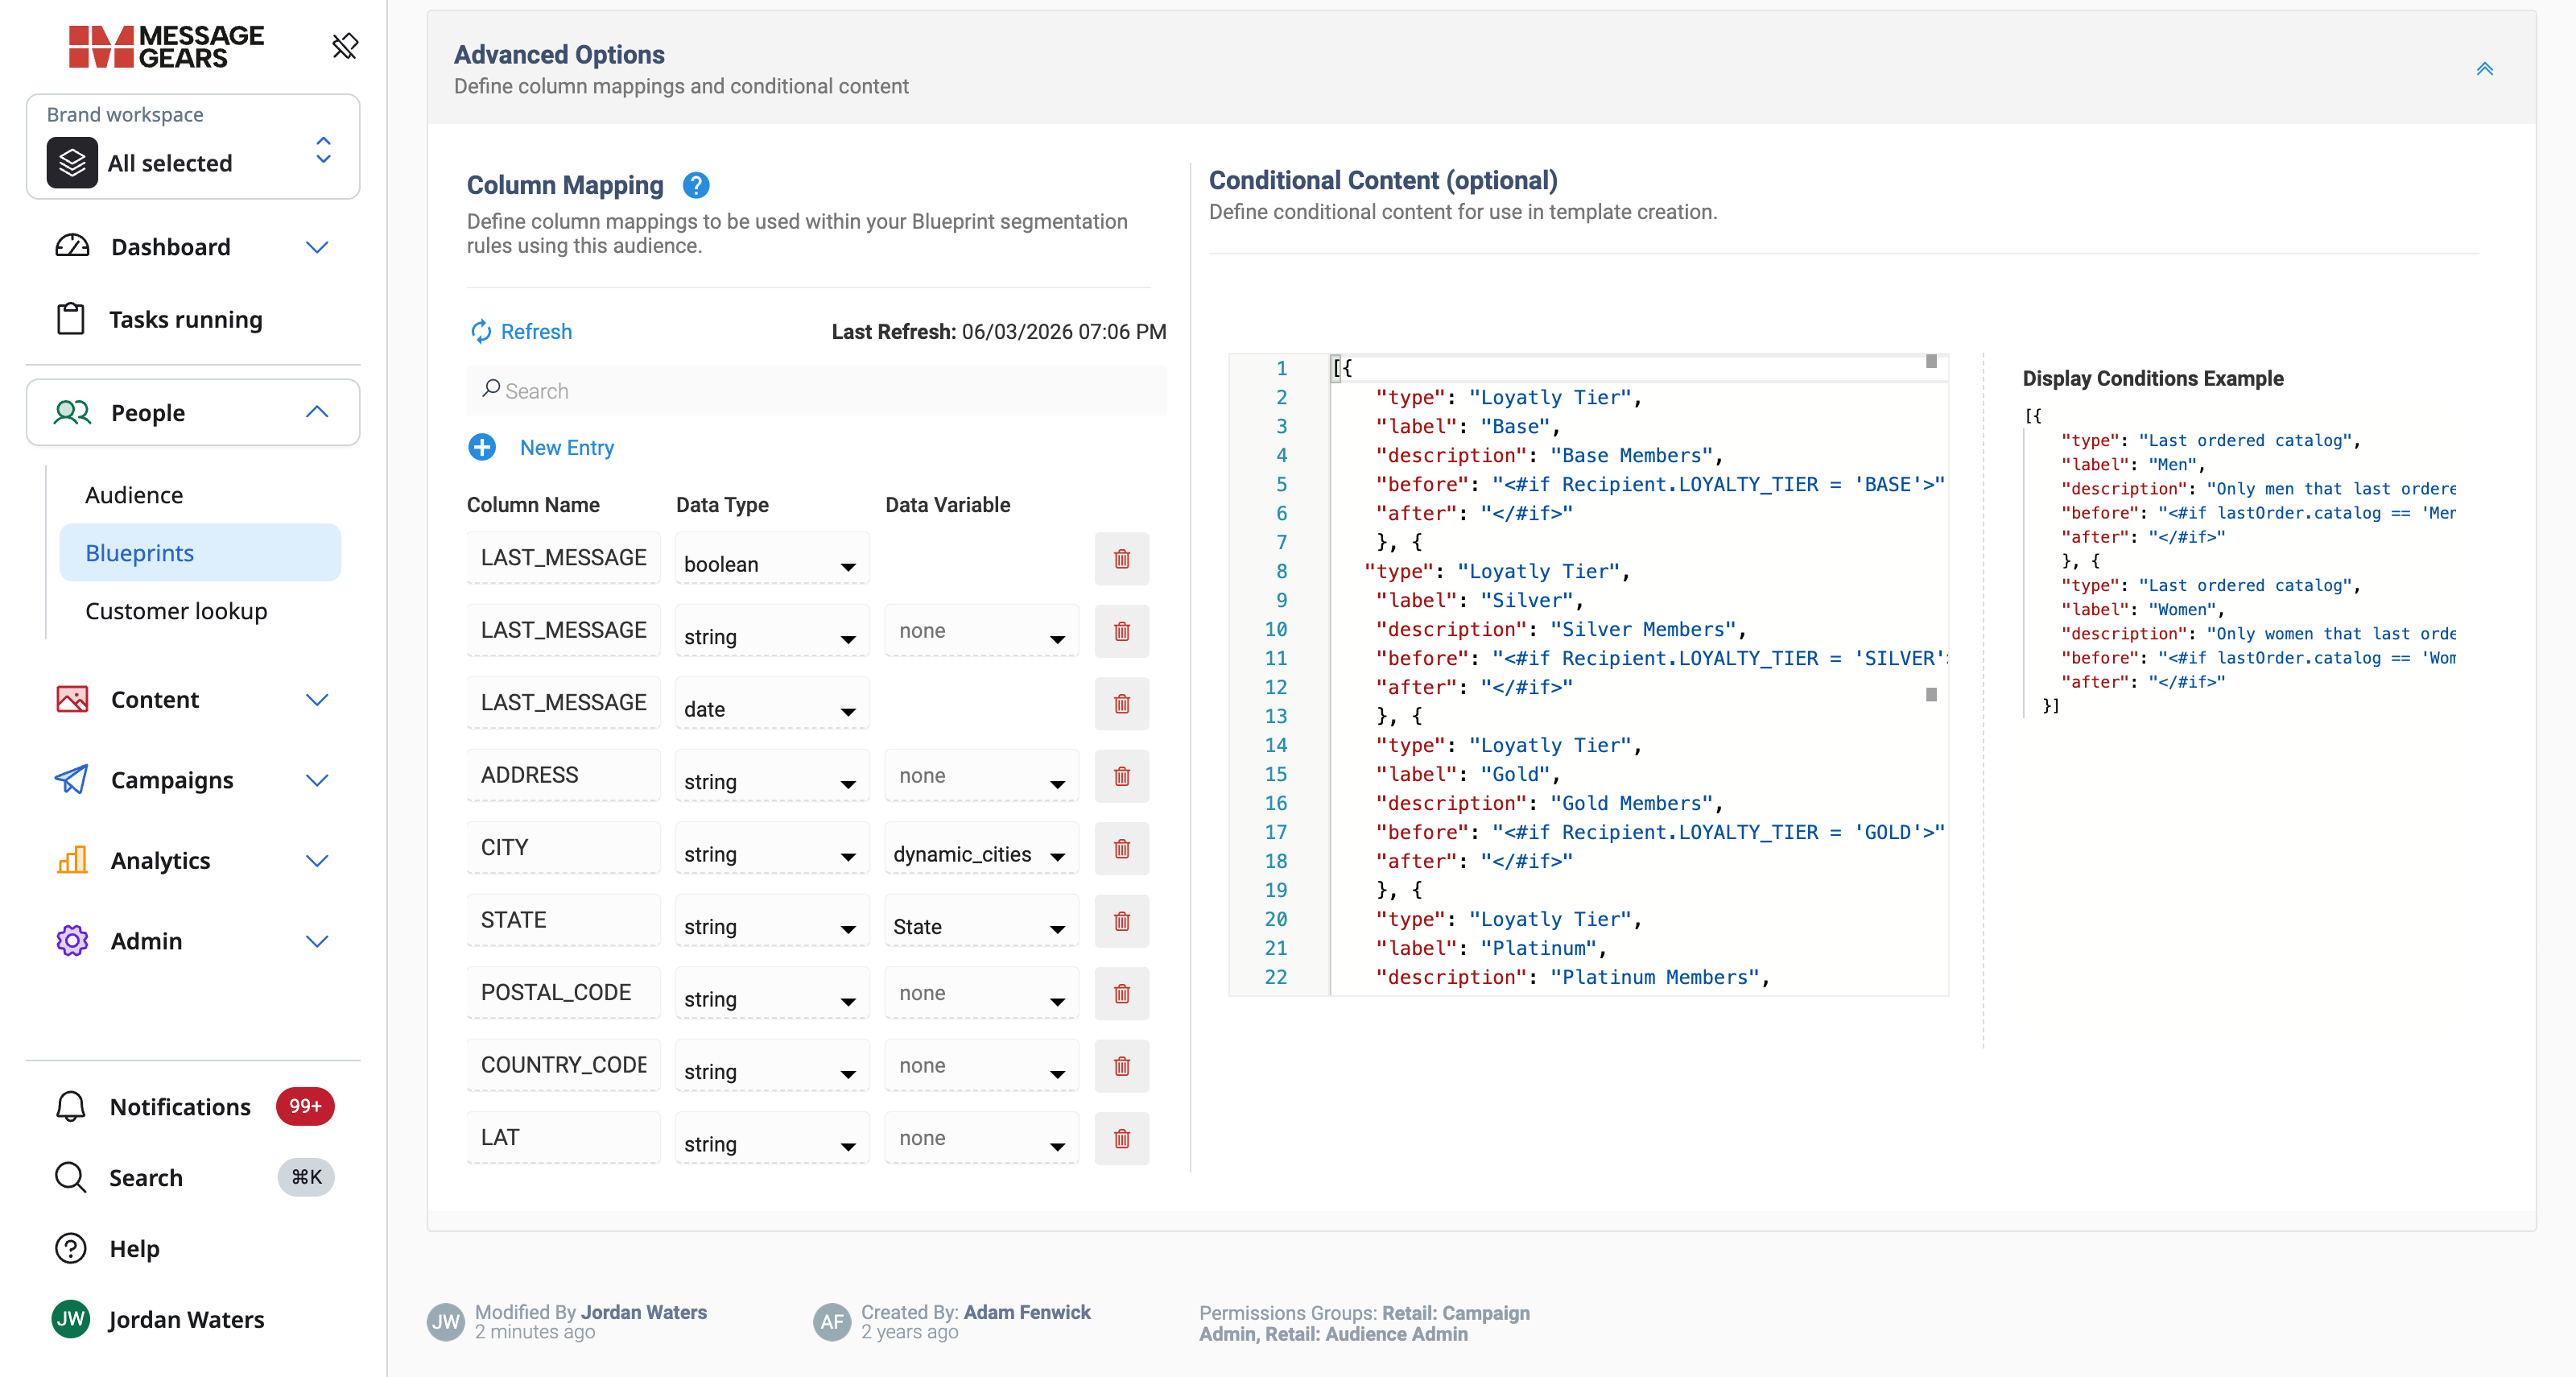
Scroll down and expand the Advanced Options section of the Data Settings tab.
-
In the Column Mapping table, find the column from your SQL query whose values should be matched against the list, and select the Dynamic List in that column's Data Variable dropdown. If the columns from your query are not listed, click Refresh to re-detect them.
-
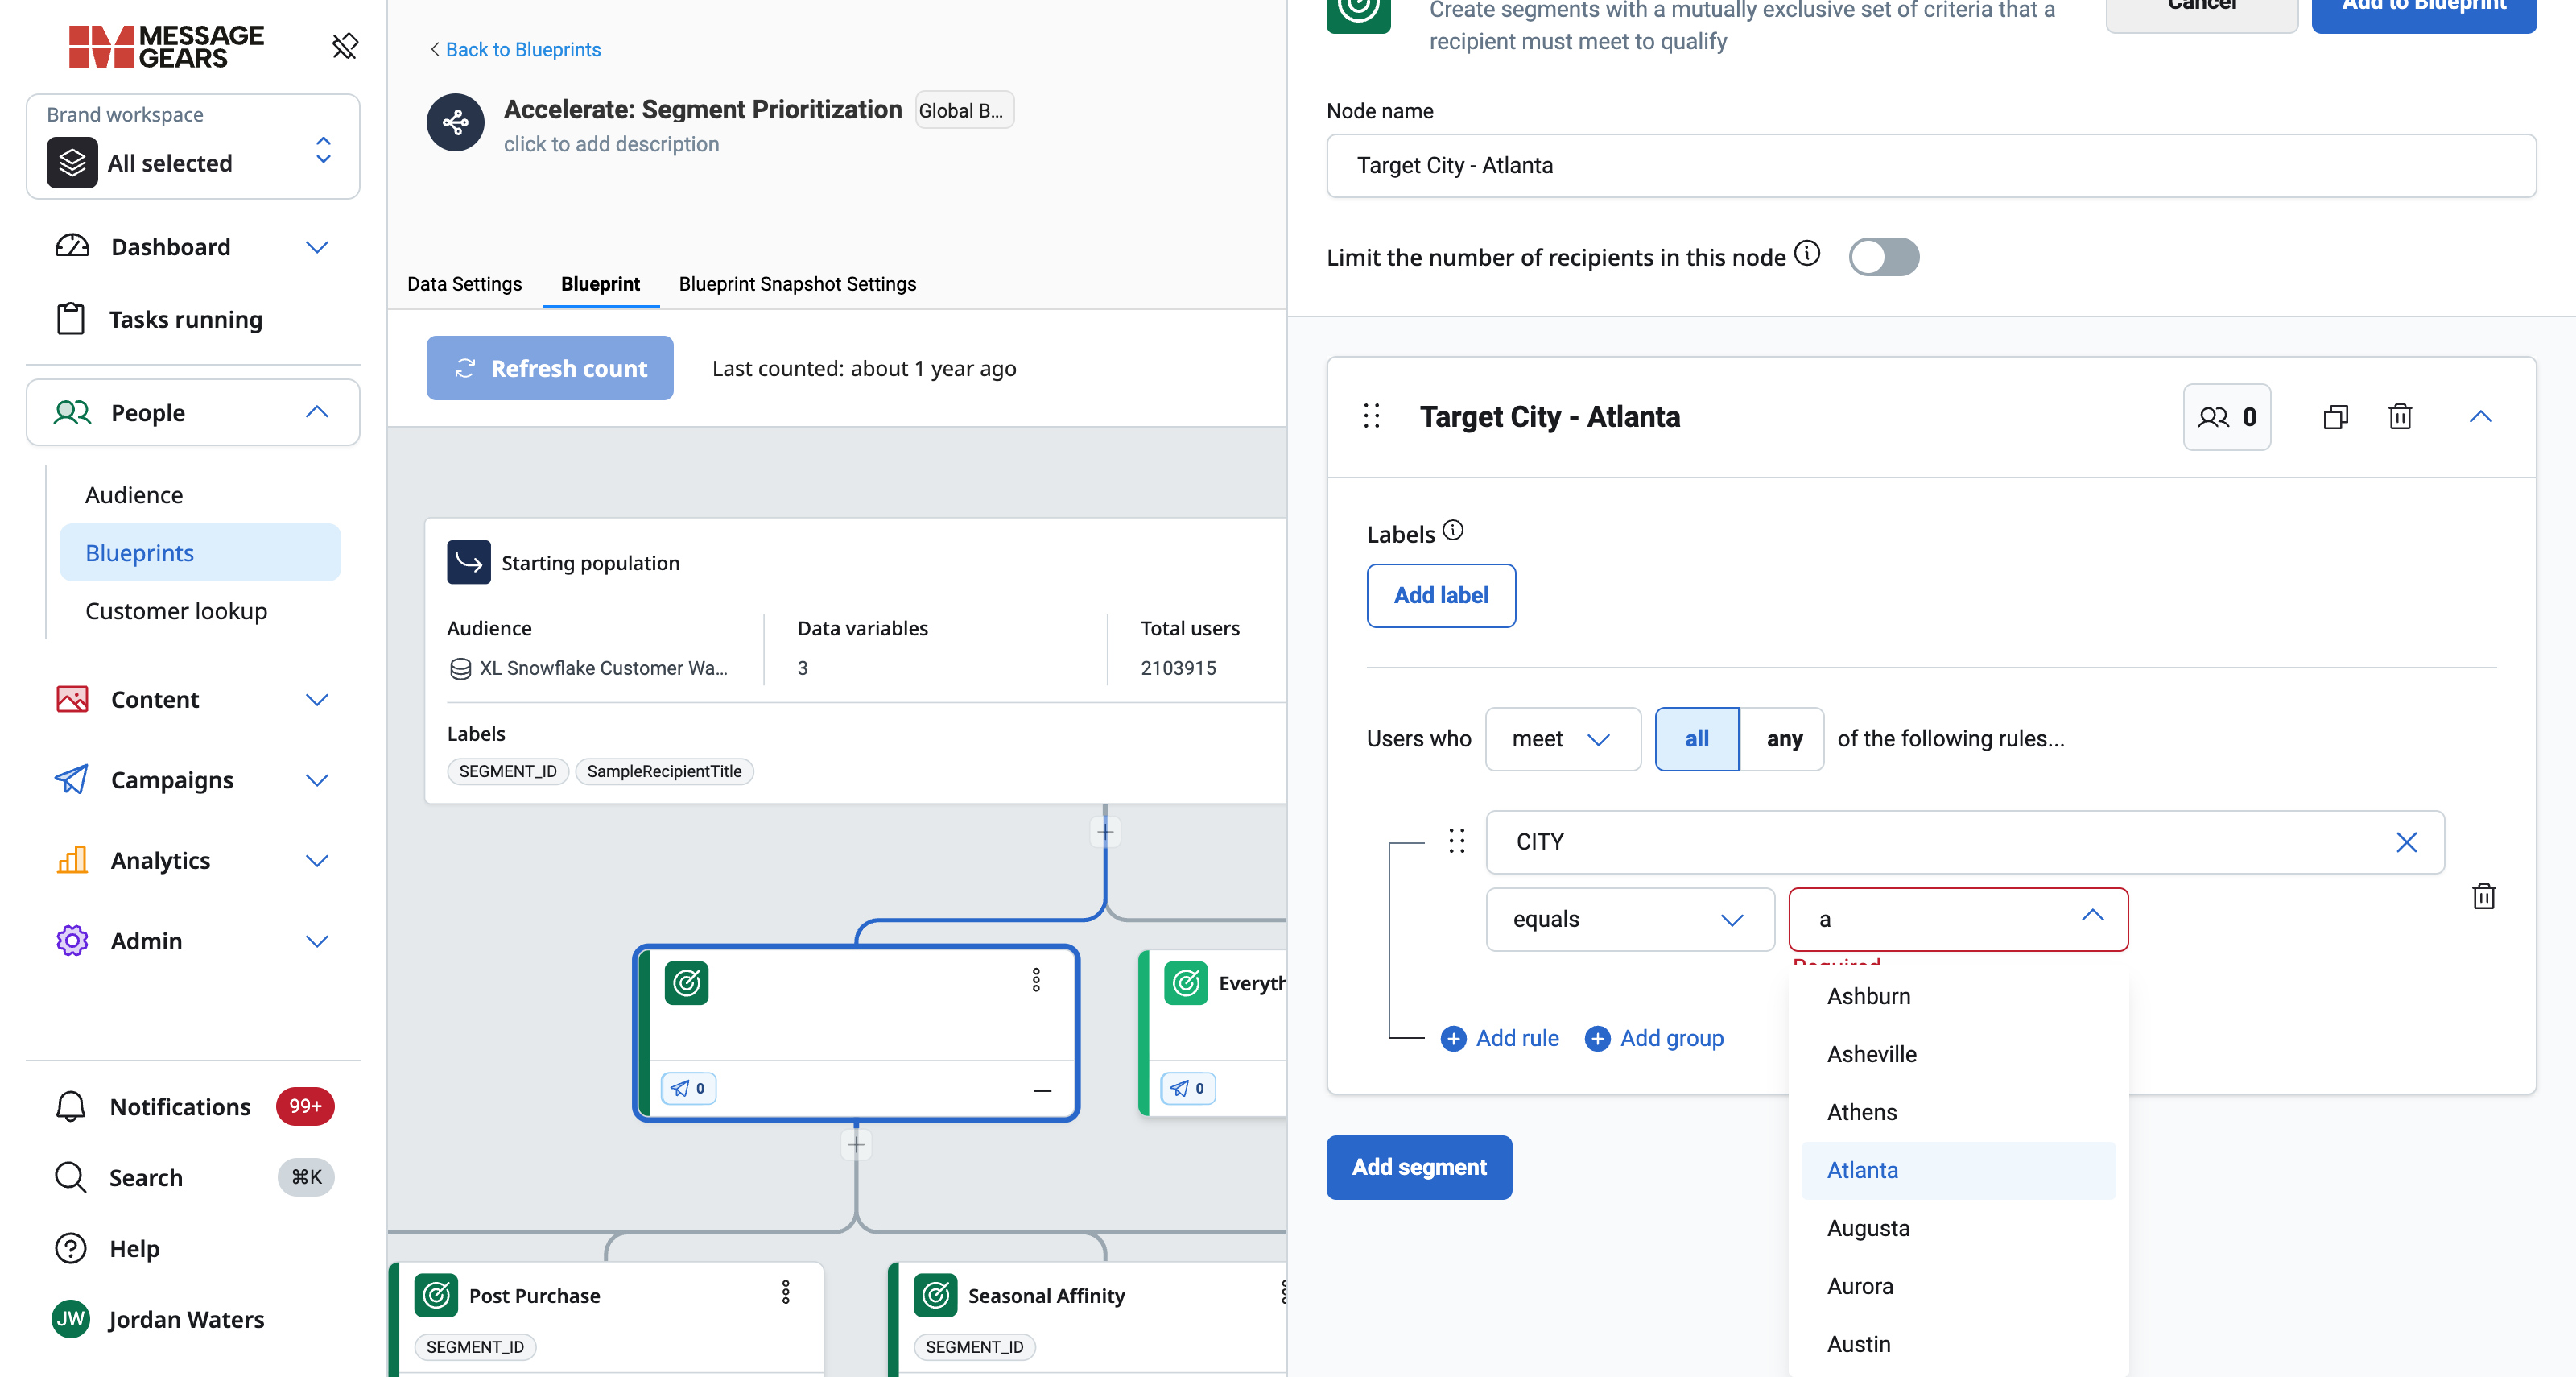
With the column mapped, the Dynamic List values are available when building Segment conditions. On the Blueprint tab, add a Target Node and create a rule on the mapped column — the value dropdown is populated with the current values from the Dynamic List. Start typing to filter the list and select a value.
-
Save the Blueprint. Click Refresh on the Blueprint to see the record counts each Node receives, and use Preview Blueprint to confirm records are routed as expected. Save before previewing.
Whenever the Dynamic List refreshes, Blueprints that reference it pick up the new values on their next execution — there is no need to re-edit the Blueprint.
Setting a Dynamic List value at a specific Blueprint level
Blueprints can be chained, and you may want a child Blueprint to evaluate against a different value than its parent. You can set the default value of a data variable (including a Dynamic List) at any level in a Blueprint chain.
- The value you set at a given level is used when previewing that child Blueprint and overrides whatever the parent Blueprint has set.
- This lets each Blueprint in the chain carry its own default for campaign execution, previewing, and Blueprint Snapshot building, and lets different levels evaluate against different Data Variable values.
- To go back to inheriting the parent's value, revert the level to use the parent's value as its default.
This override applies to the value used for preview, campaign overrides, and Blueprint Snapshot building.