Accelerator 25.1.1 release notes
Initiatives Released
Marketing Campaign Refresh
We’ve reimagined the Marketing campaign experience to make bulk messaging faster and more seamless than ever. The new Overview page streamlines campaign setup with three clear sections - Who, What, and When - so you can configure and review every detail with precision. This update enhances workflow efficiency by incorporating channel and push app selection into the creation workflow, simplifying template and audience selection later. A template preview now appears upon selection, so marketers can confirm their choice instantly. Additionally, recurring schedules now support minute, hourly, and monthly intervals, and display the next 10 launch times for added clarity and confidence prior to launch.
The new Marketing campaign experience is currently behind a feature flag while we wrap up some final polish on the functionality. If you would like to be an early adopter of the new UI you can have a technical resource to enable it by following the steps below. Please reach out to the MessageGears CS team should you have any questions or need assistance enabling it.1. In the accelerator config dir, set the accel.feature.ui.marketing.overview=true parameter
➜ cd /opt/messagegears/conf
➜ echo "accel.feature.ui.marketing.overview=true" >> features.properties
- Restart Accelerator
Goals
- Update the UI for Marketing Campaigns, introducing new Overview page and settings
- Improve template and audience selection via channel filtering
- Support new recurrence options and launch schedule display
- Add un-rendered content preview to help with template review
Capabilities
Channel selection
Marketers can specify their campaign’s channel(s) while in the campaign creation workflow. If the Accelerator instance only supports a single channel, that channel is automatically selected. Selecting Multi-channel allows for selecting any combination of Email, Push, and SMS channels. If the Push channel is selected, the push apps are made available for selection.
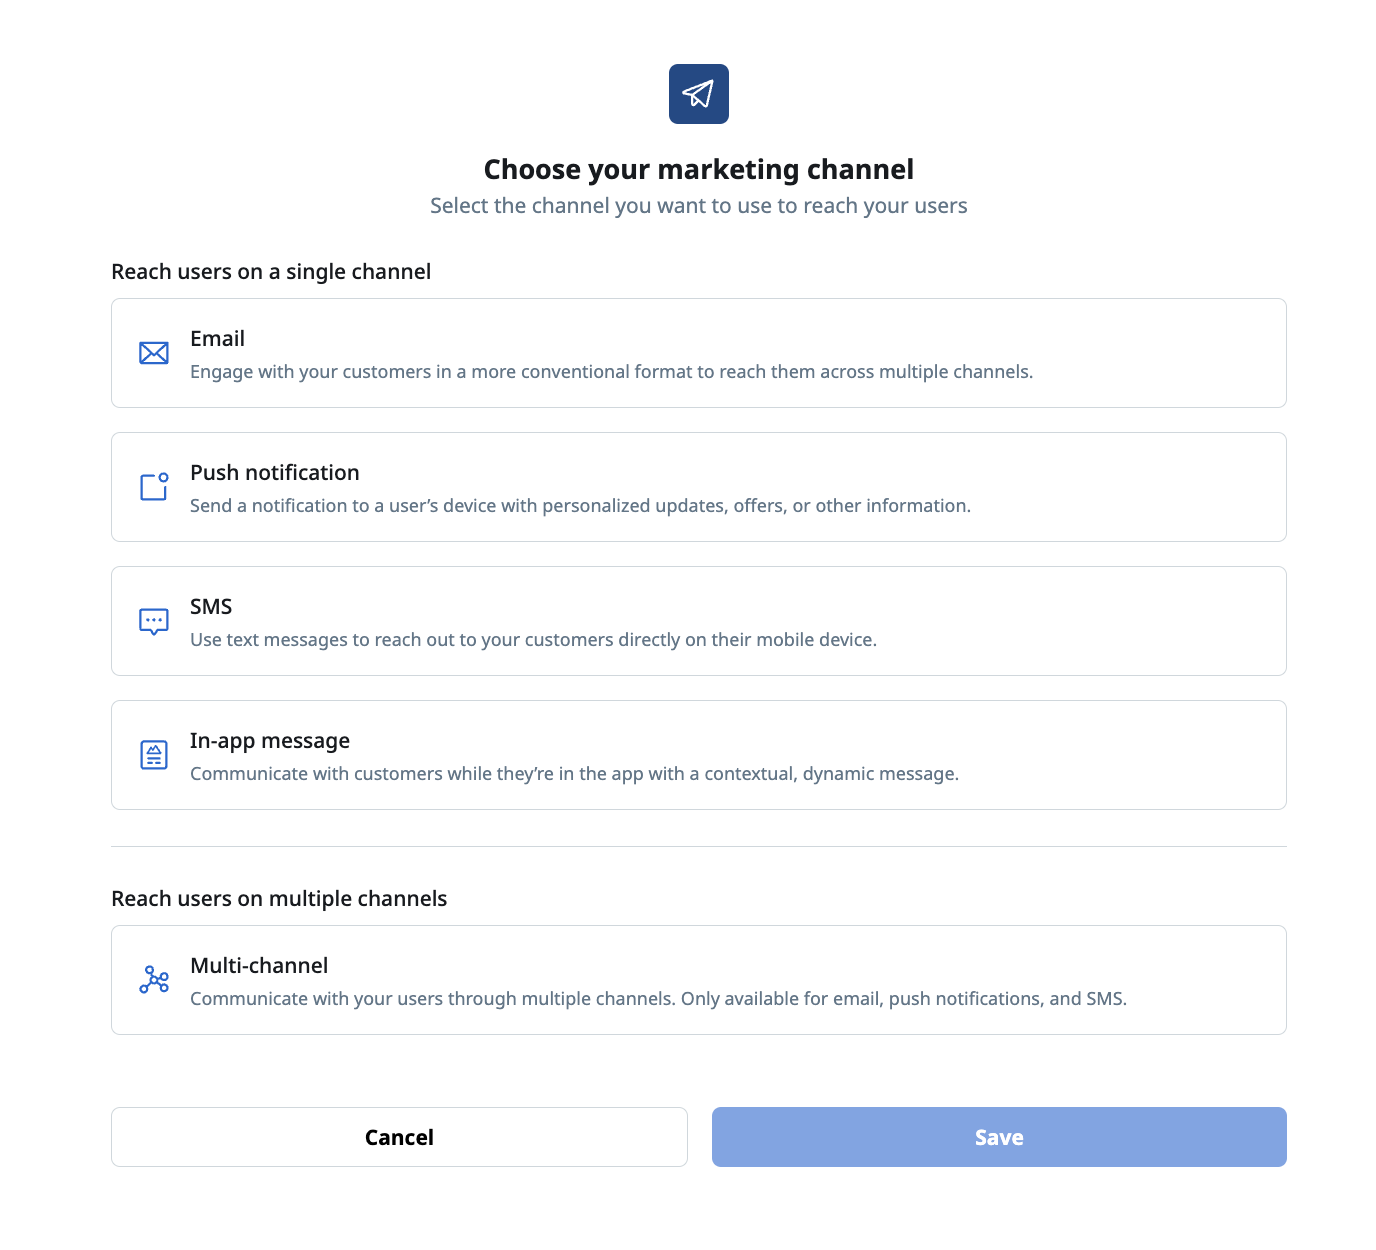
New campaign creation flow allows for channel selection up front
Campaign Overview
After saving the campaign, marketers are directed to the new Campaign Overview page. The Campaign settings are organized into distinct cards - Who, What, When, (and Advanced) - to guide you through building your campaign. You must complete the Whoand What sections before you can test, launch, or schedule your campaign through the When section.
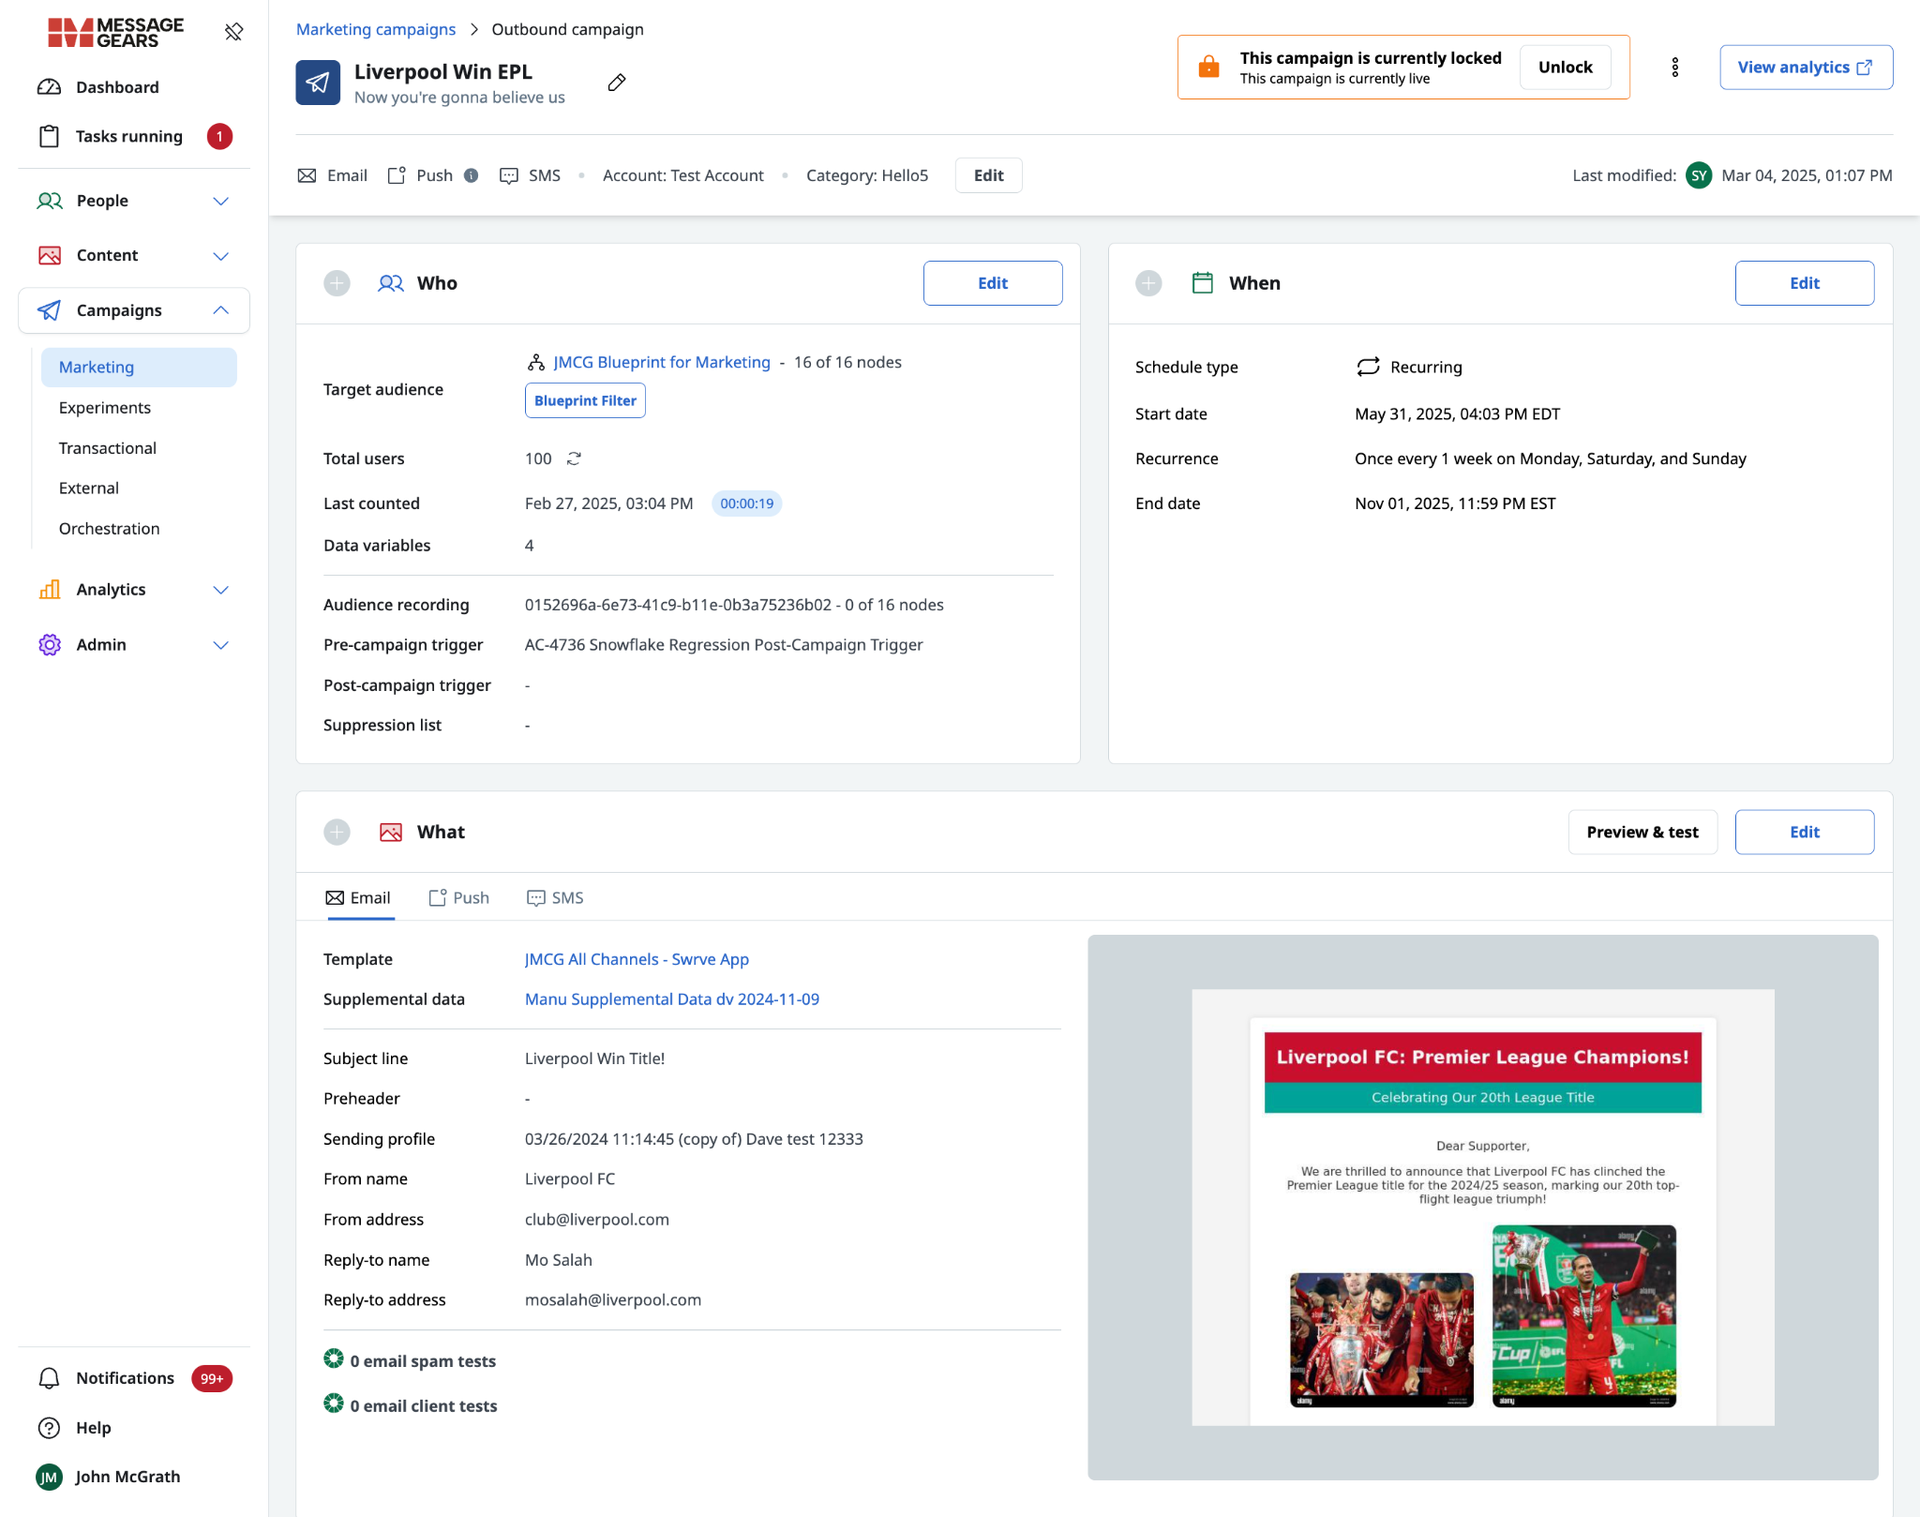
New Overview page organizes campaign settings into distinct sections
Campaign Content
The What card shows all the information about the campaign's content, including the header details, template name, supplemental data, and an unrendered preview. In Multi-channel campaigns, a distinct tab is shown for each channel.
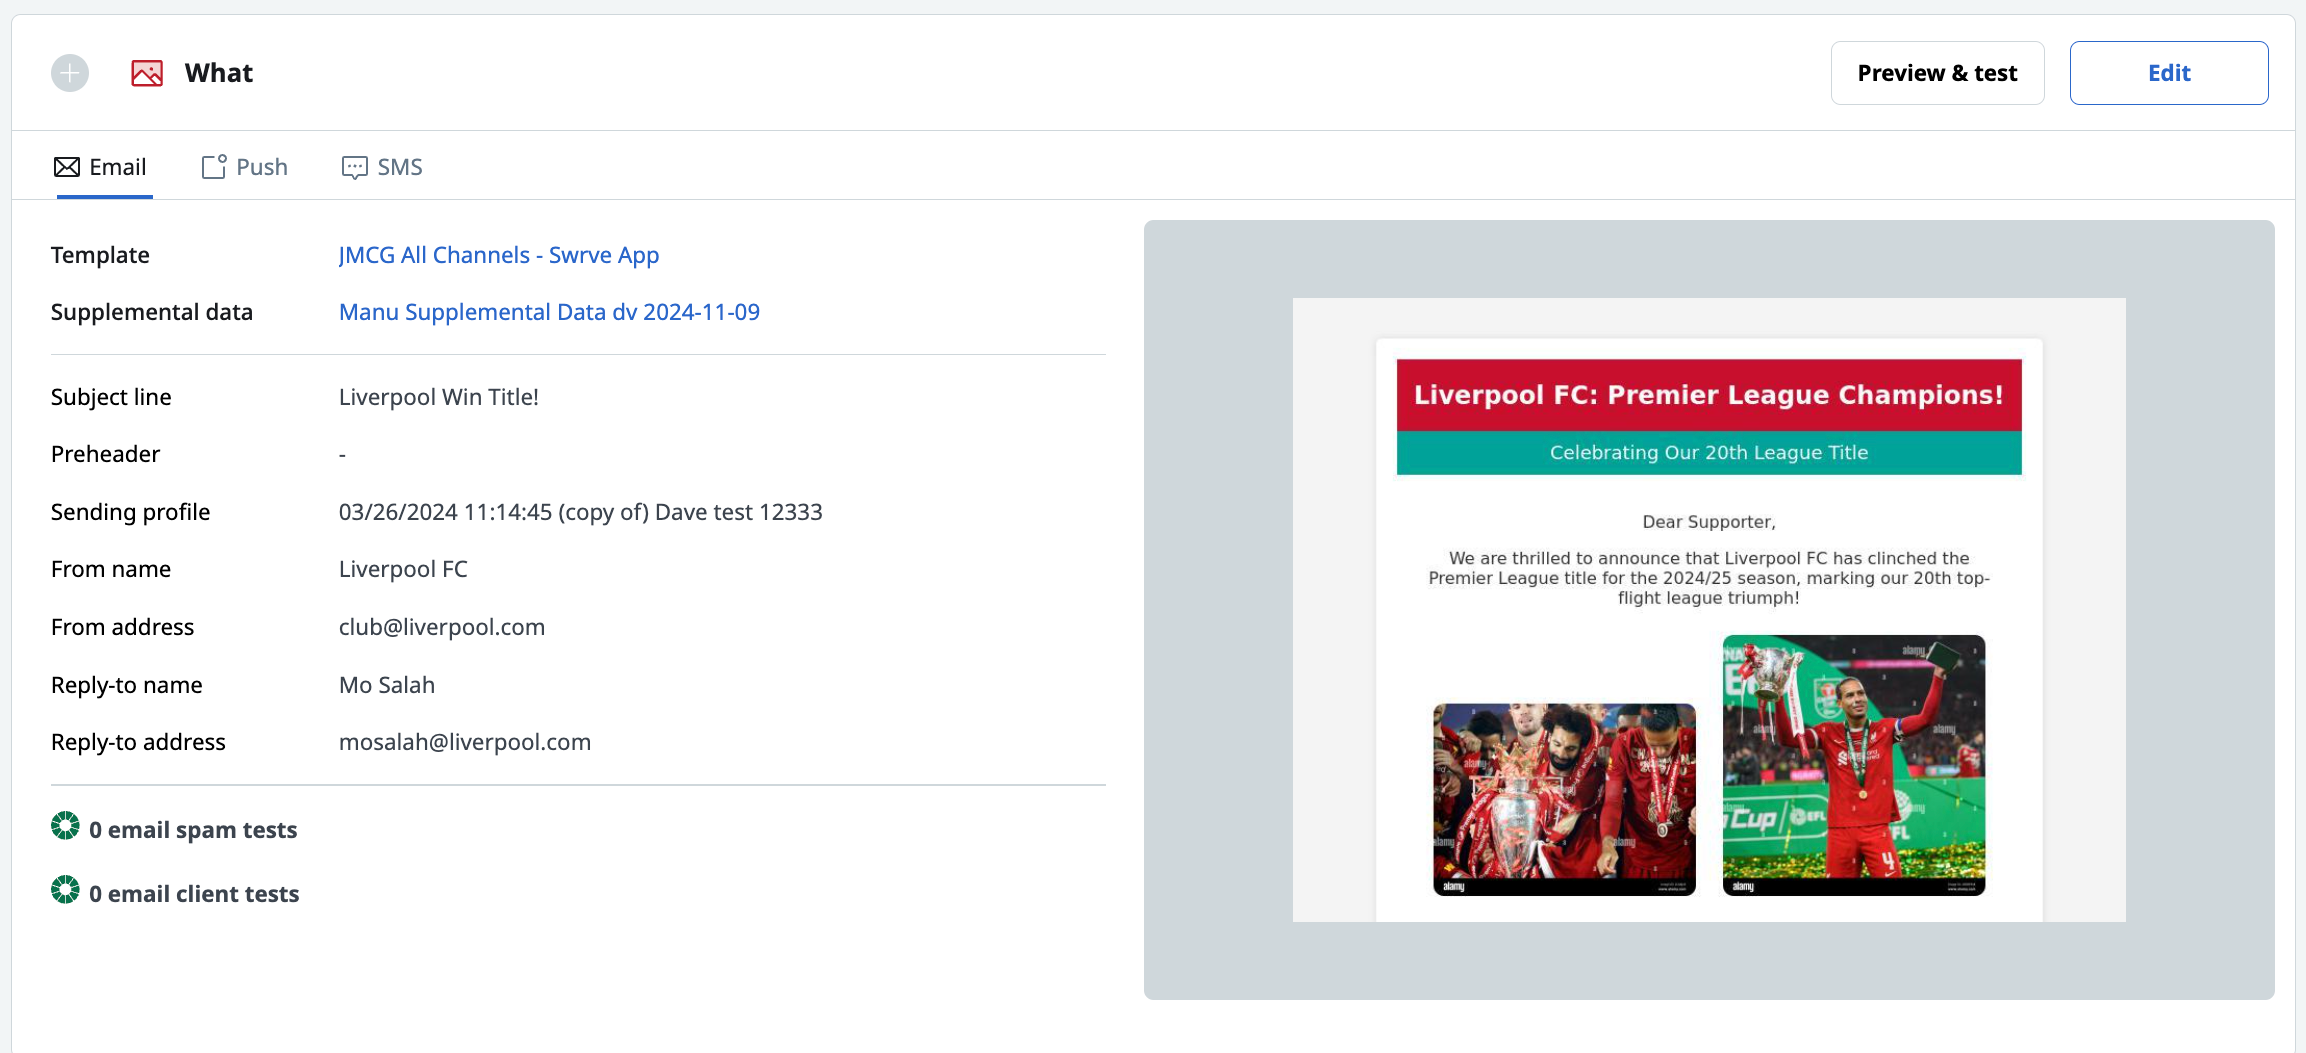
The "What" card displays the template details and preview
Clicking “Add” or “Edit” opens up the What modal, where the marketer can define the content settings:
- Template (pre-filtered based on campaign’s channels)
- Supplemental data
- Data variables
- Subject line
- Preheader
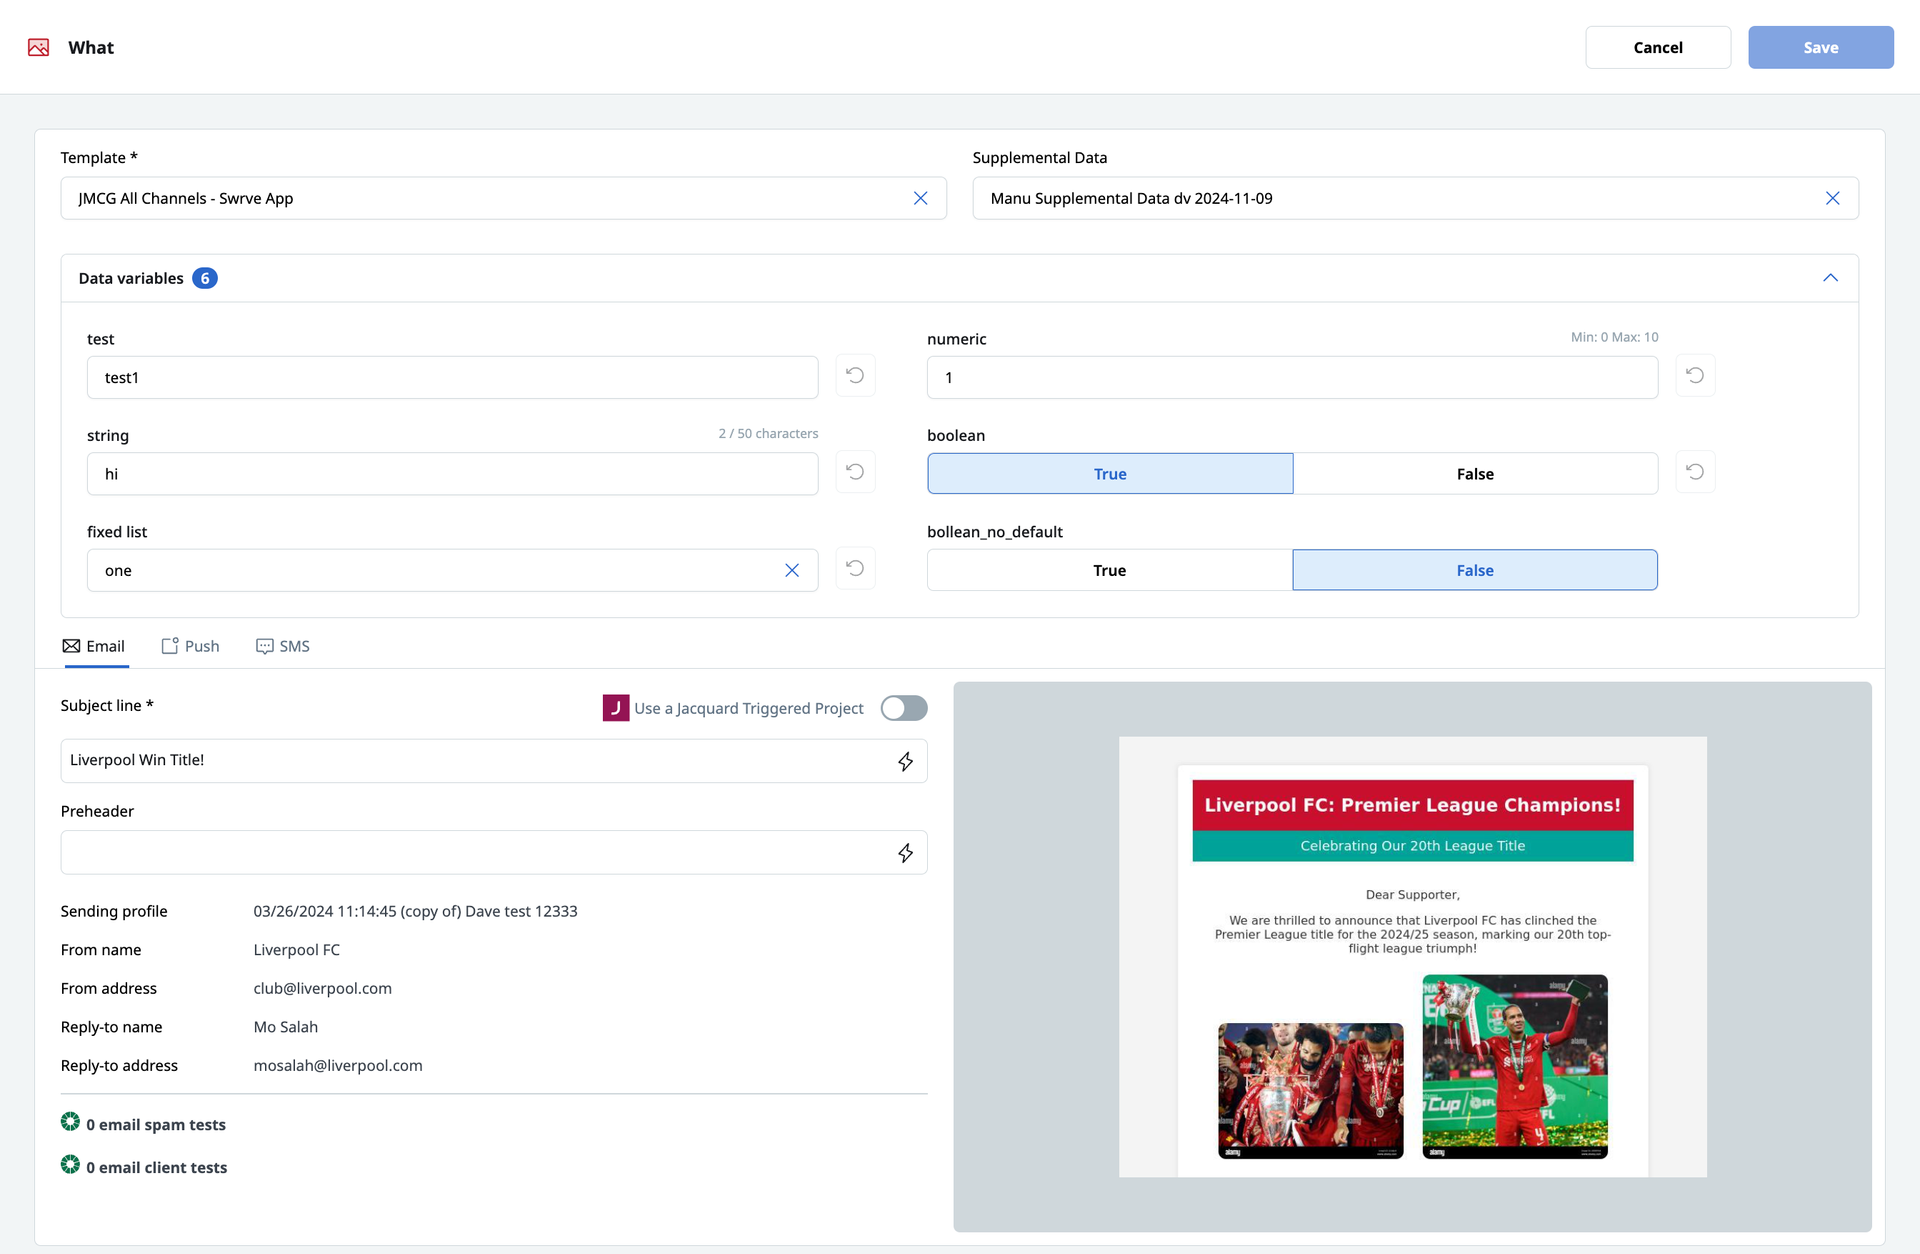
New "What" section contains all the campaign's content settings
Campaign Audience
The Who card shows the campaign’s audience settings, including:
- Target audience
- Total users
- Last counted timestamp + query time
- Data variables
- Blueprint Filters button
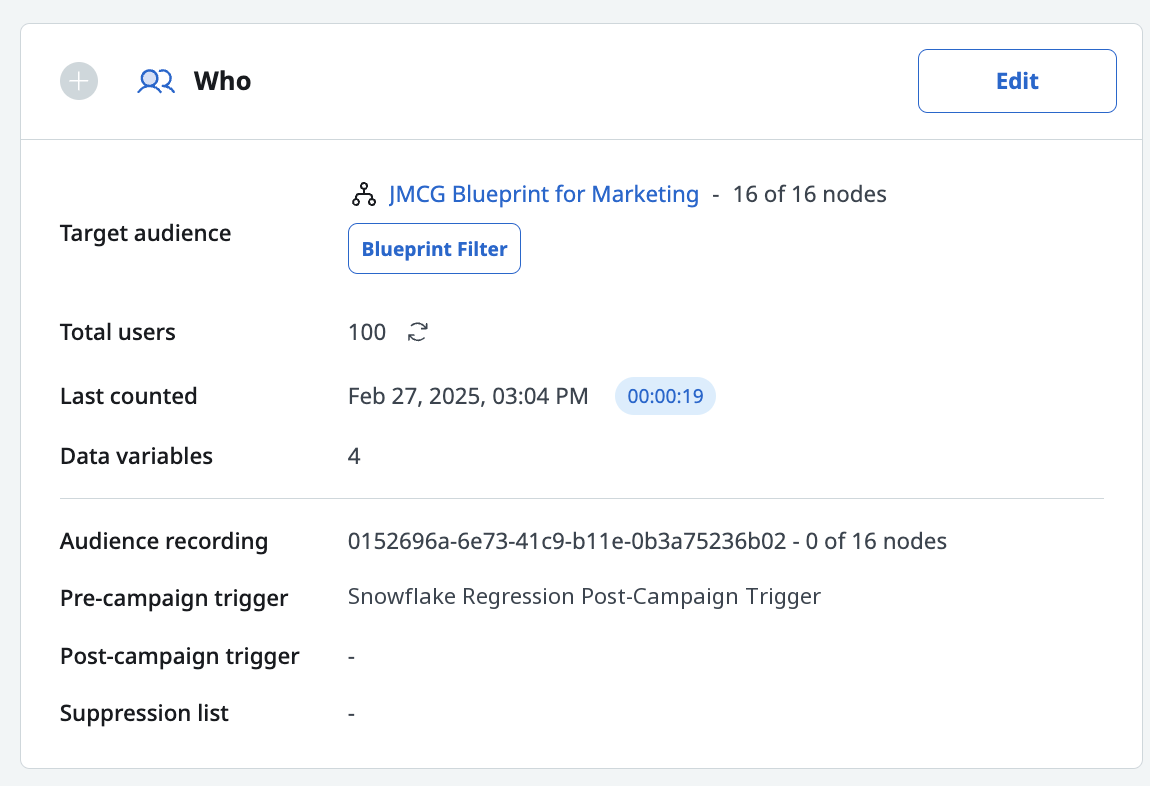
The "Who" card displays the audience and campaign trigger details
Clicking “Add” or “Edit” opens the Who modal, where the marketer can define the campaign’s audience criteria. Marketing campaigns targeting Email, Push, or SMS support two audience types:
- Audience or Blueprint
- User lists
Audience or Blueprint
After selecting a Target audience or Blueprint, refreshing the audience the count returns the total number of recipients and recipients per channel. If the Audience or Blueprint contains data variables, they are surfaced in the Data variables section.
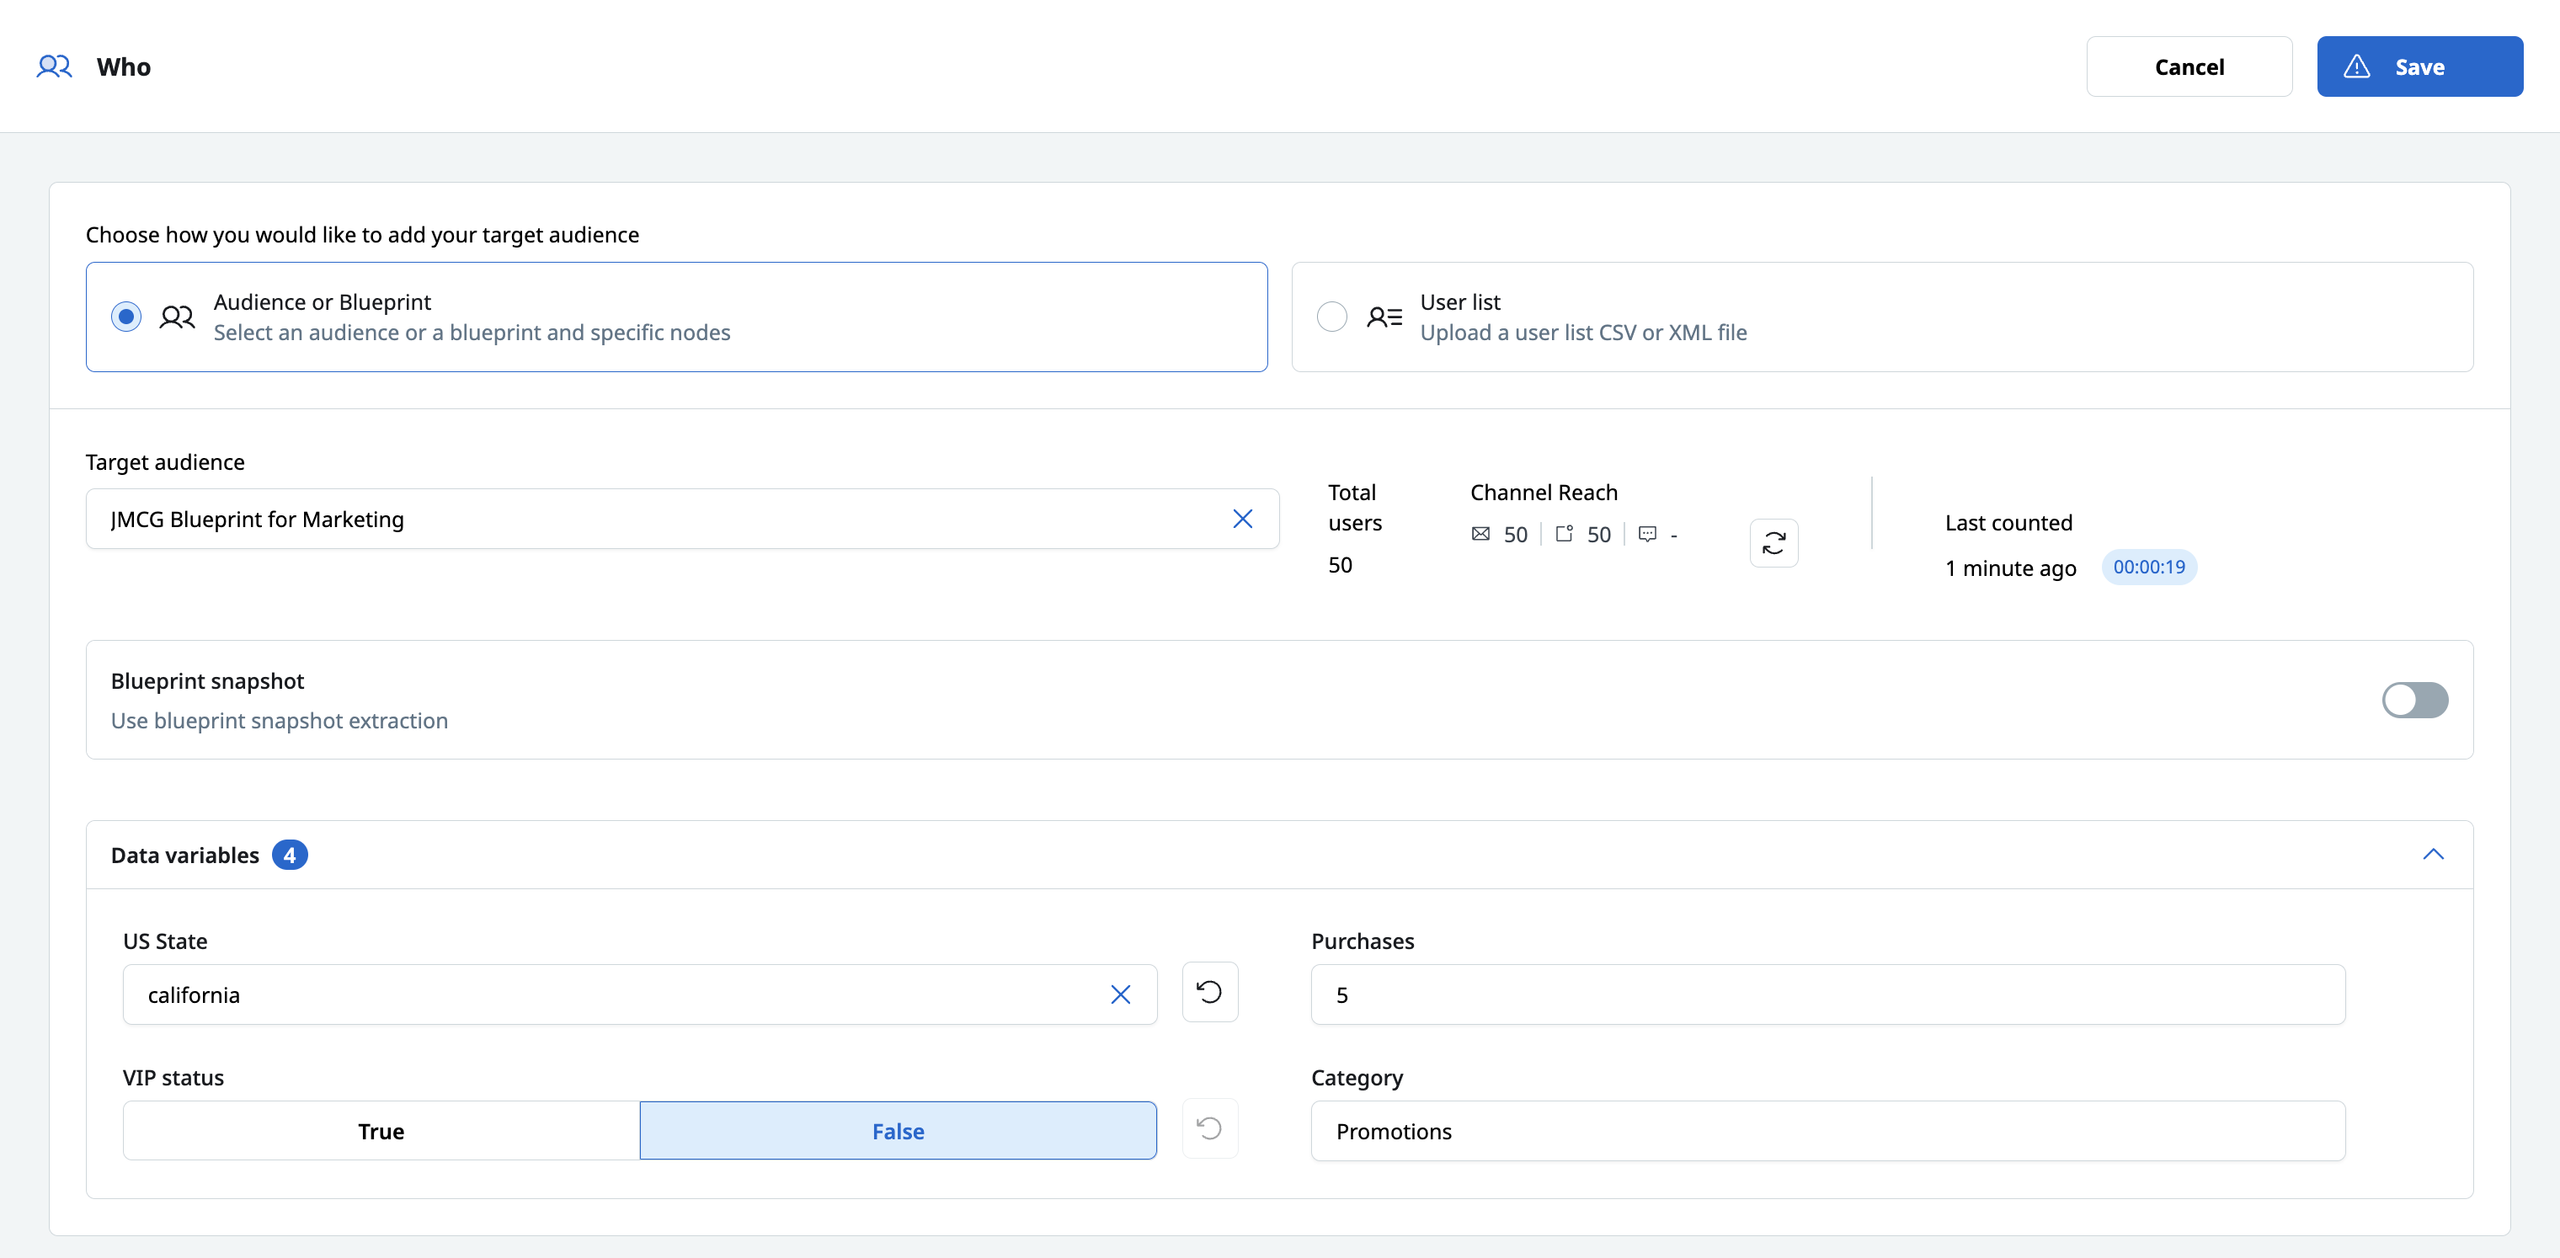
Audience settings are now configured in the "What" section
If the Blueprint contains a snapshot, a Blueprint snapshot field is displayed where the snapshot can be enabled for the campaign. Enabling the snapshot exposes the snapshot details: Data age, Status, Population, Next Refresh.

When enabled, the Blueprint snapshot's details are displayed
If a Blueprint is selected, the Who card displays a Blueprint filter button that opens to the Blueprint, where marketers can select the nodes to target.
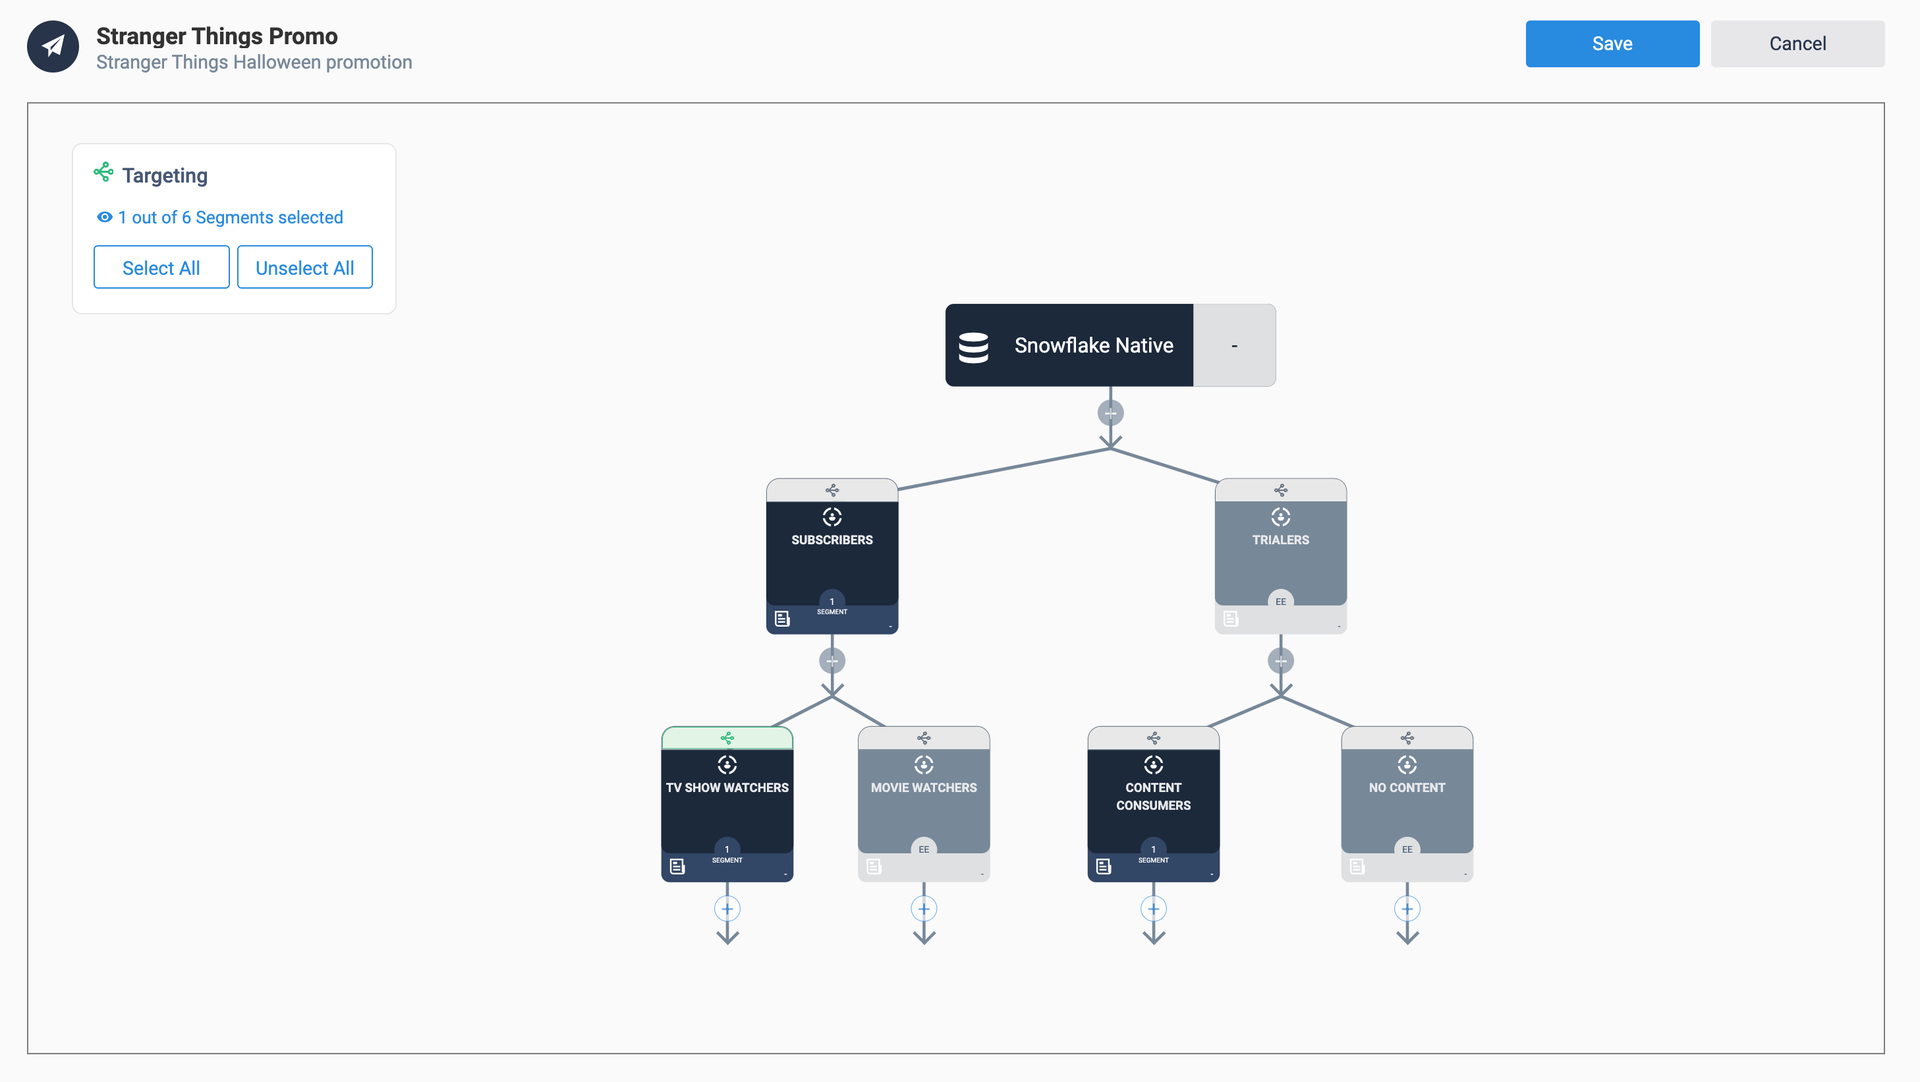
Use the Blueprint’s nodes to define your campaign’s target audience
User List
Selecting User list allows the marketer to upload a static list of recipients. When uploading a new Recipient File, all files must be UTF-8 encoded.
Campaign Schedule
The When card displays your campaign's schedule details, where you will access detailed sending options for the campaign, including recurring sends. There are three schedule types - Unscheduled, One-time, and Recurring.
The campaign can only be launched or scheduled after you've selected your Template and Target audience.
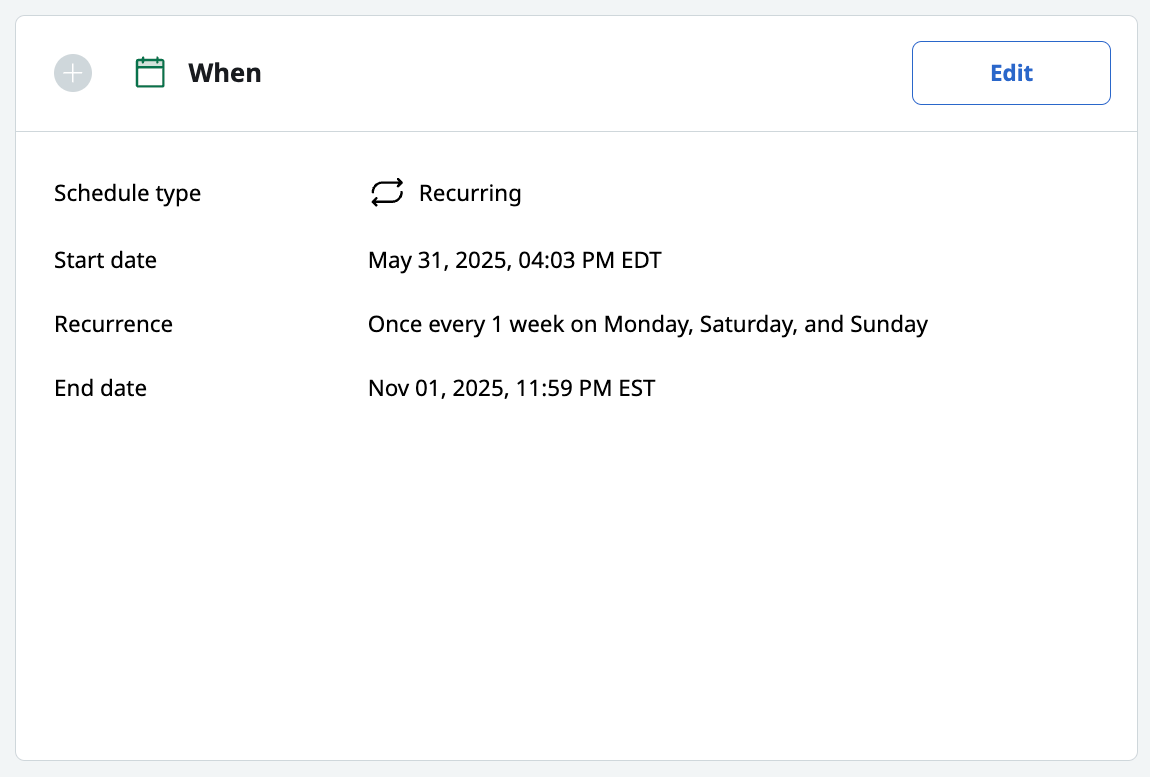
The "When" card displays the campaign schedule details
Unscheduled
This is the default for new campaigns and allows marketers to launch campaigns ad hoc. When the campaign is unscheduled, a Launch button is displayed on the Overview page.
One Time
This option is for a single send in the future. One-time scheduling allows you to schedule the campaign launch at your preferred time, regardless of your personal schedule or local time zone.
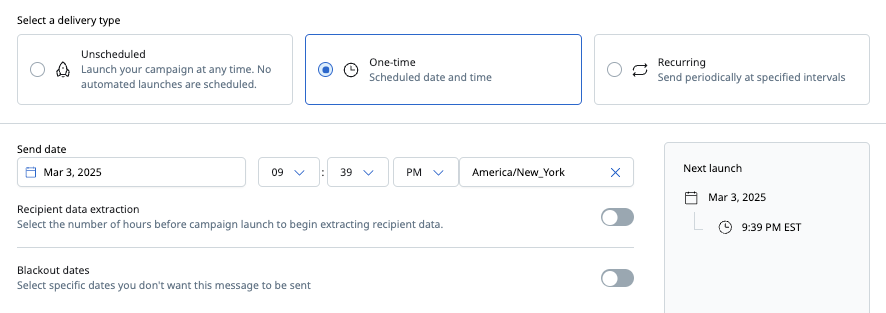
Schedule One-time campaigns through the "When" section
Recurring
This schedule type enables recurring campaign launches, similar to One-time scheduling but set to repeat at designated intervals. It also allows for windowing between a start and end time, as well as the ability to send at sub-day intervals.
The Next launch panel on the right shows the next 10 scheduled launches, allowing you to review and ensure the launches match your expectations after configuring your schedule settings.
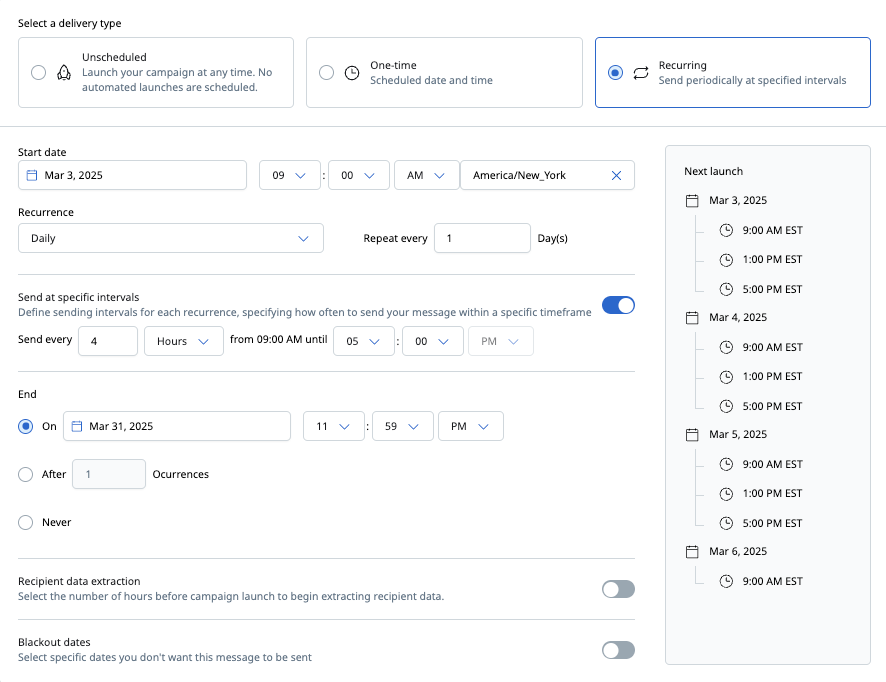
Define the the schedule recurrence and granular send intervals
The Recurrence setting now supports the intervals - Minutes, Hourly, Daily, Weekly, Monthly, or Quartz Cron Trigger - and the length of time between sends (for example, every 3 Hours).
Weekly recurrence sends on a recurring basis on the days of the week you specify. The campaign's Start date day is automatically applied and cannot be unselected.
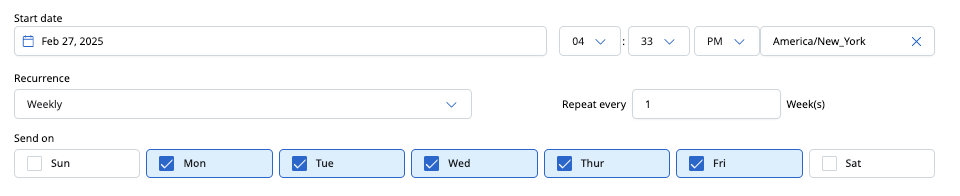
Use "Weekly" recurrence to send emails on specific days of the week
The new End options allow marketers to define when recurring deliveries should stop - either on a specific date, or after a set number launches.

Define when the recurring campaign should stop sending, using the new "End" settings
Campaign Launch
While unscheduled campaigns are launched from the Overview page, One-time and Recurring campaigns are scheduled for launch when you save your schedule settings. In either scenario, a dialog box appears with a summary of the campaign settings, allowing you to confirm the details before launching.
The launch modal’s notification email address field allows you to provide an address to receive error notifications related to this campaign. Check the Include Progress Updates box if you want the notification email address to receive additional job progress updates as well as error notifications.
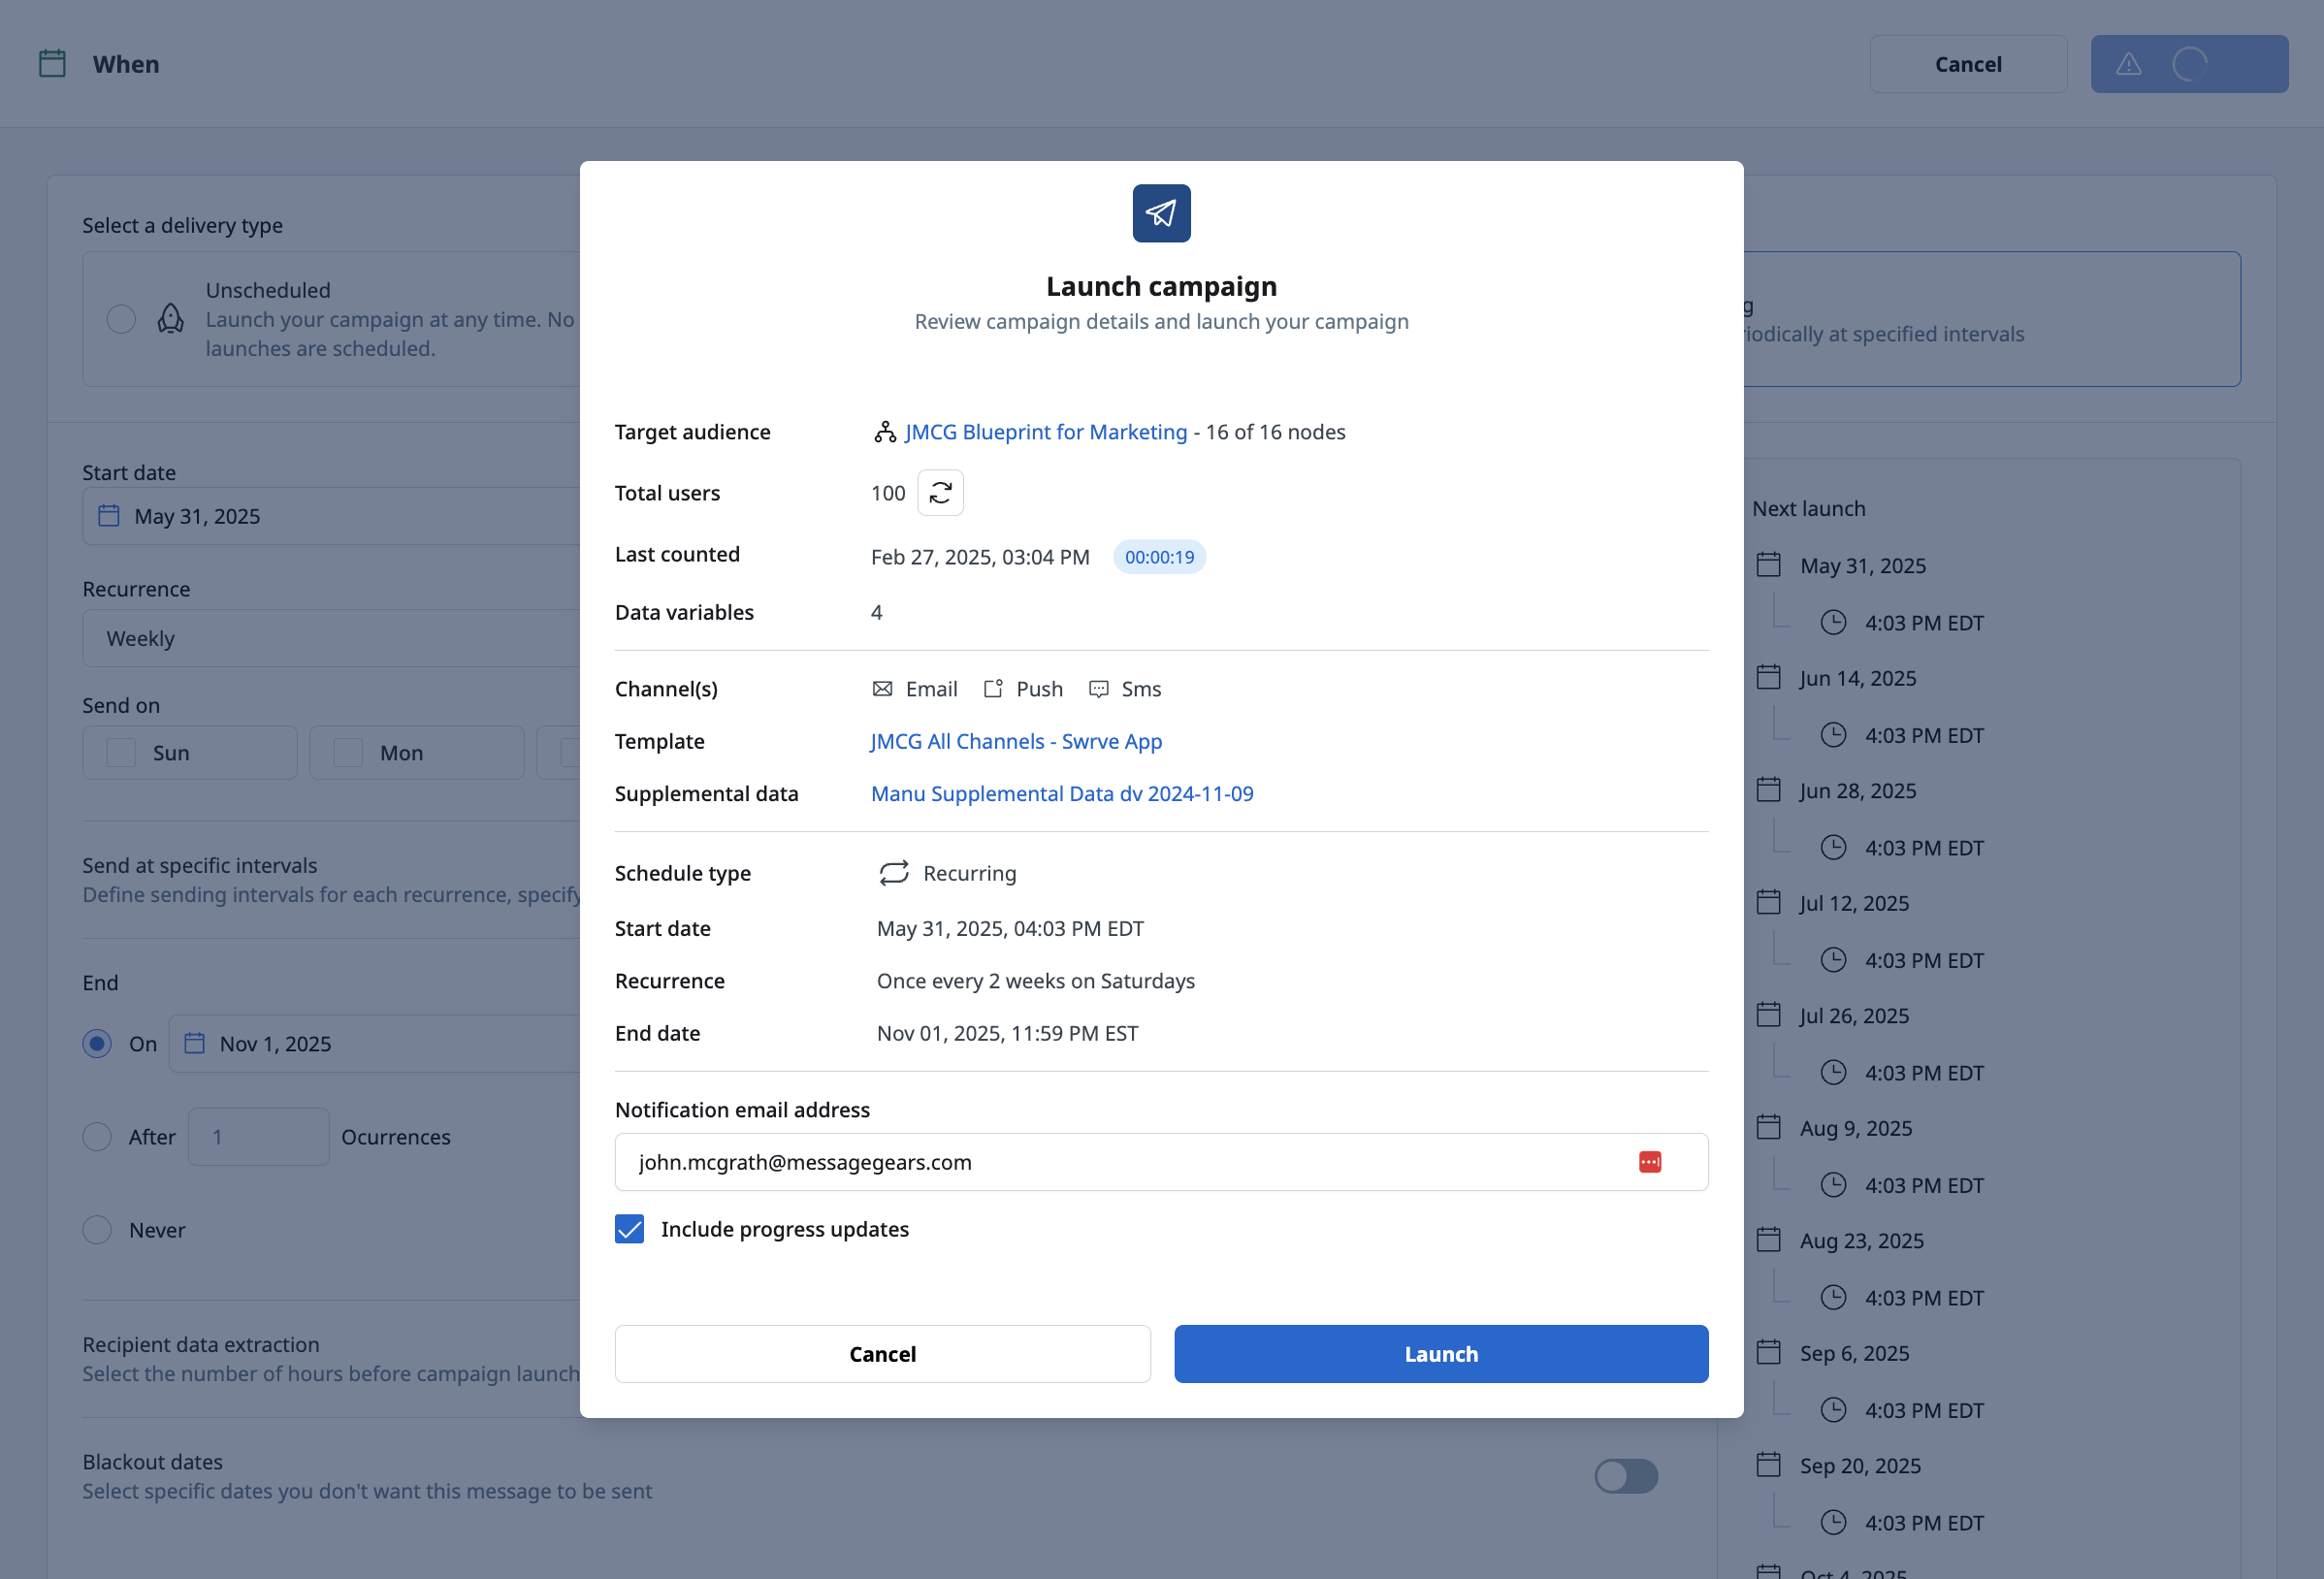
Launch a campaign with a defined schedule
Advanced
The Advanced card contains additional settings you can use to optimize your campaign:
- Campaign Identifier - included as a header on the mailing (supports FreeMarker interpreted fields such as
${seedlist.campaignName}) - Seedlists - email addresses automatically added to a recipient list for the purpose of testing and monitoring the campaign’s content rendering
- URL Append - supports adding parameters to all links in the campaign, such as Google Analytics UTM strings or other parameters for internal analytics.
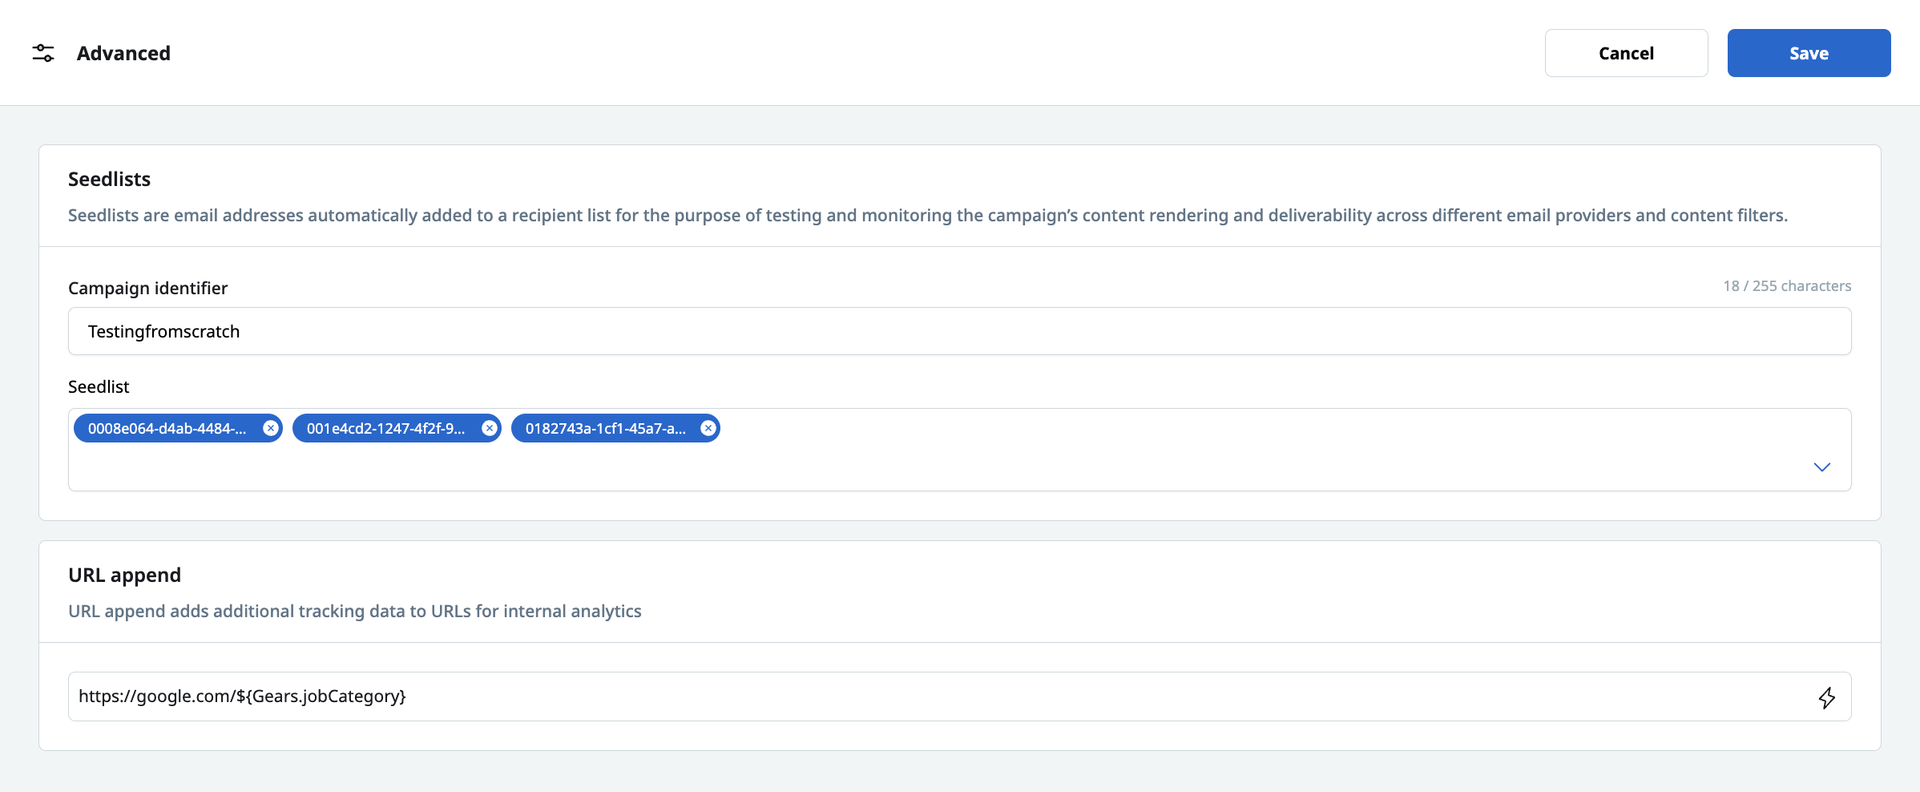
Use the Advanced section to configure additional campaign settings
Blueprint Canvas Refresh
Use Case
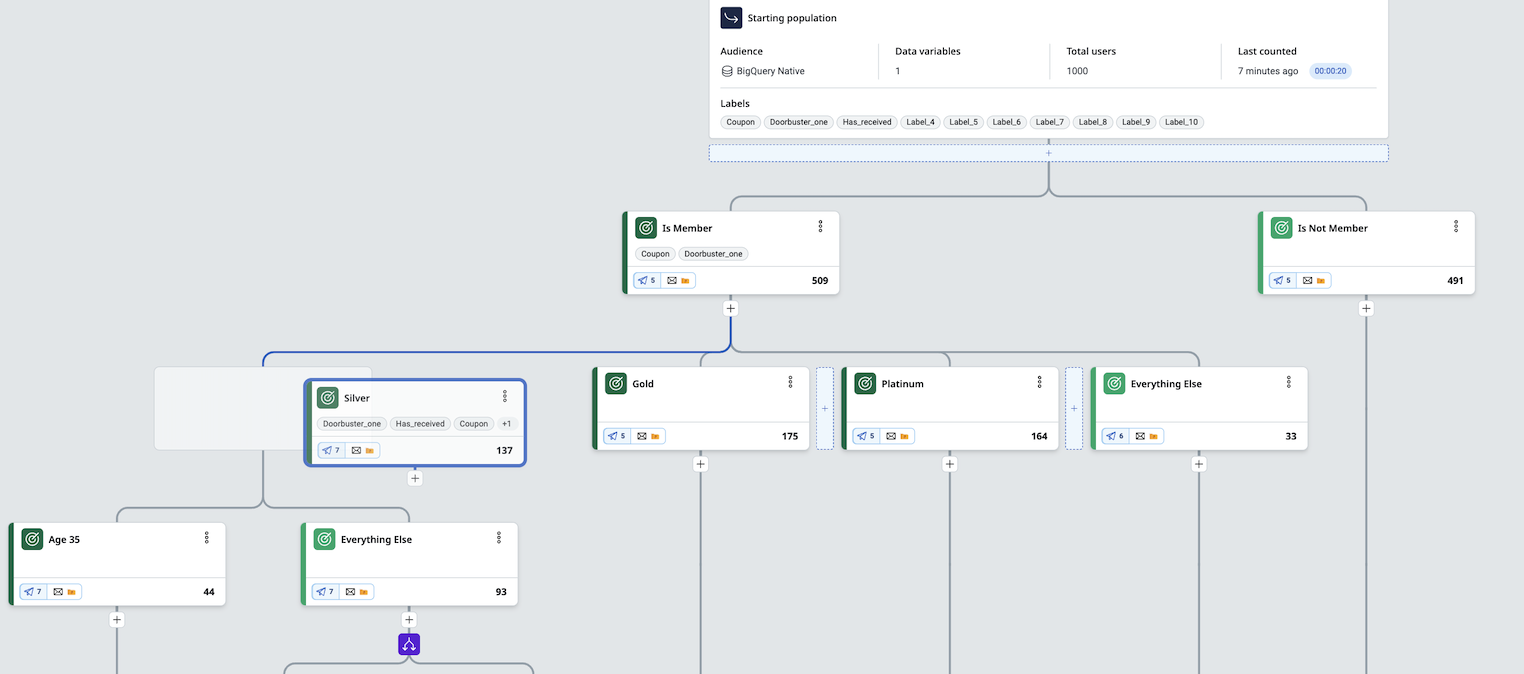
We’re thrilled to bring a brand new canvas experience to Blueprints. The process of segmenting your Audiences has never been easier, as we’re introducing brand new node designs and elements to make larger Blueprints easier to understand from a bird’s eye view. With this update, nodes will show associated campaign counts, surface labels for more visibility, and introduce new colors to help you sort through your segmentations faster. We’ve also introduced smooth zoom controls, and a brand new mini map for those larger canvases to make navigation easier than ever.
Goals
- Update the UI for Blueprint Canvas, introducing new canvas and node design
- Improve canvas performance
- Introduce new canvas mini map
Capabilities
New Canvas & Node design
Our new canvas works out of the box with 25.1.1, and supports all previously created Blueprints. You’ll find a redesigned color palette, including colors for each of the 4 node types. Each node on the canvas now displays additional information about it’s segments, including - label names used in the node, associated campaigns for the node, channels for campaigns used by the node, and any destinations for the node. These are all displayed as icons you’ll see at the bottom of each node. There are also new additions to the canvas to help in navigating larger amounts of nodes. In the bottom left, there are zoom controls, as well as a fit to window option to allow you to quickly render the full node tree. In the bottom right, there is a new mini map which can be click and dragged to move the viewable window and see a quick comparison of that window to the full node tree.
Troubleshooting an issue? You can still access the old blueprint canvas manually for any blueprint by adding ?accel.feature.ui.blueprint=true to the end of the URL. This view is only for that page load, and navigating away from the page and coming back will simply reload the new canvas.
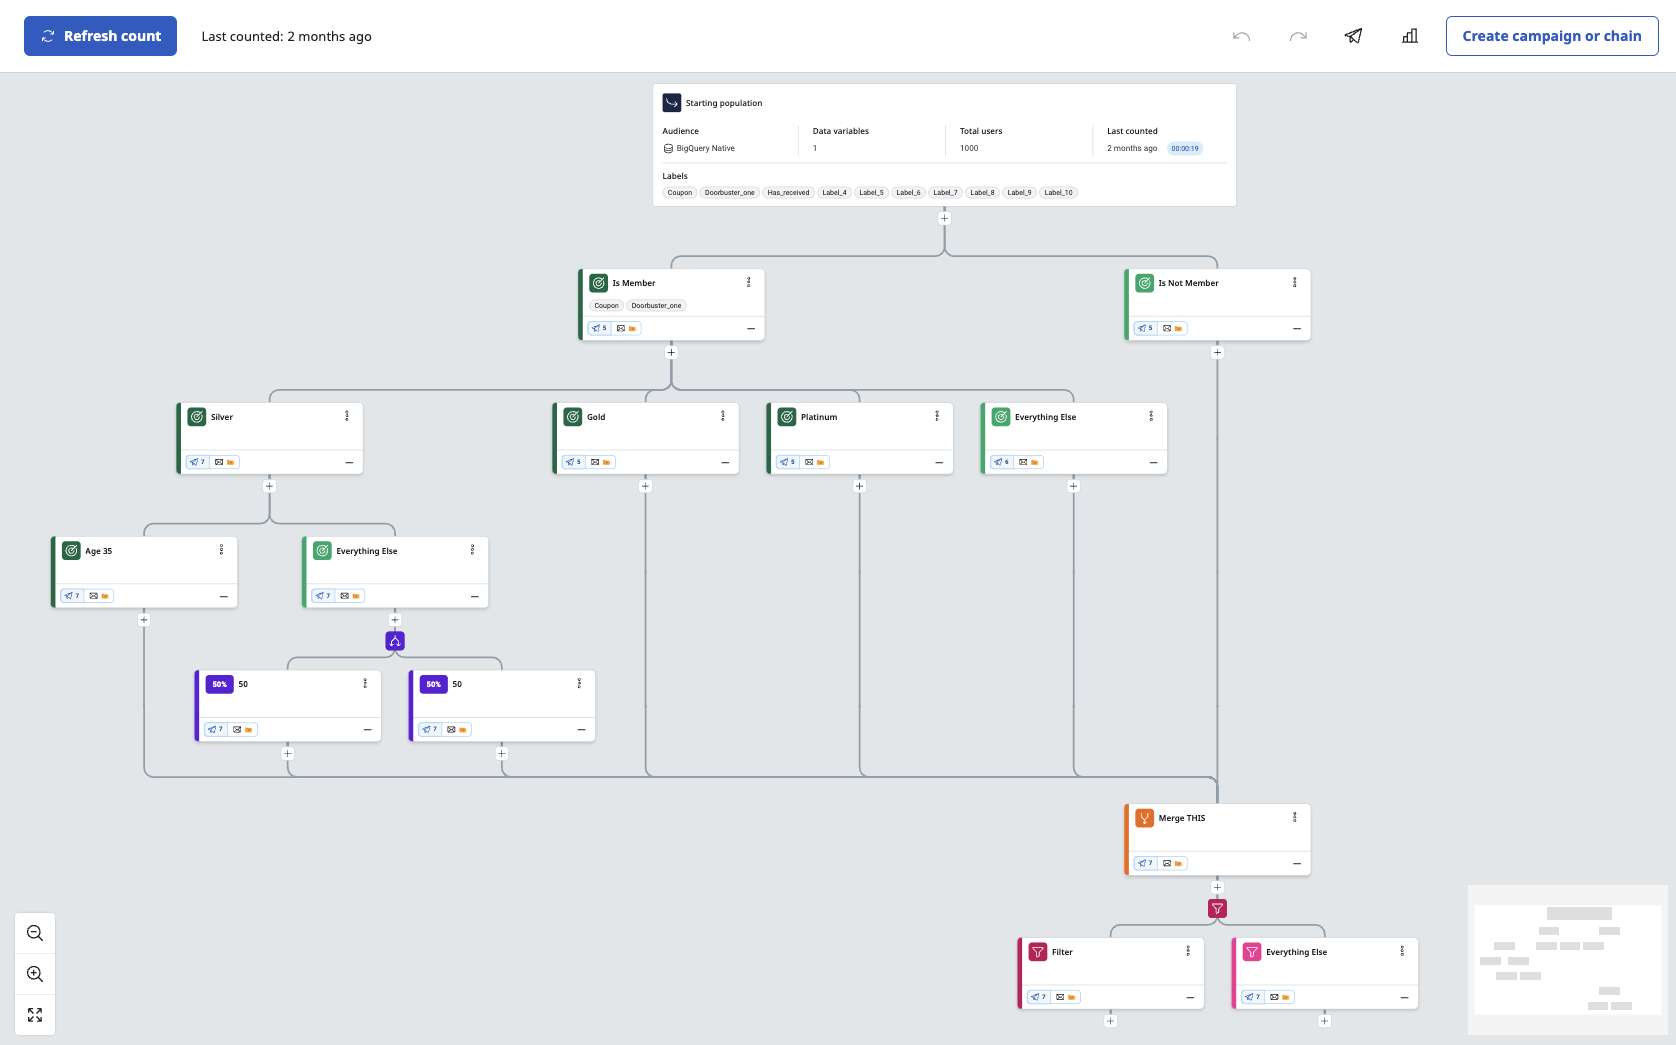
New canvas now offers additional zoom, resizing, and minimap controls
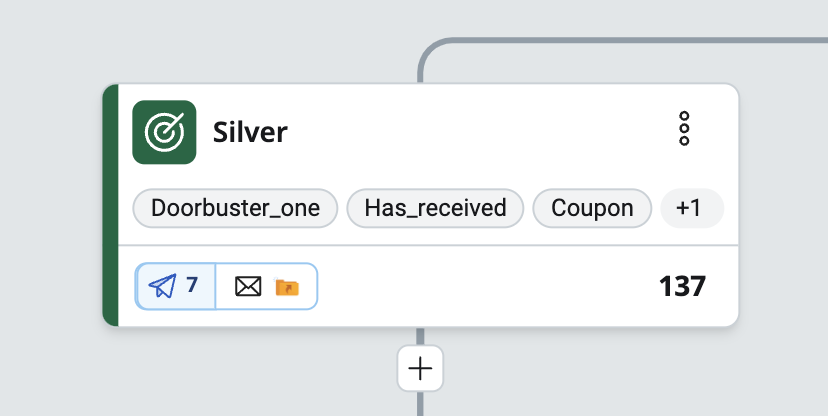
Nodes are now color coded for type and display additional information
Path Highlighting
We’ve also added highlighting for both nodes and parent lines to allow users to easily see which parent nodes are feeding into child nodes. Hover your mouse over a node to see the highlighting take effect. You can also select the node for the same view.
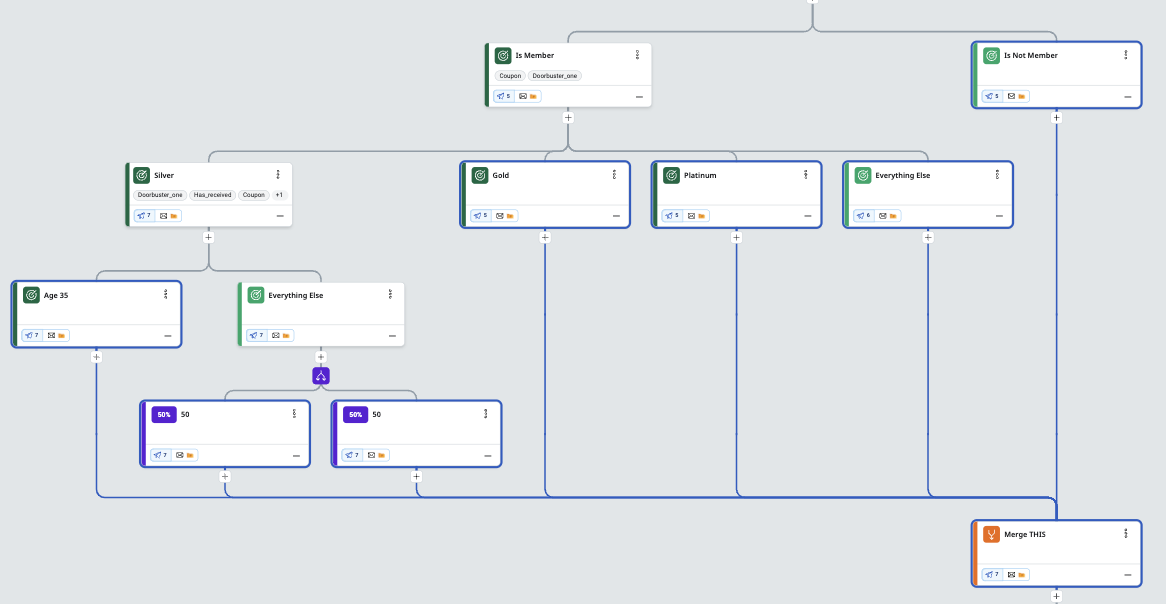
Hovering your mouse over a node will highlight all parent node paths
Drag and Drop movement
The new canvas also introduces a new way to move nodes around. Users can still shift nodes left or right from the overflow menu, but now blueprints support drag and drop to move nodes. Any node that can be moved can be dragged to one of the drop spots next to or under existing nodes to move the selected node. Dropping the selected node outside of those spots simply returns the node to its current position without moving.
New Data Preview Access Role
Use Case
There are multiple areas in Accelerator which allow for previewing data returns from client data sources where sensitive PII could be surfaced. We’ve implemented a new user role which still allows users access to those areas, but simply hides the preview functionality on those pages. This limits the risk of exposing PII for those users who don’t need to leverage those features regularly, and can be done without having to identify each unique attribute or data point which might contain PII. This can be turned on or off per user, and is defaulted to on when creating a new user or taking Accelerator 25.1.1. This means if you have no interest in leveraging this new capability, you won’t need to edit your user setup in any way.
Goals
- Allow users to be disabled from previewing potentially sensitive PII data within Accelerator
Capabilities
New Canvas & Node design
From the User Setup screen, you’ll see a brand new Data Preview Access user role available in the user role list.
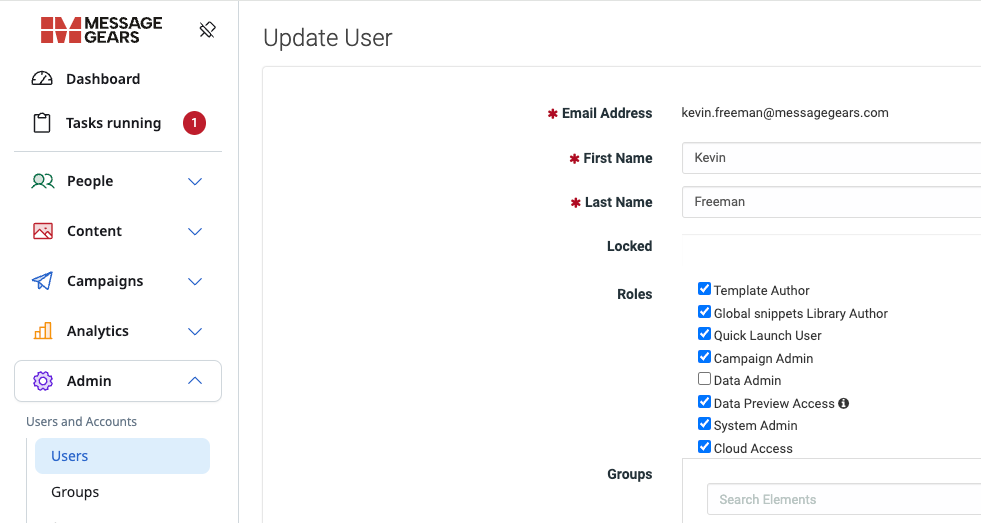
This will be defaulted to on for all users, disabling this removes access to the following from within Accelerator:
-
Preview access to Audiences - both list and edit page
-
Preview access to Blueprints - both list and edit page
-
Preview access for Campaigns
- Marketing
- Experiment
- External - including column customization data preview
-
Preview access through the Sample Audience on Templates
-
Profile lookup
-
Profile lookup builder
FreeMarker Upgrade
Use Case
Customers want to leverage the latest FreeMarker functions and improvements when building their Email, Push, and SMS templates.
- Include newer FreeMarker functions and improvements in campaign content
- Preview and test how the template is displayed in the latest FreeMarker version
- Assign a default FreeMarker version to an account
Goals
- Support rendering of templates using FreeMarker version (2.3.33)
- Make it easy for customers to test and fully transition to newer versions of FreeMarker
Capabilities
Default FreeMarker Version
Customers can now assign a default FreeMarker version to each account. When an account is applied to a template through a Sending Profile or directly to a campaign, the account’s FreeMarker version is used to render the message. By
FreeMarker version control is currently behind a feature flag. To update the FreeMarker version used to render your templates, ask a technical resource to enable it by following these instructions:
In the configuration_item table in your database config, add an entry with key ALLOW_FREE_MARKER_VERSION_TESTING set to true.
Note: Enabling the feature flag alone does not change the FreeMarker version used to render the campaign's template. You still must update the account's FreeMarker version to 2.3.33, which should only be done after testing your template with that version.
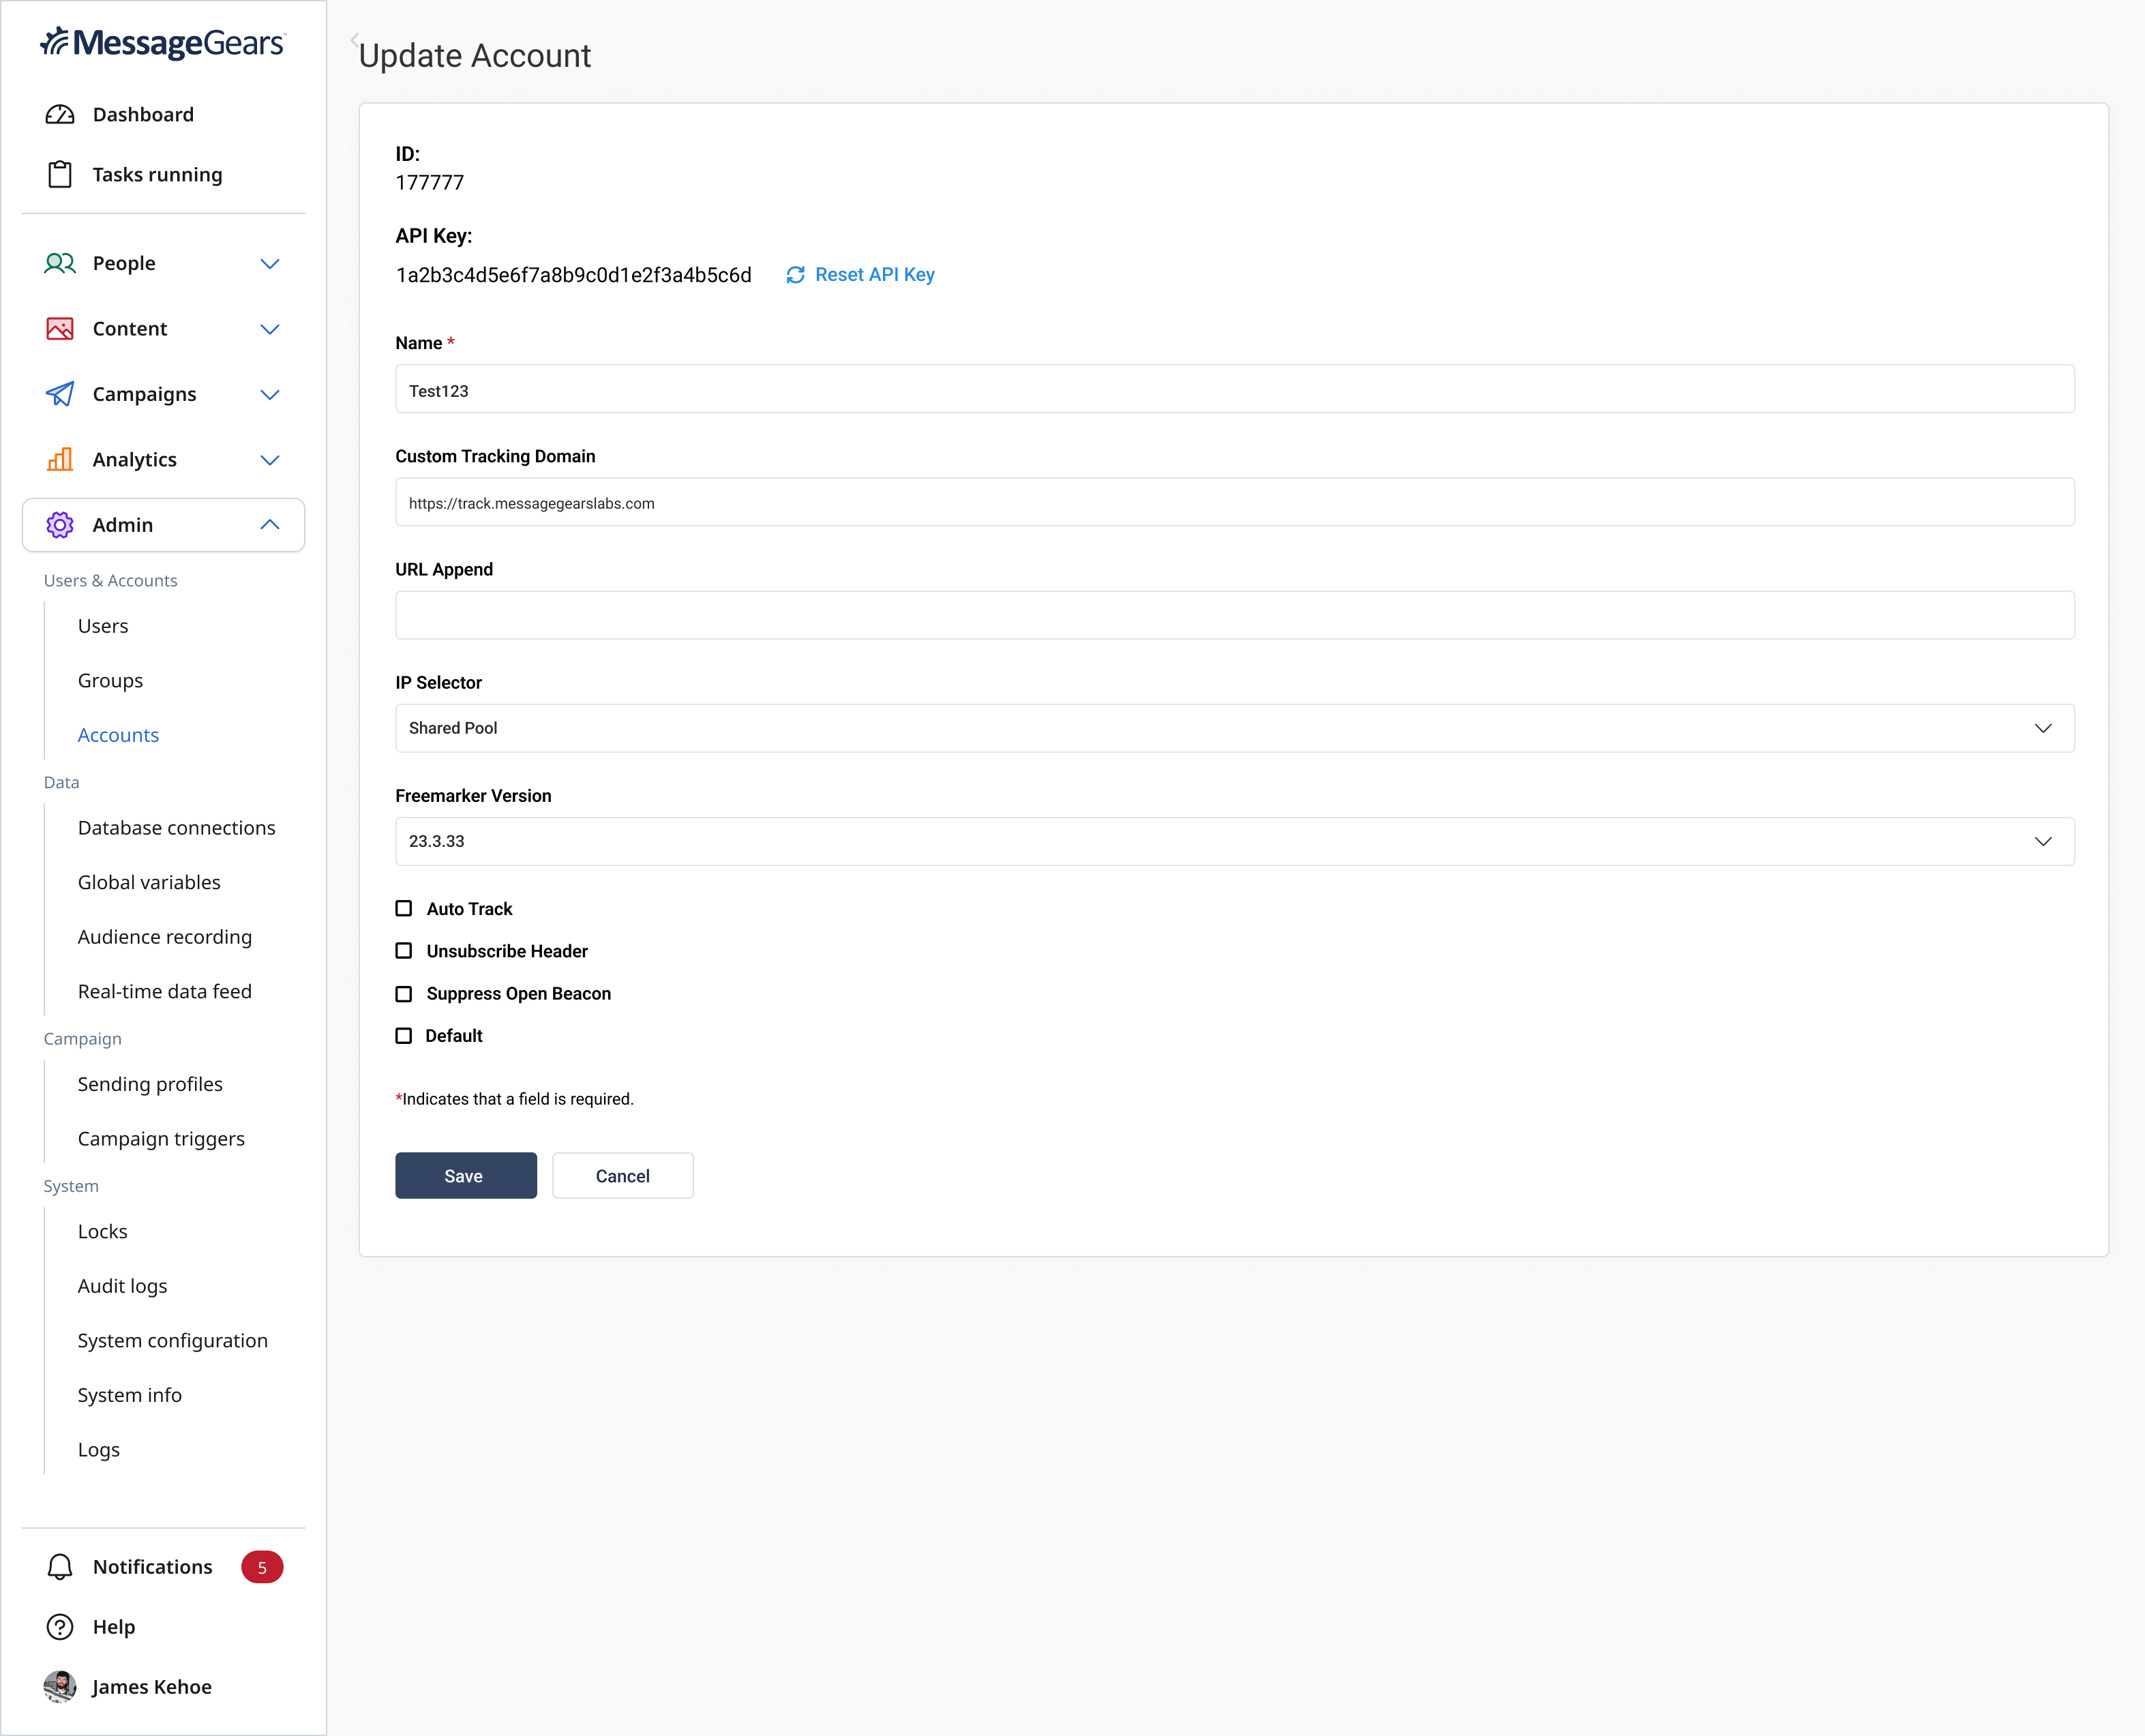 FreeMarker Version field on Account page
Build, test, and send content using the latest FreeMarker Version
Template and campaign builders can take advantage of all FreeMarker functionality and improvements available in FreeMarker (v. 2.3.33). When previewing and testing your message, select the FreeMarker version used to render the template. The selected version is also applied to any test messages.
By default, all accounts use FreeMarker version 2.3.23, with backwards compatibility for version 2.3.0. Setting the account's FreeMarker version to 2.3.33 includes all bug fixes and improvements made in that version, including improvements that are incompatible with earlier versions. Therefore, it is recommended that you test your templates with version 2.3.33 before updating your account(s).
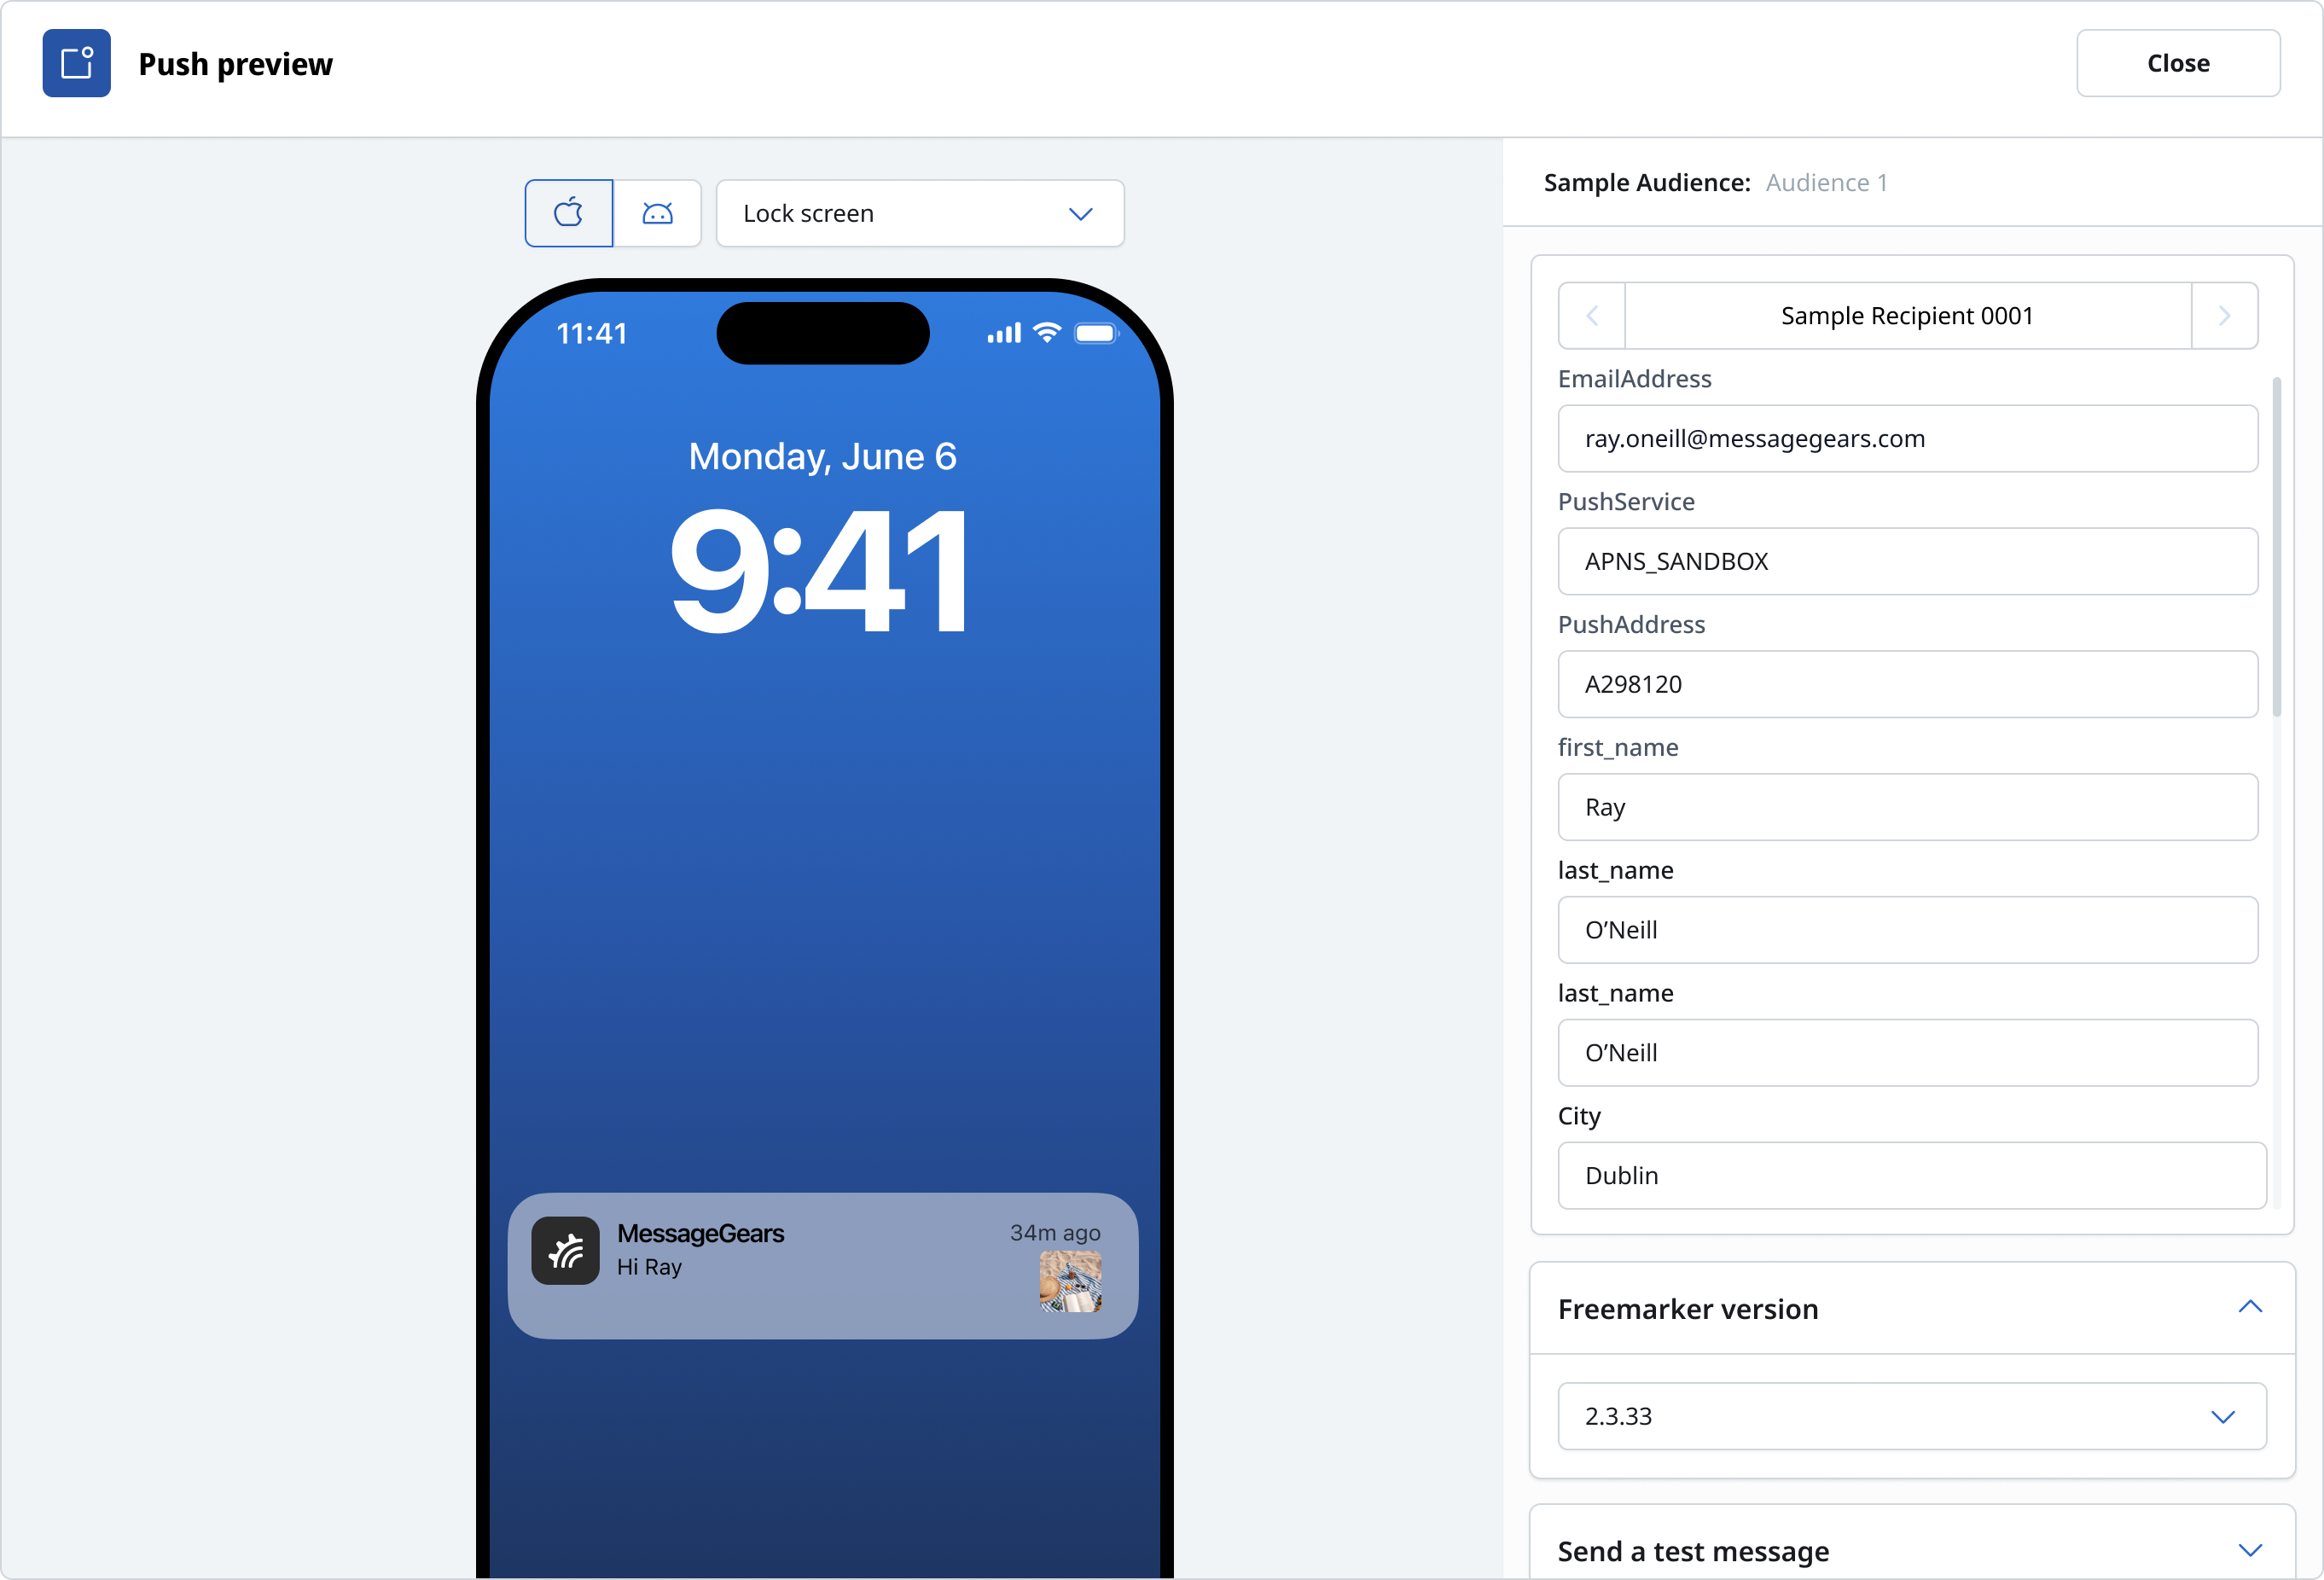
FreeMarker version field in Push preview
Render Error Updates
To help with debugging, the FreeMarker version is now included in the render error messages
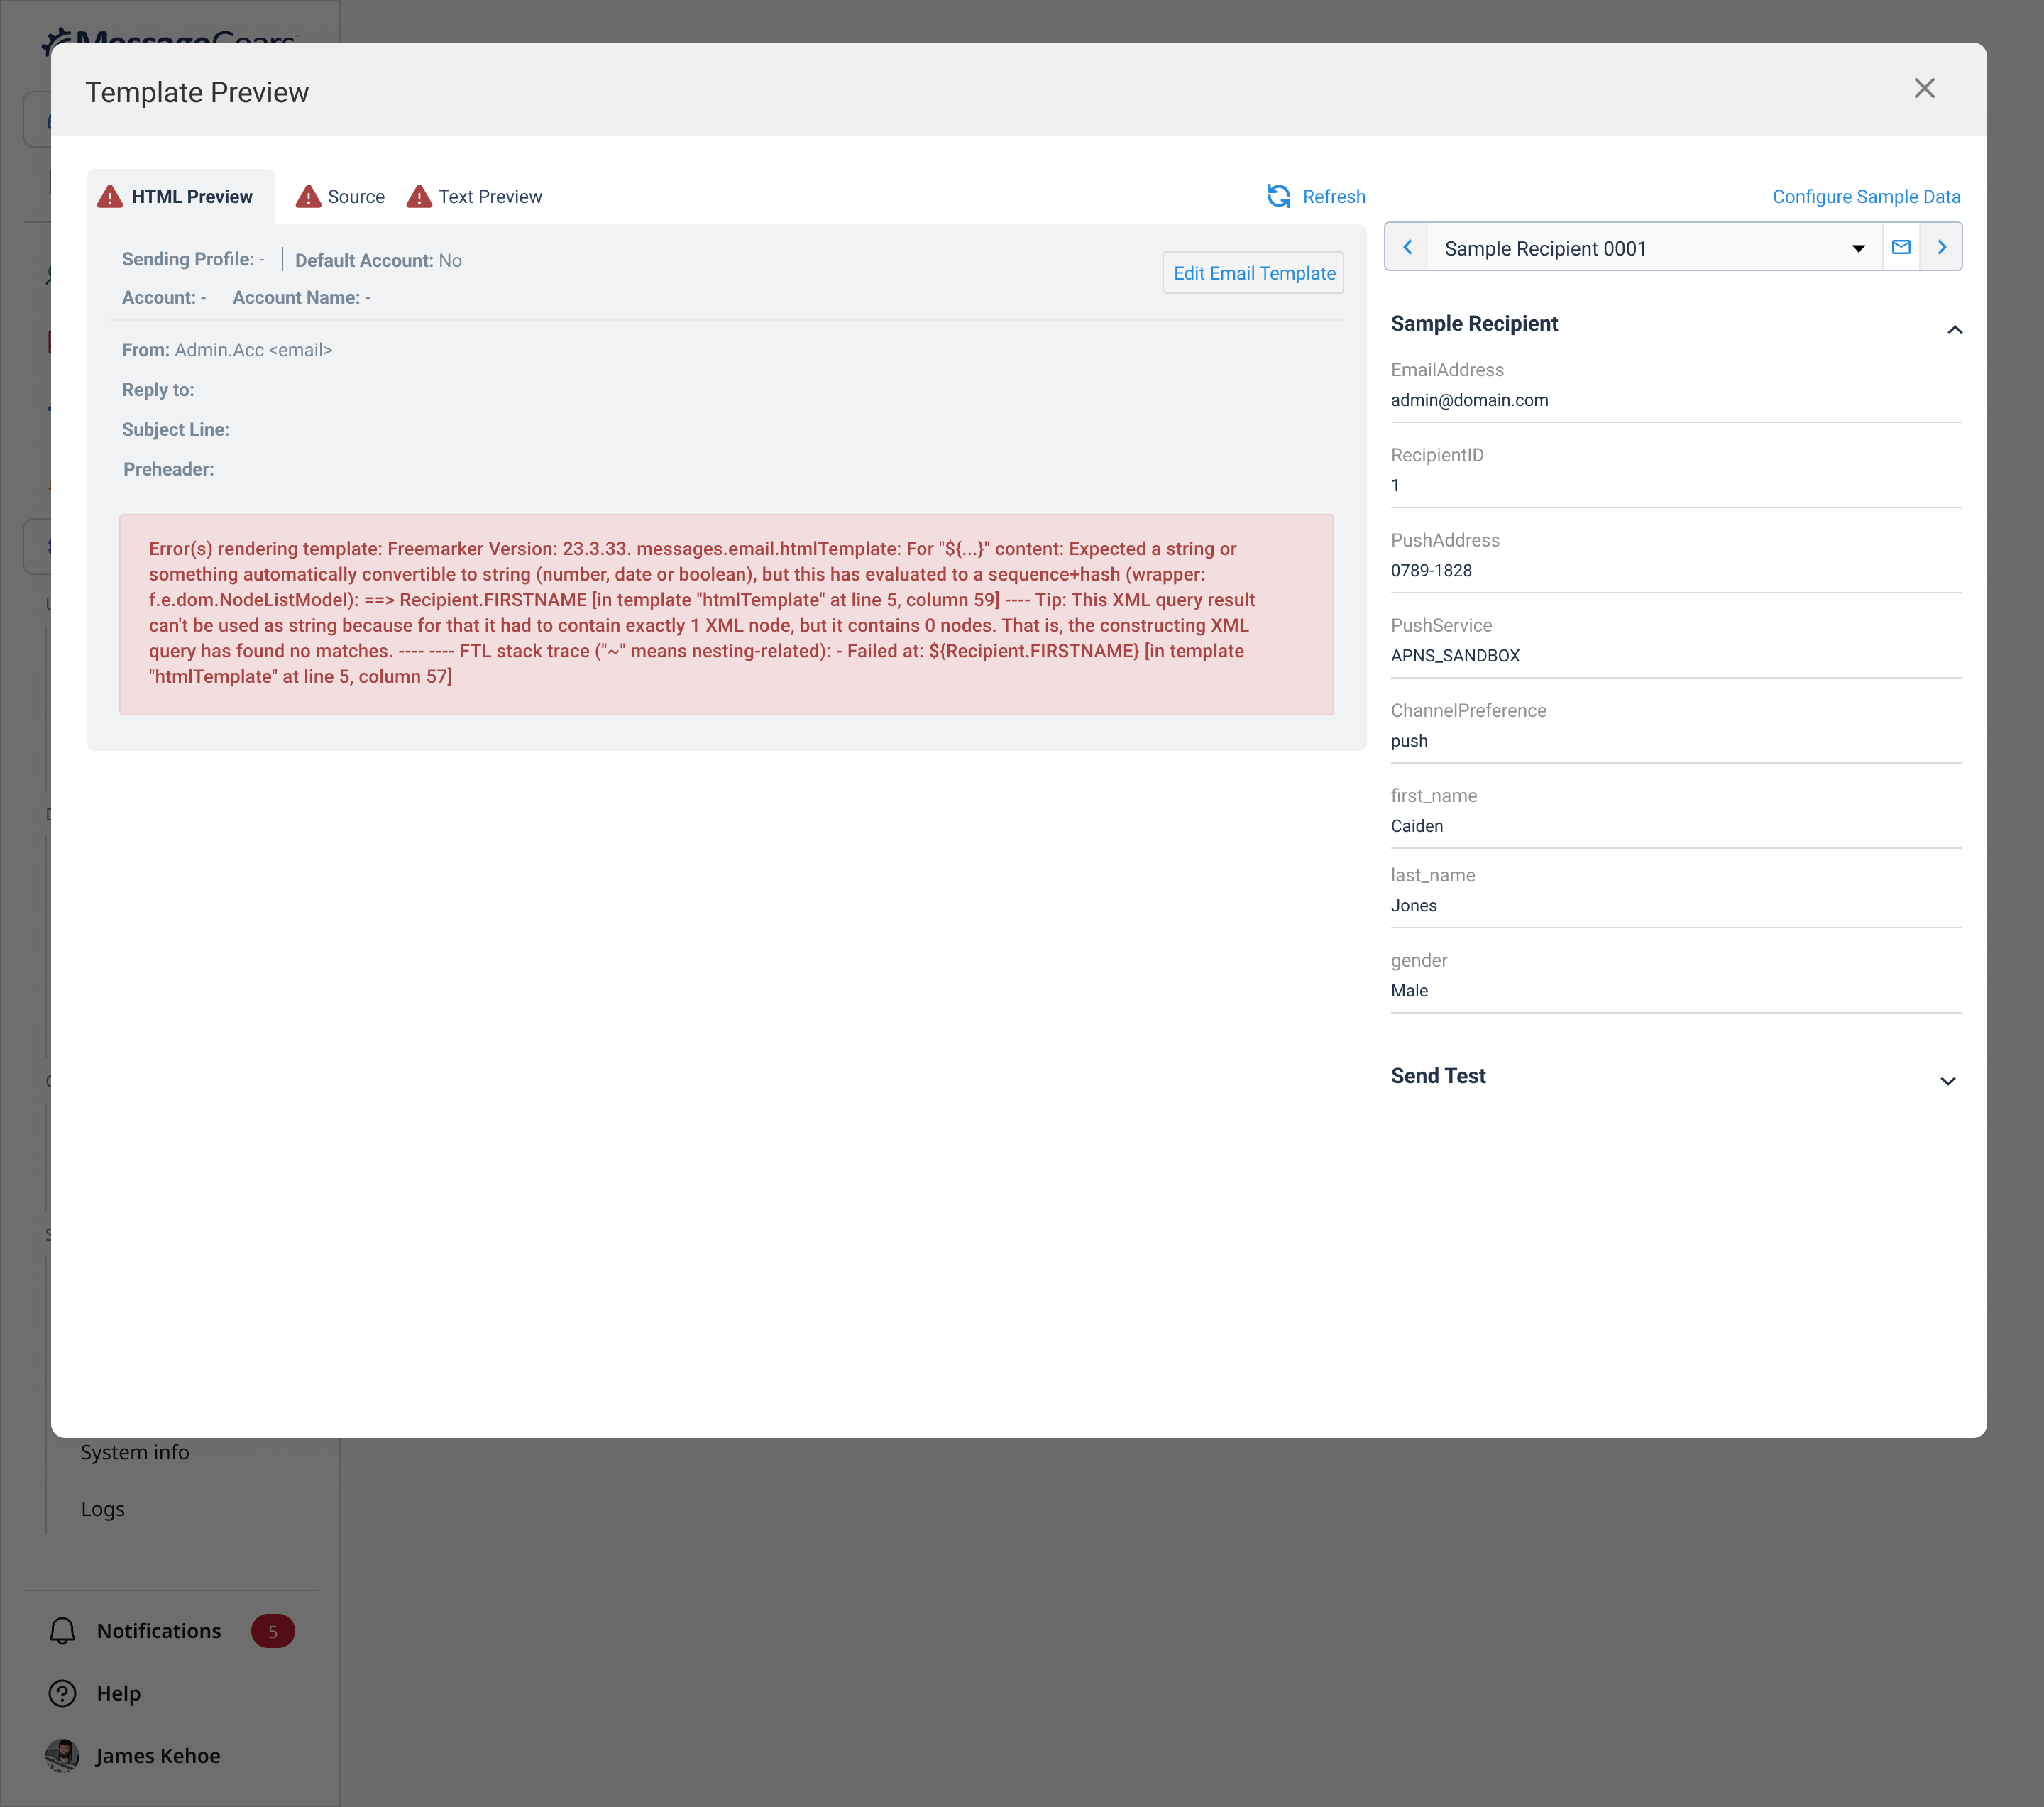
Render error with FreeMarker version
General changes
- Job Category is now an option for External Campaigns heh
- Preheader Lines have been added to the new Marketing Campaign Overview & Edit pages
- Local Snippets folder view page has been updated to the new Accelerator design
- Archived assets (Audiences, Blueprints, Templates, Triggers) will no longer be available to be added to Campaigns (Marketing, External, and Experiments)
- Don't display counts in Job Analytics of External Campaign launches until finalized, now use ‘ - ‘