Swrve Geo
Send targeted, geo-triggered notifications to your app users with Swrve Geo. To use this feature, you must integrate the Geo project alongside the general Swrve SDK for your platform. This guide explains how to integrate Swrve Geo for iOS, Android, and React Native.
Requirements
- Request a copy of the Swrve Geo project for your app platform from your CSM at support@messagegears.com. They will enable Geoplaces in your Swrve dashboard.
- The current version of Swrve Geo has the following native SDK / Plugin minimum version dependancy:
- iOS SDK 7.0.3
- Android SDK 11.0.0
- React Native SDK plugin 1.0.0
- Swrve Geo for Android uses Android's native geofencing APIs, so the following services and permissions are required:
- Google Play Services
- Wi-fi scanning set to "on"
- Location setting set to "on"
- On Android API level 26 and above, a foreground notification is recommended for reliable geoplace triggering. While the Swrve SDK can function without it, omitting the foreground notification will reduce the accuracy and timeliness of geoplace triggers. You can optionally configure this notification within SwrveGeoConfig.
- For Android API level 28 and lower, use the
ACCESS_FINE_LOCATIONpermission. - For Android API level 29, the
ACCESS_BACKGROUND_LOCATIONpermission must be set to "Allow all the time". The “Allow only while using the app” permission is not supported.
- Swrve Geo for iOS uses iOS’s native region monitoring and Significant-Change Location service, so the following services or permissions are required:
- Location Services set to "On"
- Location permission set to "Always"
- Note: In iOS 14 and above, a user can select full or reduced accuracy mode. The SwrveGeoSDK requires full accuracy. If a user selects reduced accuracy, then region monitoring will not work and enter and exist transitions will not trigger.
- Once integrated, SwrveGeoSDK silently does nothing on devices that don’t have the appropriate device capabilities. Both iOS and Android platforms can restrict installations of an app to devices that only support these capabilities. If you’d like to restrict your app to be only installed on those devices, speak to your CSM.
Integration instructions
Select one of the platform tabs below for integration instructions.
- Android
- iOS - Swift
- iOS - Objective-C
- React Native
There are two main folders in the Geo project for Android:
- SwrveGeoSDK is an Android library project that you integrate as a separate Gradle dependency alongside the standard Swrve Android SDK.
- SwrveGeoSample provides a basic example of how to integrate Swrve Geo for Android.
Integration steps
Step 1: Add the following dependencies to your app build.gradle file:
api 'com.swrve.sdk.android:swrve-geo:7.2.0'
Step 2: Choose when and where to ask for location permission. You also have the option to include a pre-prompt and post-prompt dialog.
- Call the SwrveGeoSDK Start API at the moment you want to display the location permission prompt. Further calls to this API will have no effect unless you call the SwrveGeoSDK Stop API.
SwrveGeoSDK.start(this);
Note: If your native SDK configuration uses MANAGED mode for creating the SwrveSDK instance, then start the SwrveGeoSDK only after you've called the SwrveSDK Start API.
- Android best practices recommend explaining to your users why your app requires location permission before requesting it. For example,
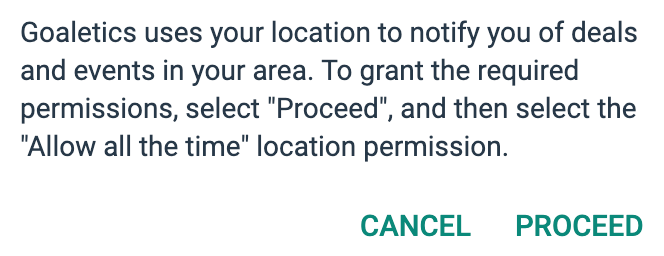
To display your explanation and prompt buttons before you initiate the system permission request, use the permissionPrePrompt API in the SwrveGeoConfig. If you prefer to use your own UI or don't want to include a pre-prompt, skip this option.
SwrveGeoConfig geoConfig = new SwrveGeoConfig.Builder()
        .permissionPrePrompt(getString(R.string.pre_prompt_rationale),
            getString(R.string.pre_prompt_proceed_button_text),
            getString(R.string.pre_prompt_cancel_button_text))
    .build();

SwrveGeoSDK.init(this, geoConfig);
- If a customer declines the system permission prompt, use the
permissionDeniedPostPromptAPI to confirm their selection and explain the features they miss out on by not giving permission. For example,
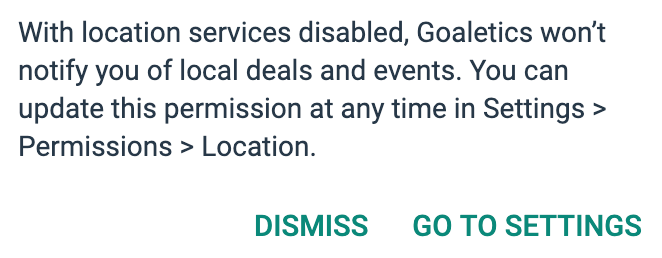
This option also gives you the opportunity to include a button that takes the user to the system settings if they want to manually grant permission. If you don't want to display the additional prompt, skip this option.
SwrveGeoConfig geoConfig = new SwrveGeoConfig.Builder()
        .permissionDeniedPostPrompt(getString(R.string.post_prompt_text),
            getString(R.string.post_prompt_settings_button_text),
            getString(R.string.post_prompt_cancel_button_text))
    .build();

SwrveGeoSDK.init(this, geoConfig);
Step 3: In the Application class where the SwrveSDK instance is created, initialize SwrveGeoSDK directly after you initialize SwrveSDK.
For better performance on devices running Android Oreo and above, we also recommend setting the foreground service notification and notification ID in the SwrveGeoConfig. The notification ID is a unique integer you must set that identifies each notification. Providing value in the content of the foreground service notification makes it easier for users to buy in to allowing this. To keep the content relevant, use the same notification ID to update the notification content on a regular basis.
Replace <app_id> and <api_key> with your app ID and API key.
SwrveSDK.createInstance(application, <app_id>, <api_key>);

Notification fgNotification = getGeoForegroundNotification(); // implement your own foreground notification
SwrveGeoConfig geoConfig = new SwrveGeoConfig.Builder()
    .foregroundNotification(fgNotification, YOUR_FOREGROUND_NOTIFICATION_ID)
    .permissionPrePrompt(getString(R.string.pre_prompt_rationale),
        getString(R.string.pre_prompt_proceed_button_text),
        getString(R.string.pre_prompt_cancel_button_text))
    .permissionDeniedPostPrompt(getString(R.string.post_prompt_text),
        getString(R.string.post_prompt_settings_button_text),
        getString(R.string.post_prompt_cancel_button_text))
    .build();
SwrveGeoSDK.init(this, geoConfig);
Step 4: If your app configures the foreground notification in SwrveGeoConfig, you must also declare the use of the FOREGROUND_SERVICE_LOCATION permission and provide a justification for its use in the Google Play Console. This is required by Google Play's policy for apps using foreground services related to location. Add the following permission and service in your AndroidManifest.xml.
<uses-permission android:name="android.permission.FOREGROUND_SERVICE_LOCATION" />
<application>
....
<service
    android:name="com.swrve.sdk.geo.SwrveGeoForegroundLocationUpdatesService"
    android:enabled="true"
    android:exported="false"
    android:foregroundServiceType="location" />
.....
</application>
Step 5: Optionally, to update the foreground notification with more relevant content, use the same notification ID you set above to update the existing notification content.
NotificationCompat.Builder mBuilder = new NotificationCompat.Builder(this, "123");
mBuilder.setSmallIcon(R.drawable.logo)
      .setContentText("Updated message that provides value")
      .setContentTitle("Title");
Notification notification = mBuilder.build();
NotificationManager notificationManager = (NotificationManager) context.getSystemService(Context.NOTIFICATION_SERVICE);
notificationManager.notify(YOUR_FOREGROUND_NOTIFICATION_ID, notification);
There are two main folders in the Geo project for iOS:
- SwrveGeoSDK.xcframework is a library that you integrate alongside the standard Swrve iOS SDK.
- SwrveGeoSample provides a basic example of how to integrate Swrve Geo for iOS.
Integration steps
Step 1: Add the following dependencies to your Podfile:
use_frameworks!

pod 'SwrveSDK'
pod 'SwrveGeoSDK'
SwrveGeoSDK requires that you have use_frameworks! in your CocoaPods.
Step 2: In your AppDelegate, implement the following:
- Import the SwrveGeoSDK framework.
import SwrveSDK
import SwrveGeoSDK
- Initialize SwrveGeoSDK directly after initializing SwrveSDK. Replace
<app_id>and<api_key>with your app ID and API key.
SwrveSDK.sharedInstance(withAppID: -1, apiKey: "<app_key>")
SwrveGeoSDK.initialize()
- Call the SwrveGeoSDK Start API at the moment you want to display the location permission prompt. Further calls to this API will have no effect unless you call the Geo Stop API.
Note: If your native SDK configuration uses MANAGED mode for creating the SwrveSDK instance, then start the SwrveGeoSDK only after you've called the SwrveSDK Start API.
Step 3: In your Info.plist, make sure you include values for the following keys to explain to your user why your app requires the related location permission. For example, "Goaletics uses your location to inform you about deals and events in your area."
NSLocationAlwaysUsageDescription- explains why the app requires access to the user's location at all times (for apps supporting iOS 10 and earlier).NSLocationWhenInUseUsageDescription- explains why the app requires the user's location information when running in the foreground.NSLocationAlwaysAndWhenInUseUsageDescription- explains why the app requires access to the user's location at all times.
There are two main folders in the Geo project for iOS:
- SwrveGeoSDK.xcframework is a library that you integrate alongside the standard Swrve iOS SDK.
- SwrveGeoSample provides a basic example of how to integrate Swrve Geo for iOS.
Integration steps
Step 1: Add the following dependencies to your Podfile:
use_frameworks!

pod 'SwrveSDK'
pod 'SwrveGeoSDK'
SwrveGeoSDK requires that you have use_frameworks! in your CocoaPods.
Step 2: In your AppDelegate, implement the following:
- Import the SwrveGeoSDK framework.
#import <SwrveGeoSDK/SwrveGeoSDK.h>
- Initialize SwrveGeoSDK directly after initializing SwrveSDK. Replace
<app_id>and<api_key>with your app ID and API key.
[SwrveSDK sharedInstanceWithAppID:-1 apiKey:@"<api_key>"];
[SwrveGeoSDK init];
- Call the SwrveGeoSDK Start API at the moment you want to display the location permission prompt. Further calls to this API will have no effect unless you call the Geo Stop API. Note: If your native SDK configuration uses MANAGED mode for creating the SwrveSDK instance, then start the SwrveGeoSDK only after you've called the SwrveSDK Start API.
Step 3: In your Info.plist, make sure you include values for the following keys to explain to your user why your app requires the related location permission. For example, "Goaletics uses your location to inform you about deals and events in your area."
NSLocationAlwaysUsageDescription- explains why the app requires access to the user's location at all times (for apps supporting iOS 10 and earlier).NSLocationWhenInUseUsageDescription- explains why the app requires the user's location information when running in the foreground.NSLocationAlwaysAndWhenInUseUsageDescription- explains why the app requires access to the user's location at all times.
There are three parts to integrating React Native Geo—Android, iOS and then the React layer.
Integration steps
Step 1: Install the standard Swrve React Native plugin. For more information, see the React Native integration guide.
Step 2: Add the react-native-swrve-geo-plugin to your project via npm:
npm install react-native-swrve-geo-plugin --save
If you prefer to use Yarn, run the following command:
yarn add react-native-swrve-geo-plugin
iOS
Navigate to the iOS folder of your React Native project.
Step 1: The SwrveGeoPlugin requires that you have use_frameworks! in your CocoaPods. Add the following to your Podfile:
use_frameworks!
Step 2: In the appDelegate.m file didFinishLaunchingWithOptions function, after you initialize the native SwrvePlugin, initialize the SwrveGeoPlugin:
#import "SwrvePlugin.h"
#import <SwrveSDK/SwrveSDK.h>
#import "SwrveGeoPlugin.h"
#import <SwrveGeoSDK/SwrveGeoConfig.h>

  SwrveConfig* config = [[SwrveConfig alloc] init];
  [SwrvePlugin initWithAppID:<app_id> apiKey:@"<api_key>" config:config];

  SwrveGeoConfig *geoConfig = [[SwrveGeoConfig alloc] init];
  [SwrveGeoPlugin initWithConfig:geoConfig];
Step 3: In your Info.plist, make sure you include values for the following keys to explain to your user why your app requires the related location permission. For example, "Goaletics uses your location to inform you about deals and events in your area."
NSLocationAlwaysUsageDescription- explains why the app requires access to the user's location at all times (for apps supporting iOS 10).NSLocationWhenInUseUsageDescription- explains why the app requires the user's location information when running in the foreground.NSLocationAlwaysAndWhenInUseUsageDescription- explains why the app requires access to the user's location at all times.
Android
Navigate to the Android folder of your project.
Step 1: Similar to the steps required to integrate the React Native plugin for Android, in the android/app directory, add swrve-geo as a dependency to the build.gradle file:
dependencies {
  implementation 'com.swrve.sdk.android:swrve-geo:5.0.0'
}
Step 2: In the MainApplication.java file, in the onCreate method, after you initialize the SwrvePlugin, initialize the SwrveGeoPlugin:
import com.swrve.reactnative.SwrvePlugin;
import com.swrvegeo.reactnative.SwrveGeoPlugin;
import com.swrve.sdk.config.SwrveConfig;
import com.swrve.sdk.geo.SwrveGeoConfig;
SwrvePlugin.createInstance(this, <app_id>, "<api_key>", swrveConfig);
SwrveGeoConfig geoConfig = new SwrveGeoConfig.Builder()
.permissionPrePrompt("", "Proceed", "No Thanks")
.build();
// Start Geo Plugin
SwrveGeoPlugin.init(this, geoConfig);
React layer
Once you've initialized the SwrveGeoPlugin in iOS and Android as above, import and start the plugin from the React layer:
import SwrveGeoSDK from 'react-native-swrve-geo-plugin';

SwrveGeoSDK.start();
Note: If your native SDK configuration uses MANAGED mode for creating the SwrveSDK instance, then start the SwrveGeoSDK only after you've called the SwrveSDK Start API.
Custom filtering
To filter notifications or modify their content based on custom properties, you can set a custom filter when initializing SwrveGeoSDK.
- Android
- iOS - Swift
- iOS - Objective-C
SwrveGeoConfig geoConfig = new SwrveGeoConfig.Builder()
        .customFilter((builder, id, properties) -> {
        // add custom modifications if necessary or return null to suppress it
                return builder.build();
        })
        .build();

// Initialize the SDK
SwrveGeoSDK.init(geoConfig);
// Set your custom filter logic
let config = SwrveGeoConfig()
config.customFilterDelegate = self
SwrveGeoSDK.initWith(config)

// Implement this method in the class that conforms to SwrveGeoCustomFilterDelegate
func filterNotification(_ notification: UNMutableNotificationContent, withCustomProperties customProperties: [AnyHashable: Any]) -> UNMutableNotificationContent? {
    // Modify the notification or return nil to prevent the notification from displaying
    return notification
}
// Set your custom filter logic
SwrveGeoConfig config = [[SwrveGeoConfig alloc] init];
config.customFilterDelegate = self;
[SwrveGeoSDK initWithConfig:config];

// Implement this method in the class that extends the SwrveGeoCustomFilterDelegate
- (UNMutableNotificationContent *)filterNotification:(UNMutableNotificationContent *)notification withCustomProperties:(NSDictionary *)customProperties {
    // Modify the notification or return nil to prevent the notification from displaying
    return notification;
}
Geoplace transition callbacks
When a customer enters or exits a geoplace, you might want to execute your own additional logic via geoplace transition callbacks. Configure the relevant platform callback as part of SwrveGeoConfig.
- Android
- iOS - Swift
- iOS - Objective-C
Implement the SwrveGeofenceTransitionListener callback.
SwrveGeoConfig geoConfig = new SwrveGeoConfig.Builder()
    .geofenceTransitionListener((name, transition, triggerLocation, customProperties) -> {
    // add custom code to execute upon enter/exit a geofence.
    // Note this executes in same BroadcastReciever as Swrve code so has limitations.
        return builder.build();
    })
    .build();

SwrveGeoSDK.init(this, geoConfig);
Note: Be aware that the SwrveGeofenceTransitionListener code runs in the same BroadcastReceiver as Swrve code. Create a separate worker thread from this to execute your own custom code.
Implement the SwrveGeofenceTransitionDelegate callback.
let config = SwrveGeoConfig()
config.swrveGeofenceTransitionDelegate = self

SwrveGeoSDK.initWith(config)

// Implement this method in the class that conforms to SwrveGeofenceTransitionDelegate
func triggered(_ name: String, transition: String, at location: CLLocation, customProperties: String?) {
    // Handle the triggered geofence event here
}
Implement the SwrveGeofenceTransitionDelegate callback.
SwrveGeoConfig config = [[SwrveGeoConfig alloc] init];
config.swrveGeofenceTransitionDelegate = self;

[SwrveGeoSDK initWithConfig:config];

// Implement this method in the class that implements the SwrveGeofenceTransitionDelegate
- (void)triggered:(NSString *)name
    transition:(NSString *)transition
    atLocation:(CLLocation *)location
customProperties:(nullable NSString *)customProperties {

}
Testing your integration
It's not always possible or practical to manually QA test geo-triggered campaigns, so in some instances you might want to use a simulator or emulator to test moving through a geographic location. This section explains how to trigger geoplaces from Android Studio and Xcode.
- Android Studio
- Xcode
Swrve Geo for Android is optimized to run in a battery-friendly manner, thus it doesn't use the GPS provider. The Android emulator runs only with GPS provider, so using the emulator location tools to test Swrve geoplace triggers requires a few extra steps. There are several methods to achieve this, but the easiest way is to allow the Google Maps app to get a location update and SwrveGeoSDK will passively use it in the background. The instruction below explain how to do this.
Preliminary setup
To test geoplace triggers in Android studio, first create an emulator and then add geoplaces in Swrve. Note: Some of the settings or locations referenced below may differ depending on the Android OS version you're using.
- Step 1: In Android Studio, open the Android SDK Manager and make sure SDK tools are up to date.
- Step 2: Open the Android Virtual Device (AVD) Manager and create your emulator Virtual Device with hardware that includes the Play Store (Google Play services).
- Step 3: Start the emulator and find the Security or Location settings.
- Step 4: Ensure the Location setting is on. Depending on the OS version, this might be located under Privacy.
- Step 5: Ensure Google Location Accuracy is in High Accuracy mode or Improve Location Accuracy is on. Depending on the OS version this is either under Location Mode, Advanced settings, or Improve Location Accuracy. This also requires accepting the Google location service policy when prompted.
- Step 6: If you're using an older emulator, you might need to update to Google Play Services. To do this, add a Google account to the emulator, open the Play store, and update all apps.
- Step 7: On the emulator, open Google maps to view the current location.
- Step 8: To change the location, open the emulator extended controls. On the Location tab, there's a map and button for setting the location. Set the desired location and verify Google Maps updates to the selected location.
- Step 9: In Swrve, add geoplaces for the locations you want to test. For information about creating geoplaces, see About geoplaces.
Testing geoplace triggers
- Step 1: In your Swrve SDK configuration, set the Logcat logging level to DEBUG. For more information, see How do I configure SDK device logging?
- Step 2: Install your app on the emulator and set it up as a QA device in Swrve. For information on setting up QA devices, see How do I set up QA devices?
- Step 3: Start SwrveGeoSDK and verify there's no geofencing errors in the Logcat console.
- If a message displays saying Google Play services are out-of-date, open the Play store and update all apps. Then restart your app.
- If Logcat displays ApiException 1000, it might indicate that Location services are not on, location accuracy is not in High Accuracy mode, or Improve Location Accuracy is not on.
- Step 4: Open Google Maps.
- Step 5: Open the emulator extended controls. On the Location tab there's a map and button for setting the location. Set the location to the center of a geoplace and debug logs will appear in Logcat about the trigger.
- Step 6: In Swrve, check the QA device logs. The QA User Logging screen should display information about the triggered geoplace. If the trigger was suppressed, the Geoplace Triggered event will include the reason.
Use Xcode's Simulate Location feature to test your geoplace triggers.
Preliminary setup
To test geoplace triggers in Xcode, first define the locations in Xcode and then create matching geoplaces in Swrve.
Step 1: For each location, add GPX files to your Xcode project. For example:
- File name: apple_park.gpx
<?xml version="1.0"?>
<gpx version="1.1" creator="Xcode">
  <wpt lat="37.335053" lon="-122.009103">
     <name>Apple Park</name>
     <time>2020-06-01T14:55:37Z</time>
  </wpt>
</gpx>
- File name: cupertino_memorial_park.gpx
<?xml version="1.0"?>
<gpx version="1.1" creator="Xcode">
  <wpt lat="37.325621" lon="-122.044625">
     <name>Cupertino Memorial Park</name>
     <time>2020-06-01T14:55:37Z</time>
  </wpt>
</gpx>
Step 2: In Swrve, add corresponding geoplaces that match the latitude and longitude of your GPX files. For information about creating geoplaces, see About geoplaces.
Testing geoplace triggers
Step 1: Install your app on the simulator and set it up as a QA device in Swrve. For information on setting up QA devices, see How do I set up QA devices?
Step 2: In Xcode, simulate your initial location. On the Debug menu, select Simulate Location, and then select the desired location, for example, apple_park.
Step 3: In Xcode, start SwrveGeoSDK and verify there are no errors in the console.
Step 4: In Swrve, the QA User Logging screen for your QA device should display a Geoplace Triggered event that includes information about the Apple Park geoplace. If the trigger is suppressed, the event includes the reason.
Step 5: In Xcode, simulate a location change. On the Debug menu, select Simulate Location, and then select the desired location, for example, cupertino_memorial_park. The device location should move from Apple Park to Cupertino Memorial Park.
Step 6: In Swrve, check the QA device logs. The QA User Logging screen should display information about the Apple Park geoplace exit and Cupertino Memorial Park geoplace enter events.
Next steps
- Create the geoplaces you want to use to trigger geo-triggered campaigns. For more information, see About geoplaces.
- Create a push notification campaign that uses geoplaces as the campaign trigger. For more information, see Creating geo-triggered campaigns.
- View results and reports for your campaign or change the status. For more information, see Managing geo-triggered campaigns.