Snowflake native connection setup
Overview
Snowflake is a cloud SQL database service that can store large amounts of customer data for use with high-performance applications. Snowflake gives you scalable access to your data anywhere, anytime, secured with global governance policies. If you are ready for more advanced work and features using Snowflake, a number of their official guides can be found here.
MessageGears Accelerator enables you to connect directly to Snowflake so that you can use customer data from the data warehouse to create audiences quickly and easily. Instantly access your customer data and activate it without any friction, data latency, or the burden of making copies of your data. Whether you're a data admin who is a pro at SQL, or you're a marketer who wants to drag-and-drop recipient attributes, you can segment recipient data and target them in real-time with personalized campaigns. Because we connect natively to Snowflake, the data will always be fresh and secure. You can even write the campaign details back to Snowflake using Audience Recording. For more information, see Creating a New Audience Recording.
To begin activating your data, you will need to establish a connection to Snowflake. The following steps will be key to get you up and running:
- Create a New Database, Schema, and Warehouse for Customer Data
- Create MessageGears Role and Apply the Necessary Permissions
- Create a MessageGears Analytics Schema for Event Feed Data
- Create Snowflake Connection in Accelerator
1: Create a new database, schema, and warehouse for customer data
You can use the following SQL commands as examples:
USE ROLE SYSADMIN;  -- Built-in Snowflake admin role

CREATE DATABASE IF NOT EXISTS IDENTIFIER(CustomerData);

CREATE WAREHOUSE IF NOT EXISTS IDENTIFIER(CustomerData_WH)
WITH WAREHOUSE_SIZE = 'LARGE' -- Be sure to modify this as necessary for your environment's needs
AUTO_SUSPEND = 300 -- Suspend after 5 minutes of inactivity
AUTO_RESUME = TRUE; -- Auto resume when activity starts again

USE DATABASE CustomerData; -- Created above
CREATE SCHEMA MessageGears;
2: Create MessageGears role and apply the necessary permissions
Next, you will need to create the Snowflake user and role for the connection with the proper access to the Snowflake Data Warehouse. You can use an existing user and role, but for the purposes of this guide, we will be creating a new one by going through the following steps:
Native Snowflake connections that use manually entered credentials require key-pair authentication — username and password authentication is no longer supported. Key-pair authentication uses an RSA key pair (a private key held by MessageGears and a public key registered on the Snowflake user) instead of a password. This is more secure and avoids issues when Snowflake enforces multi-factor authentication for password sign-ins. The user created below is therefore created without a password. (As an alternative to entering the private key manually, you can store the credentials in AWS Secrets Manager — see Step 4.) To learn more, see Snowflake's Key-pair authentication and key-pair rotation guide.
-
Log in to your Snowflake account with a user that is assigned administrative privileges to manage users and roles.
-
Open a worksheet and run the following commands to create the new role, apply permissions, and create the new user:
USE ROLE SECURITYADMIN; -- Built-in Snowflake admin role

SET New_Role = 'MessageGears_Role'
SET New_User = 'MessageGears_User'
SET New_DB = 'CustomerData' -- Created in step 1 above
SET New_WH = 'CustomerData_WH' -- Created in step 1 above
SET New_Schema = 'MessageGears' -- Created in step 1 above

CREATE ROLE IF NOT EXISTS IDENTIFIER($New_Role);

GRANT ALL
 ON WAREHOUSE IDENTIFIER($New_WH)
 TO ROLE IDENTIFIER($New_Role);

GRANT USAGE
 ON DATABASE IDENTIFIER($New_DB)
 TO ROLE IDENTIFIER($New_Role);

GRANT CREATE TABLE, CREATE VIEW, CREATE STAGE, CREATE PIPE, CREATE PROCEDURE, CREATE FUNCTION, MODIFY, USAGE
 ON ALL SCHEMAS IN DATABASE IDENTIFIER($New_DB)
 TO ROLE IDENTIFIER($New_Role);

GRANT USAGE
 ON FUTURE SCHEMAS IN DATABASE IDENTIFIER($New_DB)
 TO ROLE IDENTIFIER($New_Role);

GRANT SELECT
 ON FUTURE TABLES IN SCHEMA IDENTIFIER($New_Schema)
 TO ROLE IDENTIFIER($New_Role);

GRANT SELECT
 ON FUTURE VIEWS IN SCHEMA IDENTIFIER($New_Schema)
 TO ROLE IDENTIFIER($New_Role);

-- Create the user WITHOUT a password. The public key is assigned in the next step.
CREATE USER IF NOT EXISTS IDENTIFIER($New_User);

GRANT ROLE IDENTIFIER($New_Role) TO USER IDENTIFIER($New_User); -
Generate an RSA key pair and assign the public key to the MessageGears user. You will paste the private key into Accelerator in Step 4.
On a machine with OpenSSL installed, generate an unencrypted PKCS#8 private key and its public key:
# Generate a 2048-bit unencrypted private key (PKCS#8 PEM).
# Accelerator does not accept a passphrase, so the key must be unencrypted (-nocrypt).
openssl genrsa 2048 | openssl pkcs8 -topk8 -inform PEM -out rsa_key.p8 -nocrypt

# Derive the public key from the private key.
openssl rsa -in rsa_key.p8 -pubout -out rsa_key.pubwarningKeep
rsa_key.p8(the private key) secure — anyone with it can authenticate as this Snowflake user. Only the public key is stored in Snowflake; the private key is supplied to Accelerator in Step 4.Assign the public key to the user. Copy the contents of
rsa_key.pubwithout the-----BEGIN PUBLIC KEY-----/-----END PUBLIC KEY-----header and footer lines and without line breaks, then run:USE ROLE SECURITYADMIN;
ALTER USER IDENTIFIER($New_User) SET RSA_PUBLIC_KEY='MIIBIjANBgkqh...your public key...IDAQAB';To confirm the key was registered, you can run
DESC USER IDENTIFIER($New_User);and check theRSA_PUBLIC_KEY_FP(fingerprint) property. For details and key-rotation guidance (RSA_PUBLIC_KEY_2), see Snowflake's Configuring key-pair authentication and ALTER USER documentation.
3: Create a MessageGears analytics schema for event feed data
In a new or existing worksheet, create a dedicated schema to hold the event feed analytics data coming from MessageGears:
USE DATABASE CustomerData; -- Created in step 1 above
CREATE SCHEMA MessageGears_Events;
USE SCHEMA MessageGears_Events;
Next, create the event feed tables in that schema. To keep the schema consistent across all supported warehouses, the full and current DDL is maintained on a dedicated reference page:
Run the Snowflake statements from that page against the MessageGears_Events schema you just created. They create the bounce, click, delivery, open, spam complaint, unsubscribe, render error, push, SMS, mobile SDK, and in-app event tables. For the equivalent DDL for other warehouses, see the Event Data DDL reference.
4: Create Snowflake connection in Accelerator
Next, you are going to need to connect a Snowflake Connection in Accelerator. MessageGears' campaign management software integrates directly with Snowflake, and this integration allows users to access their Snowflake data natively with our audience builder, content personalization, and orchestration features without replication, data mapping, or synchronization.
The following are the last three high-level steps required to get a Snowflake Native Connection up and running:
- Create your Cloud File Storage Name
- Create a Snowflake Stage in the console
- Create the Database Connection
Create a cloud file storage in Accelerator
When creating a Cloud File Storage, you'll need an S3 or GCS bucket already created, as well as authentication for that bucket. The name selected for this file storage must be unique and one that has not been previously created in Accelerator.
- First, go to Admin > System configuration > File Storage and select your file type. (Note: Currently we support Google, Amazon, and Azure file types. For details on setting up each type, see Cloud File Storage.)
- Add the New File Storage Window, and fill out the info as required. Ex. AWS Key, AWS Secret, add a bucket.
For optimal performance, ensure the path entered on the File Storage in Accelerator matches the URL path used when configuring the stage in Snowflake
For example, if your Snowflake stage URL is s3://<my-bucket>/<folder-path>/<folder-name>, your File Storage configuration in Accelerator will be:
Bucket: <my-bucket>
Path: <folder-path>/<folder-name>
Create a Snowflake stage in Snowflake console
Now that you have successfully created a cloud file storage location, you can set the Snowflake Stage for the console.
Go to the Database where you’ll be loading data.
Create a new schema (or use an existing one) that will be used for loading data.
Create a new Stage and select your Cloud File Storage type (AWS S3 or GCS)
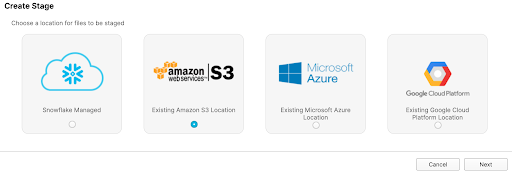
In the Create Stage section, fill out the necessary fields based on the storage type. The example shown below is for S3:
For optimal performance, ensure the path entered on the File Storage in Accelerator matches the URL path used when configuring the stage in Snowflake
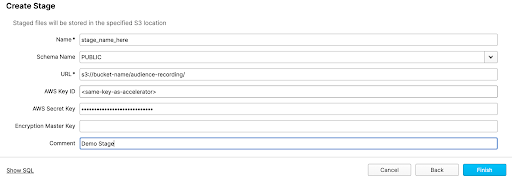
Click Finish.
Create a database connection
Database Connections must be configured before an Audience can be created for Snowflake. Database Connections are the settings and credentials that allow Accelerator to connect to the Snowflake database that holds the necessary customer data.
For more information on Database Connections, click here.
Required Information:
Snowflake Account Identifier, Snowflake User ID, and the Private Key generated in Step 2 (key-pair authentication).
Have an Accelerator System Administrator connect to the Snowflake instance using the Accelerator Database connection portal.
- Select "Snowflake (Native)" as your Database Type.
- Enter a unique and meaningful name for the database connection.
- Under Credentials, choose how you want to enter your credentials:
- Enter credentials manually — you will supply the Account Identifier, User ID, and Private Key directly (covered in the steps below).
- Use AWS Secrets Manager — Accelerator retrieves the connection credentials from a secret you manage in AWS Secrets Manager. Use this option if you prefer to centralize secret storage rather than paste the private key into Accelerator.
- Enter the Account Identifier. This is the identifier found at the beginning of your Snowflake URL. Be sure to include the region and cloud platform segments (e.g.
xy12345.us-east-2.aws).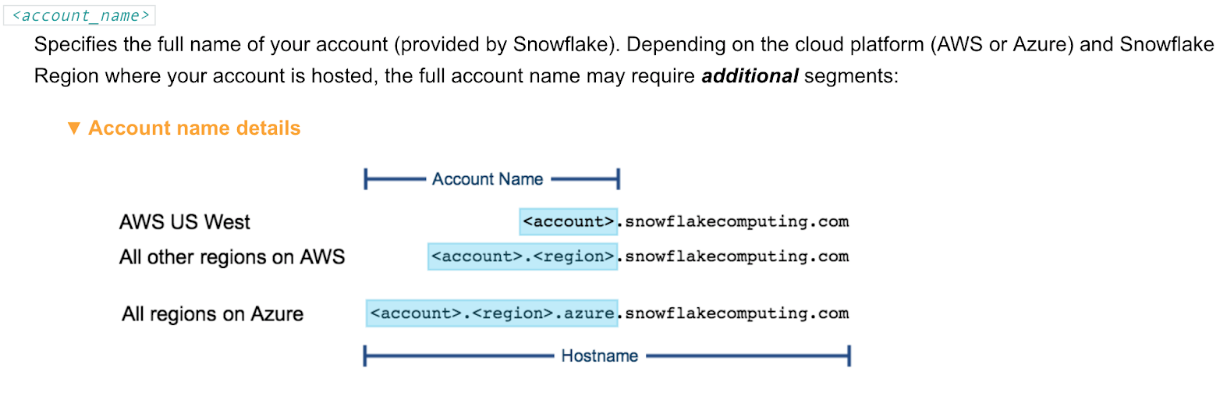
- Enter the User ID that will allow Accelerator to connect to the Snowflake instance, and optionally a Role. If the role is left blank, the user's default role is used.
- Under Authentication, paste the contents of the private key file (
rsa_key.p8) generated in Step 2 into the Private Key field. (When entering credentials manually, key-pair authentication is the only option — there is no password field.) You may paste the key with or without the-----BEGIN PRIVATE KEY-----/-----END PRIVATE KEY-----lines.noteThe private key must be unencrypted (PKCS#8), because Accelerator does not provide a field for a key passphrase. If your key is passphrase-protected, remove the passphrase before pasting it (see the
-nocryptcommand in Step 2). - Enter in the Snowflake Stage created in Step 2 above.
- Select the Cloud Storage bucket created in Step 1 above.
- Select the purposes for this connection. If this is your first or only connection, feel free to select all here.
- Optionally, make this the default connection for the application so that users are able to have this connection used by default in the various locations within Accelerator.
- You can now further define the Connection Defaults. Defaults are settings such as a Default Table or Default Schema that allow an Admin to make the experience in Accelerator more hassle-free by dictating the default areas where an Accelerator user will access data. The currently supported defaults are:
- Table
- Schema
- Database
- Warehouse
- Unique Id Column
- Preference Column
- Email Column
- Push App
- Push Address
- Push Service
Migrating an existing password connection to key-pair authentication
If you have an existing native Snowflake connection that uses a username and password, you can switch it to key-pair authentication:
- Generate an RSA key pair and assign the public key to the connection's Snowflake user, as described in Step 2. You can use
RSA_PUBLIC_KEY_2to stage a new key without disrupting an existing one — see Snowflake's key-pair rotation guidance. - In Accelerator, go to Admin > System configuration > Database Connections and edit the connection.
- In the Authentication section, switch from Password to Private Key and paste the unencrypted private key.
- Save and test the connection. Once the connection is verified, you can remove the password from the Snowflake user with
ALTER USER <user> UNSET PASSWORD;.